Page 13 of 18
Maintenance
⚠
WARNING
Store power tools out of the reach of those not using them, especially children. Power tools can be
very dangerous for untrained people to handle.
Stand the drain cleaner with the head down so that the liquid inside the drum can flow out.
Manually rotate the drum to the waterproof plug to reveal the shell, and remove the waterproof
plug with an Allen wrench (not included). Insert the waterproof plug in the sleeve hole opening at
the end of the tool.
If the drain cleaner will not be used for some time, apply grease on the surface of the flexible shaft
to prevent rust.
Maintain the drain cleaner by adopting a program of conscientious repair and maintenance in
accordance with the following recommended procedures. It is recommended that the general
condition of any tool be examined before it is used. Keep your tool in good repair. Keep handles dry,
clean, and free from oil and grease. The following chart is based on a normal operation schedule.
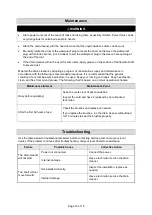
Maintenance Interval
Maintenance Point
Daily before operating:
Keep the vents clear of dust and debris.
Inspect the cord and have it replaced by an authorized
technician.
After the first 60 hours of use:
Check the brushes and replace as needed.
If you replace the brushes, run the drain cleaner without load
for 15 minutes to seat the brushes properly.
Troubleshooting
Use the table below to troubleshoot problems before contacting service personnel or your local
dealer. If the problem continues after troubleshooting, call your local dealer for assistance.
Failure
Possible Cause
Corrective Action
The drain cleaner
will not start.
Power not connected.
Connect the power.
Internal damage.
Have a technician service the drain
cleaner.
The shaft will not
move forward.
Not installed correctly.
Inspect the installation, replace as
needed.
Internal damage.
Have a technician service the drain
cleaner.
Summary of Contents for 61527
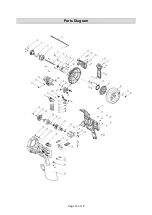
Page 14: ...Page 14 of 18 Parts Diagram...


