background image

FLAIL MOWER - FMH Series


• repeat this process for all the tools.

IMPORTANT


Remove and install one blade/hammer at a time to ensure blades/hammers are correctly oriented when 

installed.


Replace worn blades only with original parts.


WARNING


When the blades/hammers are worn out it is necessary to replace the full set of tools.


Replacement of only some of the tools is certainly cause of the rotor unbalance, machine vibrations and 

can compromise the reliability of the flail mower and generate risks to the operator.


CAUTION


Worn blades and hammers may be very sharp!

Summary of Contents for FMH Series

Page 1: ...Read and understand the manual This manual provides information and procedures to safely operate and maintain the Flail Mower July 2022 FMH Series Flail Mower Operation Manual ...

Page 2: ...l is used in conjunction with following Signal Words according to the degree of possible injuries that may result operating the implement DANGER Indicates an imminently hazardous situation that if not avoided will result in death or serious injury WARNING Indicates a potentially hazardous situation that if not avoided could result in death or serious injury and includes hazards that are exposed wh...

Page 3: ... life designed and built into it RIGHT HAND AND LEFT HAND sides are determined by watching from the tractor side Sometime in the future your Flail mower may need new parts to replace those are worn or broken If so go to nearest IronCraft dealer and provide him the model and part number Customer information Name ____________________________________________________________ Purchased from____________...

Page 4: ... SAFETY LABELS 16 4 SET UP 20 4 1 CONNECTING TO THE TRACTOR 20 4 2 DRIVELINE INSTALLATION 21 4 3 TRACTOR FLAIL MOWER STABILITY 22 5 OPERATING 23 5 1 STRT UP 23 5 2 OPERATING INSTRUCTIONS 24 5 3 ADJUSTMENTS 26 5 4 STOPPING AND DISCONNECTION 33 5 5 TRASPORTATION 33 6 MAINTENANCE 34 6 1 ROTOR TOOLS REPLACEMENT 34 6 2 GEARBOX LUBRICATION 36 6 3 ROTOR BEARINGS LUBRICATION 37 6 4 ROLLER BEARINGS LUBRICA...

Page 5: ...nges in specifications without incurring in any obligation to install them on units previously sold Text illustrations and drawings of this manual cannot be disclosed or transmitted in whole or in part to third parties without the written permission of the Manufacturer All rights are reserved 2 INTRODUCTION 2 1 MACHINE IDENTIFICATION Each flail mower is provided with a plate for unique identificat...

Page 6: ...al three point hitch that can support the implement weight and driven by the power of the tractor through the PTO driveshaft The tractors used to operate the FMH flail mower must have the following requirements Hitch Category 3 point hitch I II Category standard PTO 540 RPM 6 spline 1 3 8 Z6 Horsepower 30 60 HP DANGER Any use of the machine other than the intended use is non intended use and is to...

Page 7: ... Parking stand 5 Upper hitch 14 Side skid 6 PTO shield 15 Cardan driveshaft 7 Implement Input Connection 16 Driveshaft support 8 Gearbox with free wheel inside 17 Tie rod 9 Side transmission case 18 Hydraulic hoses NOTE To make the illustrations more clear some images of this manual may refer to machines lacking of some components e g safety devices and barriers ...

Page 8: ...an be changed applying one or more optional parts listed below STANDARD CONFIGURATION Mobile arc with hydraulic cylinder Rear roller Standard rear cover Y blades or hammers OPTIONAL Mechanical shifting device instead of hydraulic cylinder Rear cover with raks instead of standard rear cover Rear floating wheels instead of rear roller ...

Page 9: ...0 22 44 30 60 22 44 3 point hitch type Cat I II Cat I II Cat I II Number of blades N 40 44 52 Number of hammers N 20 22 26 PTO input speed rpm 540 540 540 Rotor speed rpm 2083 2083 2083 Side transmission 4 belts 4 belts 4 belts BX type BX type BX type Side shift max mm Inch 300 11 81 300 11 81 300 11 81 Rotor diameter inches 6 25 6 25 6 25 mm 159 159 159 Rotor swing diameter mm 378 378 378 Approx ...

Page 10: ... the machine In case of loss or damage request a new copy to the Manufacturer or your Dealer WARNING Follow strictly the rules prescribed by the safety pictograms applied to the machine WARNING Be sure that all safety pictograms are legible If pictograms are worn they must be replaced with others obtained from the Manufacturer and placed in the position indicated by this manual DANGER Before using...

Page 11: ...e should be used by a single operator driving the tractor WARNING Any unauthorized modification of the machine may cause problems in safety and relieves the Manufacturer from any liability for damages or injuries that may result to operators third parties and objects WARNING Before using the machine familiarize yourself with its controls and its working capacity WARNING Do not leave the flail mowe...

Page 12: ...ON WARNING Before using the machine be sure to have cleared the operating area from obstacles stones branches debris etc Mark all the obstacles that cannot be eliminated e g by means flags DANGER Never engage the tractor PTO in the presence of people close to the driveshaft The body hair or clothing of a person can get caught in rotating parts causing serious injury or death DANGER Before engaging...

Page 13: ...t with serious injury or death DANGER Before engaging the PTO of the tractor always make sure that the driveshaft is mounted in the correct direction and that its clamping elements are properly connected both to tractor side and to flail mower side WARNING Stop operating immediately if blades strike a foreign object Repair all damage and make certain rotor and blades are in good condition before r...

Page 14: ...for an adequate warning to operators of other vehicles especially when transporting at night or in conditions of reduced visibility PERICOLO In case is required the lifting of the machine make sure that the lifting device chosen is suitable to perform the operation safely and use only the lifting points prescribed on flail mower 3 5 MAINTENANCE SAFETY INSTRUCTION WARNING All maintenance and repair...

Page 15: ...ooking the machine stop the tractor set the brakes disengage the PTO lower the flail mower to the ground shut off the engine remove the ignition key and wait for all moving parts to stop WARNING Make sure all parked machines are on a hard level surface and engage all safety devices CAUTION Place support blocks under flail mower as needed to prevent unit from tipping over onto a child and or an adu...

Page 16: ...FLAIL MOWER FMH Series 17 F SAFETY LABELS POSITION AND DESCRIPTION 2 1 5 4 12 8 9 7 6 13 11 3 3 ...

Page 17: ...performing any maintenance operation 3 Thrown or flying objects hazard Keep a safe distance from the machine 4 Rotating knives severing of lower limbs hazard Keep a safe distance from the machine 5 Cutting of fingers or hand hazard Wait until all machine components have completely stopped before touching them 6 Rotating belts fingers or hand entanglement hazard Do not open or remove safety shields...

Page 18: ...nt 10 Lower limbs crushing hazard Keep a safe distance from the machine 11 Crushing hazard Do not stand rear the machine 12 Hydraulic lines under pressure keep safe distance Before carrying out maintenance operations ensure the line has been previously depressurised and does not contain any hot fluid 13 Always wear protective clothing and equipment appropriate for the job hearing protection safety...

Page 19: ...the tractor the operator must do the following drive the tractor in reverse up to align the rear lifting arms to lower hitches of the flail mower in parking see picture below set the tractor s parking brake stop engine remove the ignition key and get off the tractor connect the lifting arms of the tractor to the lower hitches of the flail mower and the 3 point top link to the upper hitch of the fl...

Page 20: ... through the fixing screws insert the driveline yoke on the implement PTO by first lining up the splines then ensure its tightening onto the shaft through its fastener snap pin replace the PTO shield of the flail mower through the fixing screws insert the driveshaft yoke on the tractor PTO then ensure its tightening onto shaft through its fastener hook to the tractor and flail mower the two retain...

Page 21: ...me make sure that the driveshaft is lubricated in accordance with how indicated in the instruction booklet before operating the flail mower the first time and after long periods of inactivity make sure that the driveline clutch has run a short run in in accordance with what indicated in the instruction manual of the Manufac turer removing the possible oxidation of the components that may compromis...

Page 22: ...mplement center of mass 61 cm 5 OPERATING Before operate the flail mower make sure you have read and understood the operating manuals of the flail mower tractor and PTO shaft and followed what is described in the section Set Up DANGER During operation adjustment maintenance repairing or transportation of the machine the operator must always use appropriate Personal Protective Equipment PPE Before ...

Page 23: ... positioned in good condition and legible Replace any dama ged decals check that there is no constraints that may prevent the movement of equipment Remove any con straint Before the start up and before each use make the following checks on the operating area identified for shredding check that area is clear of foreign objects rocks branches or debris Remove any obstacle and visibly highlight obsta...

Page 24: ...lightly lifted from the ground to avoid damage to the machine periodically check for foreign objects wrapped around the rotor shaft and remove them after disenga ging PTO turning off tractor engine and removing ignition key if the rotor strikes a foreign object stop operating immediately idle the engine speed and disengage the PTO Wait for stopping of all rotating parts then raise the implement an...

Page 25: ...ith the soil a direct contact with the ground would facilitate the rapid wearing of the tools If the flail mower is provided with a stabilizer roller to adjust the cutting height lift the flail mower put it on safety stands then turn off the tractor engine disengage the PTO set the parking brake and remove the key from the panel remove the bolts 1 that secure the roller supports to the frame on bo...

Page 26: ...s shall be based on the increase of the cutting height desired reposition the wheel with bracket into the original place and put the remaining spacers on top of the shaft reinsert the snap pin repeat the same procedure to the opposite wheel making sure the spacers are positioned exactly like on the first wheel 1 2 Depending on the different position of the spacers on the shaft it is possible to se...

Page 27: ...ail mower li fted of the ground and not the skids 1 RAKES ADJUSTMENT The function of the rear rakes is to obtain a more fine crushing by holding the material within the shred ding room It is therefore recommend to perform the racks adjustment immediately after executing the cutting height adjustment To do this follow these steps remove the cotter pin 1 from one of the rakes push the rake downwards...

Page 28: ...arking brake and remove the key from the panel unscrew and remove the bolt 1 manually move the body of the flail mower by pushing from one side until is reached the position requi red overlaying the holes of the mechanical jack reinsert the bolt removed earlier and tighten 1 In case of configuration with hydraulic cylinder the side adjustment of the frame is effected by actuating the cylinder dire...

Page 29: ...de transmission remove the safety cover of the belts by loosening the four bolts 1 that secure it to the frame see picture Check the correct belt tension 1 1 Apply a force of about 10 15 kg on the middle of the belts set and measure the entity of the consequent deflection of the belts see picture ...

Page 30: ...he lock nuts 4 tighten the tension nut 5 if the tensioning found is too low deflection of belts higher than 10 mm unscrew the tension nut 5 if the tensioning found is too high deflection of belts lower than 10 mm retighten the lock nuts 4 and the two bolts 2 fixing the extension tube to the side plate of the frame move the gearbox in order to restore the position of the extension tube perpendicula...

Page 31: ...until the extraction of the belts from their seats on the pulleys is permitted starting from the external position a reinsert the new belts in succession contrary to what done for the disassembly adjust the belt tension according to the indications done above retighten the two bolts 2 fixing the extension tube to the side plate of the frame move the gearbox in order to restore the position of the ...

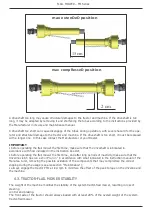
Page 32: ... disconnect the driveline from the tractor PTO and rest it on the provided support of the flail mower disconnect the top link and rear lifting arms of the tractor from the flail mower hitches check the flail mower stability If needed place additional safety blocks get on the tractor start the engine and move away from the flail mower slowly make sure the flail mower remains stored in a protected a...

Page 33: ... ignition key removed IMPORTANT Respect the environment Store or dispose of unused chemicals as specified by the chemical Manufacturer 6 1 ROTOR TOOLS REPLACEMENT Frequently check the wear condition of the tools on the rotor Y blades or hammers through visual inspec tion The wear of the tools is very variable depending on the type of soil Replacement of the tools is necessary when the operator not...

Page 34: ...ed Replace worn blades only with original parts WARNING When the blades hammers are worn out it is necessary to replace the full set of tools Replacement of only some of the tools is certainly cause of the rotor unbalance machine vibrations and can compromise the reliability of the flail mower and generate risks to the operator CAUTION Worn blades and hammers may be very sharp ...

Page 35: ...rmed after the first 50 working hours each 500 working hours To make the oil change unscrew the level plug 1 place a tank under the oil drain plugs 3 and 4 unscrew the oil drain plugs 3 and 4 and drain oil completely into the tank retighten the drain plug 4 unscrew the oil filling plug 5 on the top of gearbox fill up oil till the level reach the hole of the level plug 1 retighten level plug 1 and ...

Page 36: ...over 1 and inject grease through the nipple 2 inject grease through the nipple 3 IMPORTANT Make sure to clean the fitting zerk before using the grease gun Do not let excess grease collect on or around parts particularly when operating in sandy areas 1 3 2 6 4 ROLLER BEARINGS LUBRICATION Lubricant AGIP GREASE MU EP 2 lithium type grease or equivalent Frequency each 20 working hours To perform lubri...

Page 37: ...he inner part of the wheel bracket see picture 1 6 6 3 POINT HITCH LUBRICATION Lubricant AGIP GREASE MU EP 2 lithium type grease or equivalent Frequency each 20 working hours To perform lubrication of the shifting parts of the 3 point hitch see pictures inject grease into the nipples 2 located on the lower part of the shifting tube of the hitch inject grease into the nipples 3 located on the rod t...

Page 38: ...on to the elements possibly with storage temperature between 0 and 50 C see section Stopping and disconnection thoroughly clean the machine removing from the rotor all residues due to tillage in order to avoid damage from grass and stagnant water inspect carefully the machine checking for worn and or damaged parts Perform immediately all repairs and or replacements needed in order to make the mach...

Page 39: ...y Debris wrapped on rotor Dirty shredding room Replace blades hammers Set the roller wheels correctly Reduce the ground speed Clean the shredding room Gearbox overheating Low oil level Material difficult to be shredded Add oil Reduce the ground speed Blades hammers wear frequently Hard soil Cutting height too low Check the soil in advance Increase the cutting height Flail mower noise and vibration...

Page 40: ...d strictly follow the instruction given in the instruction manual provided by the company along with the IronCraft equipment at the time of delivery Changes if any resulting in improper usage will not be covered by the warranty This warranty will automatically terminate on the expiry of warranty period of Six months even the IronCraft equipment may not be in use for any time during the warranty pe...

Page 41: ...repairs executed by a person or persons other than the company or its authorized representative f Any defect is not informed immediately to the company or its authorized representative any alteration in warranty card is made g 12 a Whenever the user or anyone else on his behalf applies equipment to the tractor or to prime mover that has not been expressly approved by the manufacturer or not suitab...

Page 42: ...arings 5 Rubber parts 6 Gaskets 7 Fasteners 8 Fabrication 9 Chains sprockets 10 Tines PARTS INFORMATION Replacement parts are available from your authorized Dealer Parts Department Visit our website at https www ironcraftco com parts to download the latest Parts Lists from IronCraft Contact your dealer for more information or to order your parts ...

Page 43: ......

Page 44: ...__________________________________________________________ ADDRESS __________________________________________________________________________ CITY _________________________________ STATE __________________ ZIP _______________ SELLING DEALER S NAME ____________________________________________________________ CITY _________________________________ STATE __________________ ZIP _______________ I have ...

Page 45: ......

Page 46: ...FLAIL MOWER FMH Series NOTES ...

Page 47: ...FLAIL MOWER FMH Series NOTES ...

Page 48: ...Form No 9300M Printed in USA 1 2022 P O BOX 649 232 INDUSTRIAL LN DECATUR TENNESSEE 37322 PHONE 423 405 5150 FAX 423 334 0023 WEB www IRONCRAFTCO com Member of ...

Reviews: