IronCraft Euro Installation Instructions Download Page 2

STEP 2: POST INSTALLATION

Starting with the first post, remove the stake from the ground and dig a hole measuring approximately 8” in 

diameter and around 22“ deep in the stakes place.  Once the hole is dug, position the post in the hole and 

check to make sure the pre-cut holes are facing the direction the panels will be installed.  Using a hammer 

and a block of wood (to protect the post) hammer the post into the ground approximately 2-1/2” so the post 

is 24-1/2“ below ground level.  This will provide stability when pouring concrete and attaching the panel to 

the post.  

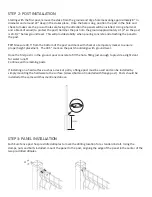
TIP:  Measure 49.5” from the bottom of the post and mark with chalk or a temporary marker to ensure 

proper height placement.  The 49.5” mark on the post should align with ground level.

Once the first post is in the ground, pour concrete to fill the hole, filling just enough to provide a slight slant 

for water runoff.   

Continue with remaining posts.

If installing on a hard surface such as a deck or patio, a flange post must be used and can be installed by 

simply mounting the hardware to the surface (screws/bolts not included with flange post).  Posts should be 

installed at the same width as mentioned above.  

STEP 3: PANEL INSTALLATION

Each Euro fence post has pre-drilled dimples to mark the drilling location for a standard install.  Using the 

clamps, nuts and bolts included, mount the panel to the post, aligning the edge of the panel in the center of the 

two pre-drilled dimples. 

Summary of Contents for Euro

Page 1: ... you intend on installing the posts Post Post 72 Center of Post POSTS FOR PANELS Post Post 48 Center of Post POSTS FOR GATES REQUIRED TOOLS PLEASE NOTE Additional accessories are required if installing on hard surface such as a deck or if mounting the end panel to a wall Please consult with your local store for information regard ing the necessary materials HAMMER TAPE MEASURER MASONS STRING 2 x 2...

Page 2: ...mark with chalk or a temporary marker to ensure proper height placement The 49 5 mark on the post should align with ground level Once the first post is in the ground pour concrete to fill the hole filling just enough to provide a slight slant for water runoff Continue with remaining posts If installing on a hard surface such as a deck or patio a flange post must be used and can be installed by simply m...

Page 3: ...m the bottom of the post cap to the bottom of the hinge the top hinge should measure 8 75 from the bottom of the post cap while the bottom hinge should measure 40 25 from the bottom of the post cap Drill 3 8 holes in post where the hinges will be installed 8 75 Top Post Hinge 40 45 for the bottom post hinge Next mount gate side of hinge into existing holes in the gate Mount the bottom post hinge o...

Page 4: ...prevent rusting Once the paint has dried continue with installation INSTALLING AT ACUTE OR OBTUSE ANGLES If you want to install a corner that is less or greater than 90 you will mount the panel in the same fashion however the holes will have to be drilled depending on the angle desired INSTALLING ON AN INCLINE While this fence is designed to be installed on flat ground it can be installed on a slig...

Reviews: