background image

PAGE 7 OF 8 

0117 IH-6472

CARE CONTINUED

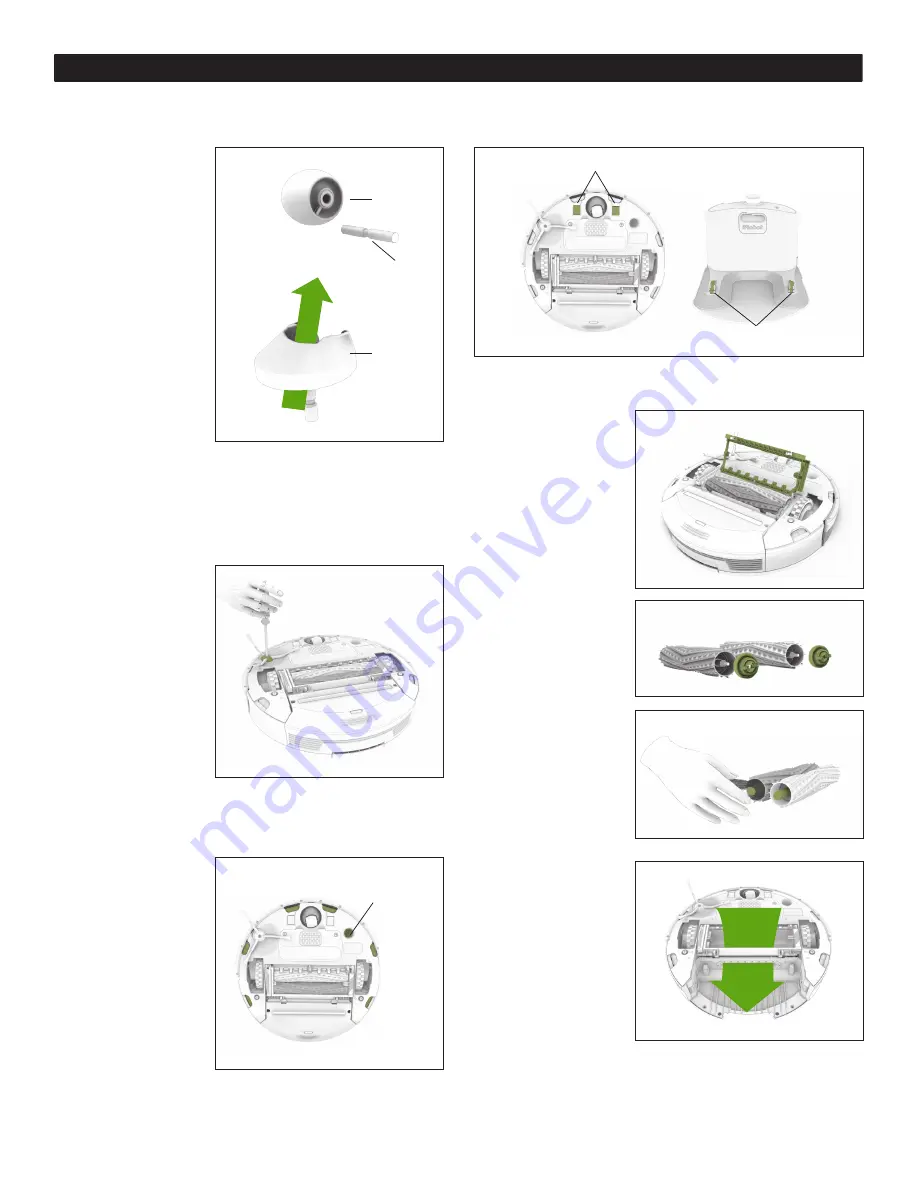
CLEANING THE FRONT CASTER WHEEL

1.  Pull firmly on the 

front wheel to 

remove it.  

(See Figure 11)

2.  Remove any 

debris from inside 

the wheel cavity.

3.  Spin the wheel by 

hand. If rotation is 

restricted, remove 

the wheel from its 

housing and push 

firmly to remove 

the axle and 

clear any debris 

or hair wrapped 

around it.

4.  Reinstall all parts when finished. Make sure the 

wheel clicks back into place.

CLEANING THE SIDE BRUSH

1.  Use a coin or 

small screwdriver 

to remove the 

screw. 

(See Figure 12)

2.  Remove the brush, 

clean the brush 

and the brush 

post, and reinstall 

the brush.

CLEANING THE SENSOR AND CHARGING 
CONTACTS

1.  Wipe the sensor 

with a clean, dry 

cloth. Do not 

spray cleaning 

solution directly 

onto the sensors 

or sensor 

openings.  

(See Figure 13)

2.  Wipe the charging contacts on Roomba and the 

Home Base with a clean, dry cloth. (See Figure 14)

CLEANING THE EXTRACTORS

1.  Pinch the yellow 

extractor frame 

release tabs, lift up 

the extractor frame 

and remove any 

obstructions.  

(See Figure 15)

2.  Remove the 

extractors and 

remove the yellow 

extractor caps. 

Remove any hair 

or debris that 

has collected 

underneath the 

caps and around 

the metal axles. 

Reinstall the 

extractor caps. 

(See Figure 16)

3.  Remove hair 

and debris from 

the square and 

hexagonal plastic 

pegs on the 

other side of the 

extractors.  

(See Figure 17)

4.  Clear the vacuum 

path. (See Figure 18)

5.  Reinstall the 

extractors. Match 

the color and 

shape of the 

extractor pegs with the color and shape of the 

extractor icons on the cleaning head module.

Figure 11

Figure 12

Figure 15

Figure 18

Figure 17

Figure 16

Wheel

Axle

Housing

Figure 13

Floor 

Tracking 

Sensor

Figure 14

Charging Contacts

Charging Contacts

Summary of Contents for Roomba 960 Vacuum

Page 1: ...cals or anything wet Before using Roomba pick up objects like clothing loose papers pull cords for blinds or curtains power cords and any fragile objects If Roomba passes over a power cord and drags i...

Page 2: ...very use check the battery pack for any sign of damage or leakage Do not charge damaged or leaking battery packs If the battery pack is leaking contact Uline for disposal instructions The battery pack...

Page 3: ...Release Button CLEAN Button SPOT Button DOCK Button Battery Indicator Full Bin Indicator Dirt Detect Indicator Wi Fi Indicator Troubleshooting Indicator BOTTOM VIEW Extractor Caps Debris Extractors E...

Page 4: ...the battery indicator After its battery has been recharged Roomba automatically returns to where it left off and completes the cleaning cycle You can check the iRobot HOME app for a current status of...

Page 5: ...he Off middle position Virtual Wall Mode When the switch is in the up position the device functions as a virtual wall This means that you can set it to block openings of up to 10 feet It creates an in...

Page 6: ...Figure 4 2 Open bin door to empty bin See Figure 5 NOTE If the full bin indicator comes on at any time during a cleaning job you can always pause the cleaning job to empty the bin and then continue cl...

Page 7: ...ors or sensor openings See Figure 13 2 Wipe the charging contacts on Roomba and the Home Base with a clean dry cloth See Figure 14 CLEANING THE EXTRACTORS 1 Pinch the yellow extractor frame release ta...

Page 8: ...ed power standby mode refer to the iRobot HOME app LITHIUM ION BATTERY For best results only use the iRobot lithium ion battery that comes with Roomba While Roomba will operate with older model batter...

Reviews: