background image

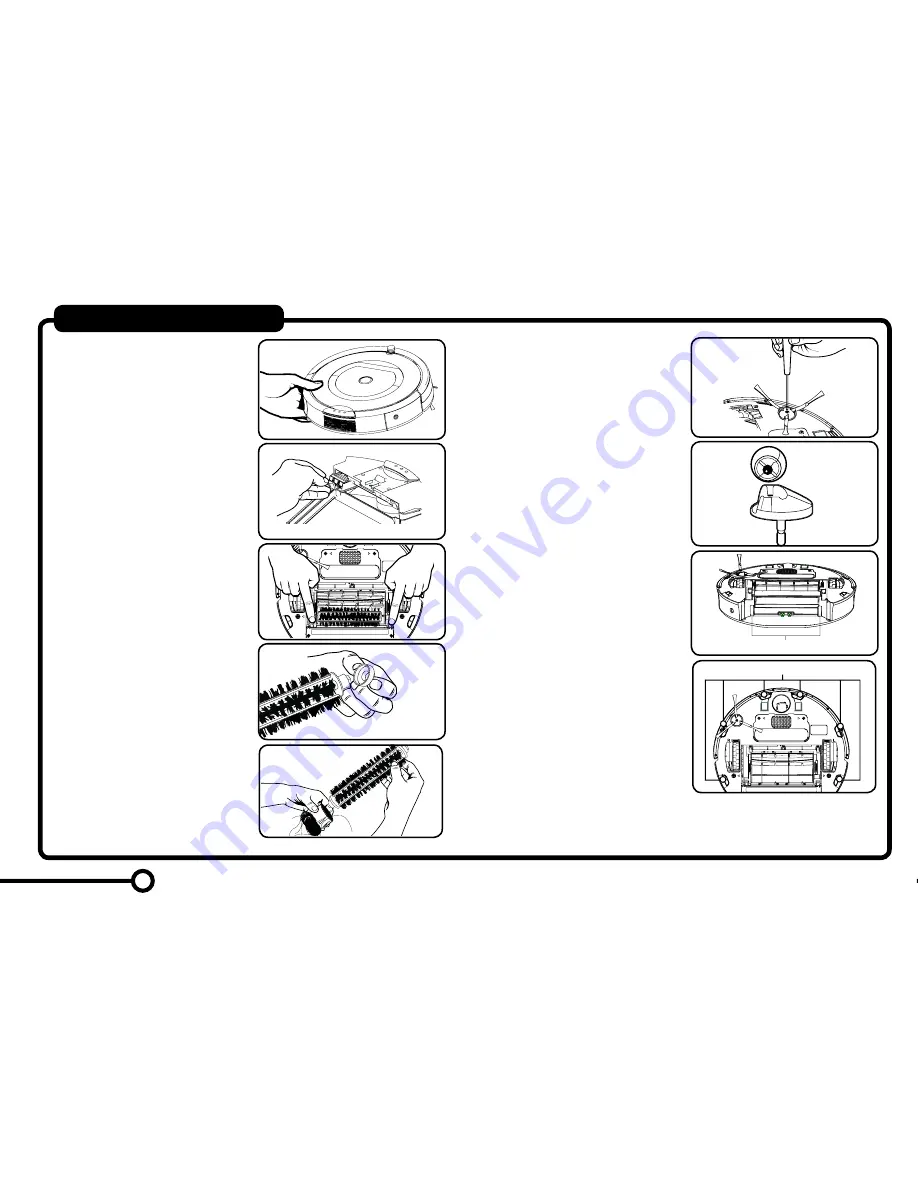
4.  To clean the side brush, use a small  

Phillips screwdriver to remove the screw 


from the center. Remove the brush,  
clean, reinstall.  


Cleaning the front wheel

1. Pull firmly on the front wheel to remove it. 

2. Remove any debris from inside the 
    wheel cavity.
3. Remove the wheel from its housing and     

    wipe clean. Pull firmly to remove the axle 

    and clear any hair wrapped around it. 
4. Reinstall all parts when finished. Make  
    sure the wheel clicks right back into place.

Cleaning the bin sensors  
(models 770 and above only)

Remove the bin and wipe the two optical  
bin sensors with a clean, dry cloth.

Cleaning the cliff sensors

Simply wipe all six cliff sensor openings 
with a clean, dry cloth.

Troubleshooting

Occasionally, something can go wrong. But  
don’t worry – there’s an early warning system. 

Your Roomba will tell you what the problem  
is. The troubleshooting light will also blink.  
To repeat an error message, just press CLEAN.

For more information you can download a detailed user manual at 

www.irobot.com

Emptying the bin

You should do this after each use. 
Ensure proper insertion of the bin each 
time as Roomba will not run without it.


Cleaning the two filters

Regular cleaning is important and  

you should replace the filters after two 

months of regular use. 


Cleaning the brushes and 
associated parts

1. Remove brush guard by lifting both 
   yellow tabs. 


2. Remove and clean the two brushes
    and brush bearings.  


3. Use the included cleaning tool to 
    remove hair easily from the bristle 
    brush by pulling it over the brush. 

Essential maintenance

Essential Maintenance   

|    Step by step

9

10

Cliff sensor openings

Bearings

Bin sensors

Summary of Contents for Romba 780

Page 1: ...Roomba Vacuum Cleaning Robot 700 series Owner s Manual...

Page 2: ...ong term storage remove and store the battery in a cool dry place Safety first As your Roomba contains electrical parts don t submerge or spray it with water clean with a dry cloth only Before using y...

Page 3: ...o show it is charging and will turn solid green when Roomba is fully charged and ready to clean again Virtual Wall Optional accessory for all models Virtual Walls create an invisible barrier that your...

Page 4: ...or to furniture that could block the invisible beams Otherwise your Roomba might not recognize the Lighthouses or be able to return to Home Base How to use the Virtual Wall mode In Virtual Wall mode t...

Page 5: ...DULE 3 Use DAY HOUR and MINUTE individually to set the schedule 4 Press OK to save changes To exit or cancel press CLEAN and start again Viewing a schedule 1 Turn ON your Roomba by pressing CLEAN 2 Pr...

Page 6: ...lly something can go wrong But don t worry there s an early warning system Your Roomba will tell you what the problem is The troubleshooting light will also blink To repeat an error message just press...

Page 7: ...links and says Your Roomba displays Likely cause Your Roomba says What to do Likely cause What to do Remove and clean your Roomba s brushes Your Roomba s side wheel is stuck Clean your Roomba s side w...

Page 8: ...ot use this device to pick up spills of bleach paint or other chemicals or anything wet Before using this device pick up objects like clothing loose papers pull cords for blinds or curtains power cord...

Page 9: ...ity Requirements for household appliances electric tools and similar apparatus Part 2 Immunity Product family standard Low Voltage tests and EMC tests have been conducted by TUV Rheinland of North Ame...

Reviews: