background image

A long press of

the

NAVI/MENU button will enter

the

menu system.

Scroll between menus : Push

I

or

I

(

VOL + or VOL -)

.

Exit : Click the PLAY/STOP button (or long pressing of
NAVI/MENU button).
Select Function: Press the NAVI/MENU button.

During MP3 playback, you can select the playback mode by turns by clicking the
MODE/REC button.

MODE

MENU

Repeat Playback

Shuffle Playback

Intro Playback

4-6

Basic Operation

4-5

Click

Press and hold the MODE/REC button : You can select MP3 or FM, Voice or Line-in
recording functions. (Play mode is automatically activated when MP3 is selected).

NAVIGATION

Press NAVI/MENU button and find the desired track by pushing the VOL + or VOL –
button. To select the track, press the NAVI/MENU button,

I

or the

button.

To move to the upper folder, push the

I

switch.

If there is no upper folder, NAVIGATION stops.

Basic Operation

FILE DELETE

FOLDER DELETE

1

1

2

2

3

3

4

4

1

1

2

2

3

3

4

4

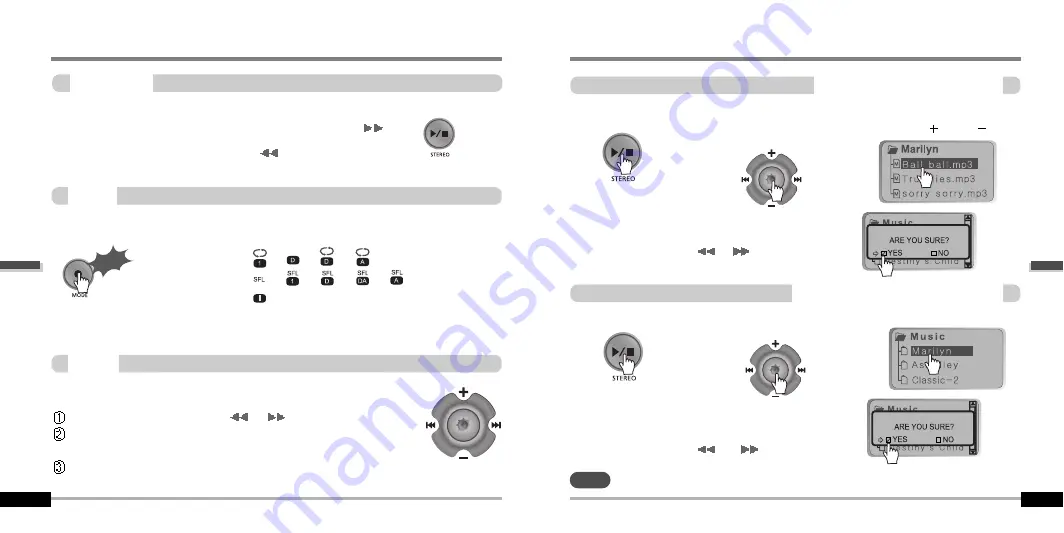
DELETING FILES ON THE PLAYER

Stop playback.

Press the
“NAVI/MENU”
button.

Select the file to delete by
using VOL

or VOL .

Click the “MODE” button.
“FILE DELETE ARE YOU SURE?” is displayed on the
screen.
Select “YES” by using

I

or

I

(VOL + or VOL -)

to

delete. Then click NAVI/MENU button.

Stop playback.

Select the folder to delete.

Click the “MODE” button.
“FOLDER DELETE ARE YOU SURE?” is displayed on
the screen.
Select “YES” by using

I

and

I

(VOL + or VOL -)

to

delete. Then press NAVI/MENU button.

You can only delete an empty folder.

Press the
“NAVI/MENU” button.

DELETING FOLDERS ON THE PLAYER

NOTE

Basic

Operation

Basic

Operation

Summary of Contents for iFP-700 Series

Page 1: ...ies www iRiver com HardwareInstructionManual Thank you for your purchase Please read this manual carefully before using your new player www iRiver com Digital Audio player Recorder FM Tuner Model iFP...

Page 2: ...ause harmful interference to radio communications However there is no guarantee that interference will not occur in a particular installation If this equipment does cause harmful interference to radio...

Page 3: ...ATION CONVENIENT FUNCTIONS ADDITIONAL INFORMATION 1 2 3 4 5 6 Contents THIS MANUAL COVERS THE INSTALLATION AND USE OF THE PLAYER HARDWARE FOR DETAILS REGARDING THE SOFTWARE OPERATION INCLUDING TRANSFE...

Page 4: ...OUT POWER SUPPLY 1 1 1 2 1 3 Getting started THIS MANUAL COVERS THE INSTALLATION AND USE OF THE PLAYER HARDWARE FOR DETAILS REGARDING THE SOFTWARE OPERATION INCLUDING TRANSFERRING MUSIC TO THE PLAYER...

Page 5: ...re trademarks of their respective companies or organization All other product names may be trademarks of the companies with which they are associated 1999 2004 iRiver Limited All rights reserved INTER...

Page 6: ...remove the battery if the player is not to be used for a long time Remove dead battery immediately to avoid damage from corrosion When corrosion occurs wipe the battery compartment immediately with a...

Page 7: ...he Controls Side View Locating the Controls Front View MIC LCD Screen Volume Volume I Previous Track Fast Reverse I Next Track Fast Forward NAVI MENU STEREO Power ON OFF Play Stop MEMORY EQ A B Interv...

Page 8: ...ails about this music format IRM Locating the Controls PC software installation Attach the player Detach the player 3 1 3 4 3 7 PC software installation 3 Contents THIS MANUAL COVERS THE INSTALLATION...

Page 9: ...begin The installation CD contains the following contents Device Driver iRiver Music Manager MoodLogic Manager Program for Mac Please be sure your login has Administrator privileges if using Windows 2...

Page 10: ...ting to the PC Connect the USB cable provided to the USB port of your computer Type A Type B USB port on the PC USB port on the player USB cable Type A Type B Turn on the player by pressing the button...

Page 11: ...not cause any damage to your computer 1 1 3 3 4 4 After installing iRiver Music Manager from the CD and connecting the player to your PC Found New Hardware screen is displayed 2 2 The computer will a...

Page 12: ...ick the OK after confirming the hardware to remove Click the Close after confirming the Safely Remove Hardware message In case of Windows XP 1 1 3 3 4 4 Select the Safely Remove hardware after clickin...

Page 13: ...h Long Click Push Push LISTENING TO MUSIC Put the HOLD switch to OFF Connect the earphones as shown below Press the PLAY STOP button to turn on the player Press it again to play To select song To sele...

Page 14: ...FM Long Click FM RADIO FM VOICE LINE IN Basic Operation Basic Operation 1 LCD window Displays the operating status of the player 2 To skip to previous track or previous FM station 3 To increase volum...

Page 15: ...L or VOL button To select the track press the NAVI MENU button Ior the button To move to the upper folder push the I switch If there is no upper folder NAVIGATION stops Basic Operation FILE DELETE FOL...

Page 16: ...oward I or Ito select your desired station The function selection graphic displays on the LCD To automatically locate a station press and hold NAVI MENU button to the right or left The player will qui...

Page 17: ...saving To cancel Saving Save complete Operating the FM Tuner Memory Function Save stations Select the station to be deleted at PRESET mode FM Tuner reception may vary in different areas While in PRES...

Page 18: ...cording To stop FM recording To record FM To pause FM recording To play a recorded file After selecting MP3 mode select the recorded file to listen and press the PLAY STOP button to play Recording FM...

Page 19: ...ed REC files can be converted to MP3 files using iRiver Manager Refer to page iRiver Music Manager Software Instruction Manual 4 32 4 34 Press the MODE REC button Press the PLAY STOP button Press butt...

Page 20: ...on your external equipment if necessary to begin playback to be recorded 7 7 Press the MODE REC button To play a recorded file 2 After pressing the NAVI MENU button select a recorded file using the V...

Reviews: