IRIS IRIScan Anywhere 5 Quick User Manual Download Page 4


Quick User Guide – IRIScan

TM

 Anywhere 5 


1. Introduction 

The IRIScan

TM

 Anywhere 5 is designed to be used on its own, disconnected from any computer. The 

documents you scan are stored on the scanner's microSD card. From there they can be loaded into 
Readiris

TM

Note that the IRIScan

TM

 Anywhere 5 is not a Twain-based scanner that can be used from within any 

application to scan documents. Instead, think of it as an external storage device that is able to scan 

independently. 
 

2. Hardware Overview 
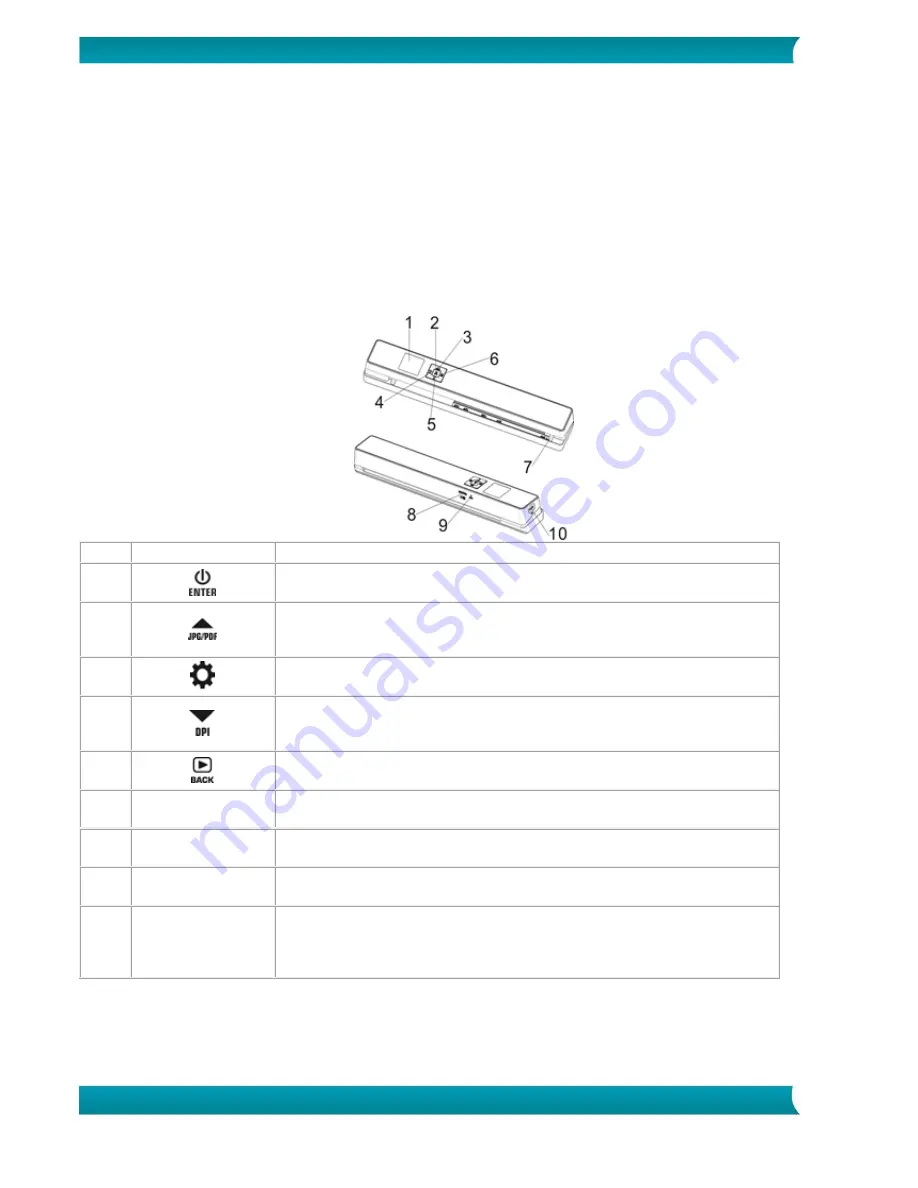
 

LCD display 

Displays the scanning status, scanned image and scanner settings. 


Press for 3 seconds to power on/off. 


Press repeatedly to select the file format: JPG, PDF-A4 or PDF-Letter. 
The corresponding icon is displayed on-screen. 


Press once to enter Setup mode and configure the settings. 


Press repeatedly to select the scan quality: LO (300dpi), MI (600dpi) 
or HI (1200dpi). The corresponding icon is displayed on-screen. 


Press to enter Playback mode and display scanned images.  


Paper guide 

Adjust to scan documents of different sizes. 


microSD card slot  Insert the microSD card in this slot. 


Reset 

Insert paper clip to reset the scanner. 
  

10 

USB port 

Insert the provided USB cable and connect to a computer to view and 
transfer files, and to charge the built-in battery. 

An AC/DC power adapter (not included) can also be used to charge 
the battery. 


Summary of Contents for IRIScan Anywhere 5

Page 1: ...Scan anywhere go paperless for Windows and Mac Mobile scanner OCR software IRIScan Anywhere 5 PDF ...

Page 2: ...ion about the full range of features of ReadirisTM and IRISCompressorTM consult the help file provided with the software or the latest User Guides on www irislink com support Table of Contents Getting Started 1 1 Introduction 3 2 Hardware Overview 3 3 LCD Display 4 4 Preparing the Scanner 4 4 1 Charge the Battery 4 4 2 Insert the microSD Memory Card 4 5 Using the Scanner 5 5 1 How to Scan Document...

Page 3: ...owever there is no guarantee that interference will not occur in a particular installation If this equipment does cause harmful interference to radio or television reception which can be determined by turning the equipment off and on the user is encouraged to try to correct the interference by one or more of the following measures Reorient or relocate the receiving antenna Increase the separation ...

Page 4: ... 2 Press for 3 seconds to power on off 3 Press repeatedly to select the file format JPG PDF A4 or PDF Letter The corresponding icon is displayed on screen 4 Press once to enter Setup mode and configure the settings 5 Press repeatedly to select the scan quality LO 300dpi MI 600dpi or HI 1200dpi The corresponding icon is displayed on screen 6 Press to enter Playback mode and display scanned images 7...

Page 5: ...st charge the built in battery Connect the scanner to a computer with the included USB cable or Connect the scanner to an AC DC power adapter via USB Not included When the scanner is powered off during charging recommended the charge time is about 1 5 hours When the battery is fully charged an corresponding icon appears on the screen for a instant 4 2 Insert the microSD Memory Card 1 Power OFF the...

Page 6: ...cument at the scanner slot 5 Gently insert a document facing upwards into the scanner slot The scanning starts automatically Tip align the documents left in the scanner slot During scanning the scanning status is displayed on screen Notes 1 When you are scanning while the scanner is connected to an external power supply the scanner enters battery charging mode if no action is undertaken during 1 m...

Page 7: ...or Mono Language Menu Language Date Time Date and Time Inst Preview Instant Preview Auto Off Auto Power Off disabled or after 10 minutes Delete All Delete All Files Format Format the microSD Memory Card Device Info Device Information 5 3 Displaying Scans When you have scanned documents you can display the scans on the scanner screen 1 Press to enter Playback mode The last scanned image is displaye...

Page 8: ... the scans on the computer screen 1 Press for 3 seconds to power on the scanner 2 Connect the scanner to your computer using the USB cable 3 Press briefly to enter USB mode The USB icon is displayed on the scanner screen and the scanner is now recognized as removable disk 4 Browse to Computer Removable disk DCIM 100Media to view import copy move or delete scans Note on Mac OS the Removable disk ic...

Reviews: