
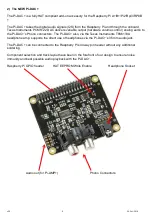
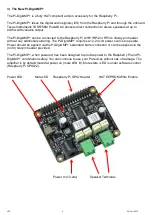


Enabling the IQaudIO sound card in Raspbian / example SD card images.
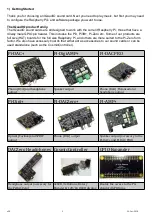
By default all our latest full size audio boards include a pre-programmed EEPROM. This allows the
Raspberry Pi operating system to auto detect and auto configure itself allowing the IQaudIO boards
to be plug and play.
If however you are using an older version of our board, or a Pi-Zero type board then you may have to
configure the Raspberry Pi operating system yourself. This is done by editing the Pi’s configuration
file (found at /boot/config.txt) and ensuring the correct device tree overlay is included. This is also
how you disable the Pi’s onboard audio if it exists.
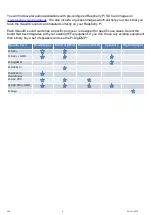
We’ve included below the entries needed for the IQaudIO boards and also the quickest image that
can be downloaded from our website.
The following will help you check your sound card is working and it’s configured correctly.
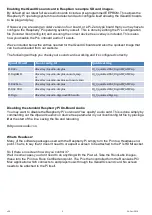
Disabling the standard Raspberry Pi On-Board Audio
You may want to disable the Raspberry Pi’s on-board “low quality” audio card. This is done simply by
commenting out the
dtparam=audio=on
device tree parameter in your /boot/config.txt file by placing a
#
at the start of the line, saving the file and rebooting
#
dtparam=audio=on
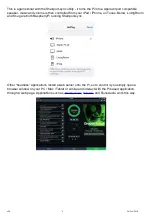
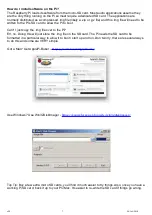
What’s Headless?
Many of the software packages used with the Raspberry Pi simply turn the Pi into a Headless end-
point. That is to say that it doesn't need to or expect a screen to be attached to the Pi’s HDMI socket.
So if there’s no screen how do you control it?
Well in some cases you don’t need to do anything with the Pi at all. Take the RoonLabs images,
these turn the Pi into a Roon Certified end-point. The Pi is then controlled form the RoonLabs PC/
Mac application which connects to and plays music through the IQaudIO sound card. No screen
needs to be attached to the Pi itself.
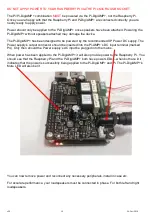
IQaudIO Card
/boot/config.txt
Quicktest img
Pi-DAC+
dtoverlay=iqaudio-dacplus
IQ_0_quicktestDAC_DigiAMP_AMP.zip
Pi-
dtoverlay=iqaudio-dacplus,unmute_amp
or
dtoverlay=iqaudio-dacplus,auto_mute_amp
IQ_0_quicktestDAC_DigiAMP_AMP.zip
Pi-DACZero
dtoverlay=iqaudio-dacplus
IQ_0_quicktestDAC_DigiAMP_AMP.zip
Pi-DAC PRO
dtoverlay=iqaudio-dacplus
IQ_0_quicktestDAC_DigiAMP_AMP.zip
Pi-Digi+
dtoverlay=iqaudio-digi-wm8804-audio
IQ_0_quicktestDigi.zip
v28
=
24-Oct–2018
5


