background image

61

12.Multi-screen Interaction

12.1 Application note

The main function of this application is to wirelessly transmit the content of mobile phones, tablets
or computers to the display, and truly achieve the wireless screen transmission function of the
projection device and the projected device (note: mobile phones, tablets or computers need to be on
the same local area network).

12.2 Operating instructions

1. Click

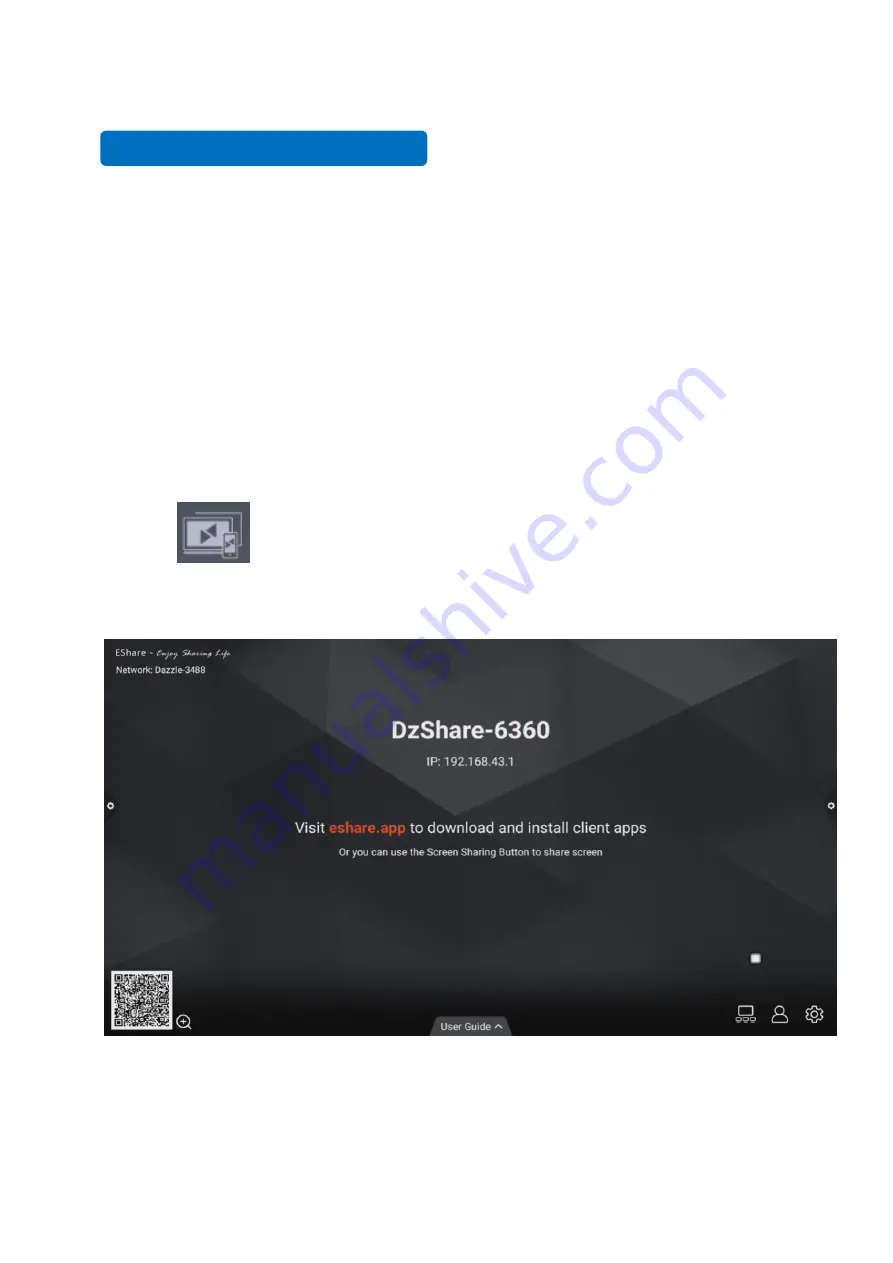
(multi-screen interaction) icon to open the multi-screen interaction interface,

and the application display interface is as shown.

2. Function activation
Activate it only through connecting network if you have purchased EShare serial number.

Summary of Contents for IQTouch TB1000

Page 1: ...IQTouch Interactive Flat Panel TB1000 User Manual ...

Page 2: ...rsonalization 23 9 2 Network 27 9 3 Intelligence 29 9 4 System 32 10 Whiteboard App 36 10 1Interface display 36 10 2 More menus 36 10 3 Code scanning and sharing 44 10 4 Common function 45 11 Document Management 52 11 1Interface introduction 52 11 2 Classification display 52 11 3 Extended menu 55 11 4 Display method 57 11 5 Toolbar 58 12 Multi screen Interaction 60 12 1 Application note 60 12 2 Op...

Page 3: ...weather is thunder storm or lighting Please unplug power supply when there is nobody at home or didn t use over a long time Please keep power cord from physical or mechanical damage Please use exclusive power cord don t modify or lengthen it Please check and ensure AC source is connected with the ground A sudden power failure may damage the panel Frequent power on and off in a short time may cause...

Page 4: ...hat may have formed inside the unit can dry completely Normal operating temperature is 0 40 Humidity Do not expose machine in rain damp or place near water Ensure the indoor drying cool Ventilation Keep the ventilation openings clear Ensure that the unit has enough space for ventilation around left right and back 10cm top 20cm Earphone It will affect the hearing if you listen to noisy sound for a ...

Page 5: ...oduct is installed on a surface made of loose material such as an old brick wall wood plank wall solid brick wall a metal or non metal structure surface or a surface with a thick decoration layer take necessary consolidating measures to ensure that the product is stably installed Step1 Punching holes in the wall Mark 8 holes location on the wall according to wall mounting bracket A and use the dri...

Page 6: ...crews and gaskets Please ensure that the wall mounting bracket A is installed horizontally Ref Picture3 Step4 Install the left right hang bracket B to IQTouch Use screws fix the hang bracket B at the back of IQTouch Please check the direction of hang bracket B before installation Ref Picture 4 ...

Page 7: ...mounting bracket A Hanging the left right hang bracket B to the wall mounting bracket A please ensure two hang brackets B total hang on wall mounting bracket A then tighten the screws of hang bracket B to prevent it slide Ref Picture5 ...

Page 8: ...the plug of the OPS after the interactive panel is disconnected from the power Install the OPS by the following steps 1 Insert the OPS into the special slot on the rear of the interactive panel 2 Tighten the screws 3 Confirm that the OPS is installed correctly Handle facing outward ...

Page 9: ...ED light is not turn red please turn on the rocker switch at the back of the device 4 Press power button or put the battery in to remote control and use remote control to power on the device 3 Control Panel Icon Function Description Power button On or standby model IR receiver Receive infrared signals such as remote control USB 2 0 port Android PC ...

Page 10: ...6 4 Interface Terminal Interface Side Interface Coax out HDMI 1 HDMI 2 RS232 USB2 0 USB 2 0 WIFI antenna port Touch RJ45 YPBPR IN AV IN AV OUT VGA VGA EARPHONE AUDIO IN ...

Page 11: ... Select different input source PgUp PgDn Next previous page in ops mode Up down left right button Enter Confirm Input Select different input source Menu Open close menu HOME Back to Home page Auto Auto correction valid under VGA channel Reserved function keys Start menu in OPS mode Space Function key in OPS mode Alt Tab Change window in OPS mode Alt F4 Close window in OPS mode Stop current operati...

Page 12: ...g area is about 3 meters with 30 angle from vertical point to the left and right And the effective receiving area is about 5 meters from the front of device Note that the remote control signal receiver locates at the position of power indicator 5M ...

Page 13: ...al PC Connect an earphone cable between the PC and audio at the same time 2 Connect a USB cable between the external PC and USB terminal 3 Plug the POWER cord and switch it on from the rear panel 4 Start up the external computer 5 Press to turn on the panel 6 Select Signal source to VGA source according to the one you connected Note The panel can connect with the external PC via HDMI 7 2 AV Connec...

Page 14: ... cord and switch it on from the rear panel 3 Press to turn on the panel 4 Select Signal source to AV IN source YPbPr 1 Connect a YPbPr cable with the device with YPbPr 2 Plug the POWER cord and switch it on from the rear panel 3 Press to turn on the panel 4 Select Signal source to YPbPr source Front HDMI HDMI 1 HDMI 2 ...

Page 15: ...it on from the rear panel 3 Press to turn on the panel 4 Select Signal source to HDMI source according to the one you connected 7 3 Video OUT HDMI out 1 Connect a HDMI cable with the device with HDMI 2 Plug the POWER cord and switch it on from the rear panel 3 Press to turn on the panel ...

Page 16: ...serial port cable with the device 2 Plug the POWER cord and switch it on from the rear panel 3 After connecting the central control system and unit you can use some of the function such as power on off or adjust the volume etc ...

Page 17: ...mode 99 23 04 01 FB AA Analog TV 99 23 07 01 F8 AA Video 1 99 23 08 01 F7 AA Video 2 99 23 09 01 F6 AA Quantity 99 23 0A 01 F5 AA Computer 1 99 23 0B 01 F4 AA Computer 2 99 23 0C 01 F3 AA HDMI 1 99 23 0E 01 F1 AA HDMI 2 99 23 0F 01 F0 AA Front HD 99 23 10 01 EF AA Built in computer 99 23 11 01 EE AA Menu 99 23 12 01 ED AA Signal source 99 23 13 01 EC AA Exit 99 23 14 01 EB AA Listen alone 99 23 16...

Page 18: ...idebars are divided into left sidebar and right sidebar Click on the icon floating on the left and right side of the screen to show the sidebar The functions are Back Home page Task Annotation Input and Control panel The sidebar will be hidden automatically after 5 seconds without any operation ...

Page 19: ...e main interface of Android system Task Click icon to enter the task management interface where you can select to open or close the application 1 In multi task state touch the task list area and slide up and down to view the task list 2 Touch the task thumbnail to enter the task interface ...

Page 20: ...he writing menu choose color and size of the pen Click to open eraser mode Click to exit the mode if the current mode is annotation Click to open drop down menu of the annotation Click to share scan QR code You can scan code to save the files to your own mobile device Click to insert whiteboard Click to exit the annotation mode ...

Page 21: ...t and the user can switch channel Control panel Click icon to display the notification panel as shown below The Notification Center panel contains Calendar Child Lock Energy Saving Screenshot Eye Protection Spotlight Camera Curtain Timer and Customize ...

Page 22: ...580 in turn and click OK to unlock the initial password is 2580 the user can enter the settings to change the password 2 Remote unlocking press F9 to unlock quickly 3 Combination key unlock press the signal source key twice and then press the sound plus and sound decrease Note it is necessary to press the sound addition and subtraction in the signal source interface Energy saving Click icon to ent...

Page 23: ...the curtain function and use the existing background template to block the content on the screen Custom Click icon to add common applications from user s choice Brightness and sound adjustment Brightness adjustment move backlight progress to adjust the brightness Sound adjustment move sound progress to adjust the volume Notice Click icon to open system app notifications or third party app notifica...

Page 24: ...20 Quick Apps Click the icon to enter the corresponding application Click to enter more applications ...

Page 25: ...n off the all in one machine 3 Setting Click the icon to enter the system setting interface 8 2 Status bar The status bar mainly displays the current network connection status current machine temperature sound brightness and also contains the wallpaper channel settings and quick access to shutdown As shown in the figure ...

Page 26: ...current temperature of the machine Click Adjust the sound of the machine Click Adjust the brightness of the machine Click Enter the wallpaper interface Click Enter the preview channel interface Click Enter setting interface Click Execute shutdown operation ...

Page 27: ...s interface Basic Device Name Users can modify the name of the interactive display Network MAC Display the MAC address of the currently connected network Start up screen animation Display the current start up screen animation click the setting to customize the start up screen animation Please follow the on screen prompts when customizing the start up screen and animation Theme Click on the corresp...

Page 28: ...24 Conference theme Educational theme ...

Page 29: ...25 Science and technology theme Wallpaper Wallpaper has dynamic and static wallpaper It also can be added by custom Custom added wallpaper can be stored in static wallpaper and deleted by long press ...

Page 30: ...he current brightness decreases when turned on Color temperature adjustment adjust color temperature Screen saver When turned on enter screen saver mode after sleep Change screen saver Click to change screen saver animation users can add or delete static screen saver and dynamic screen saver by themselves ...

Page 31: ...ce users can view the MAC address IP address and other information The automatic access to the IP address is opened by default and the parameters such as the IP address and the subnet mask can be manually modified after the automatic acquisition is closed Wireless network Turn on the wireless network which automatically connects the display to the available wireless network ...

Page 32: ...users can change the hot spot name security password and other parameters Notice 2 4G and 5G hot spot 2 4G hot spot and wireless network can neither be opened at the same time Bluetooth Turn on Bluetooth function to achieve Bluetooth transmission after Bluetooth pairing ...

Page 33: ...gent settings interface users can set the intelligent lock password energy saving mode time switch channel and so on Print settings Energy saving mode Set the sleep time it will be in screen saver status The screen saver can be customized ...

Page 34: ... video is a dynamic screen saver and you can delete it by clicking the delete icon Timing switch After setting the power on time and power off time the system will automatically power on or power off when the scheduled time is up Channel setting Click to set Power on Channel or click to custom channel name ...

Page 35: ...ings USB lock screen lock application lock and touch lock can be turned on or off You can also set the corresponding unlock password the initial password is 2580 Click Set Password to change the corresponding password ...

Page 36: ...llow and other functions 9 4 System The system setting options are mainly for system input method language display setting system update and upgrade etc as well as system version information and built in storage usage Language and typing Click to set the language Chinese traditional Chinese English Arabic Spanish French Italian Japanese Portuguese Russian etc and input method ...

Page 37: ...urn on the Auto set time If the network connection is successful the current network time will be automatically synchronized When the Auto set time is off you can manually set the date and time Click to modify time zone ...

Page 38: ...4 Image It is valid for any source channel except Android mainly used to adjust the image quality of the channel and the ratio of the channel picture Voice Adjust volume and set sound mode output device ...

Page 39: ...mode standard news music theater sports user voice output device speaker coaxial Bluetooth USB mode System information You can view the system version information and built in storage usage and other information ...

Page 40: ...tore the factory settings 2 Local update Copy the firmware to the root directory of the U disk insert the U disk into the multimedia USB interface of the machine and select local upgrade and update 3 Online update Check whether a new version of firmware is released through the network to download and update ...

Page 41: ...oint and multi point up to 20 points 3 Single point mode two fingers or more to perform zoom roaming function 4 Support small tools insert pictures and shapes draw lines and sectors You can also use some of aid tools such as camera calendar calculator etc 10 2 More menus Click on the More Menu icon in the lower left corner of the interface to pop up the subordinate content menu ...

Page 42: ...n the whiteboard file directory the default path directory is internal storage whiteboard And it can perform the functions such as editing and saving again 2 Save the file Click icon to save the currently written content Users can customize saving name and the choice of internal storage or U disk to save ...

Page 43: ... whiteboard in jpg picture format The storage location of exported pictures can be internal storage or U disk 4 Insert Click to open the picture file of the local storage or U disk The user can insert the picture on the whiteboard and write on the picture ...

Page 44: ...e email sending function for the first time you need to set the information of the email sender s mailbox on the email login interface as shown in the figure a Use your mailbox enter account number and password and click Login ...

Page 45: ... the content recorded on the whiteboard as a PDF file to the recipient s mailbox and click Settings to modify and replace the current account 6 Click to enter network sharing settings and writing mode settings The network sharing is divided into network sharing and local sharing functions ...

Page 46: ...42 The network sharing is divided into network sharing and local sharing functions Writing mode is divided into standard mode single pen mode and double pen mode ...

Page 47: ...mation Click Exiting the whiteboard when there is content on the whiteboard will pop up the prompt Are you sure to exit the whiteboard or save the file You can choose Save or Quit If the whiteboard has no content you can exit directly ...

Page 48: ...een calculator timer and spotlight which can be inserted to whiteboard When the ruler is selected the ruler tool appears on the screen You can use ruler to draw different length of lines When you select a compass you can draw circles or sectors on the screen ...

Page 49: ...indow and scan it when the network is connected If popping up the prompt return to the home page and set the network connection Enter whiteboard again and re scan the code after the connection is successful QR code sharing is divided into current page sharing and all sharing ...

Page 50: ...t After scanning the QR code you must enter the password to view the file 10 4 Common Function Pen tool 1 Click icon to pop up pen tool menu 2 Modify the thickness and color of the pen Click the dot icon to modify the thickness of the pen trace click the color box to select the pen color click the custom icon to expand the palette and customize the pen color ...

Page 51: ...n content 2 Circle rub Click icon to erase the handwriting in the area inside the erase circle Shape Click to to pop up the graphic and image selection box When the selected graph is drawn on the screen it will be displayed as the corresponding figure ...

Page 52: ...48 Choose the shape to insert to whiteboard Background 1 Click to change Whiteboard background color picture shape background picture ...

Page 53: ...49 2 Picture shape 3 Background image ...

Page 54: ...icon to re execute the operation that has been cancelled and support up to 50 steps once Select function Click to change selection function The interface switches from the writing mode to the selection mode You can circle the handwriting and shape in the interface and then move delete copy and paste rotate and zoom the inserted pictures ...

Page 55: ... and right switching function Click icon to switch the left and right positions of more function icons including code scanning switching function icons and lower page function icons page number preview function icons and page addition function icons Page preview 1 Open the page preview pop up window Click to show that the current page is selected ...

Page 56: ...the page or click at the bottom of the page preview window to delete all pages Click to enter all page display mode 4 Turning page function Click the left and right page turning buttons and icons to achieve the page turning effect or in the page preview window the preview page exceeds the limited preview range slide up and down to quickly find the page click to select ...

Page 57: ...file manager icon Open the file management application and the external SD card and USB external storage device are displayed on the left side of the file browser 11 2 Classification display 1 When user clicks Documents the main contents are Word EXCEL PDF TXT files ...

Page 58: ...54 2 When user clicks Picture the image format file is displayed 3 when user clicks Audio the audio format file is displayed 4 When user clicks Video the video format file is displayed ...

Page 59: ... user needs to find After clicking Search the file to be found will be displayed in the main content window as shown in the figure 6 Sort Click icon the sorting list will pop up There are four sorting methods size name type and time Users can sort files according to their needs ...

Page 60: ...56 11 3 Extended Menu Click icon there are functions such as display settings favorites and version information Display settings User can set the file manager s font display and background color display ...

Page 61: ... collect and click on the collection 2 Viewing files If you want to view a file or folder just double click to open it 3 Remove the favorite file Click to select the file or folder to be removed 4 Exit the favorites Click outside the Favorites interface to exit ...

Page 62: ...58 About User can view the file browser version information 11 4 Display Method Icon display The icon display can be divided into a large icon display and a small icon display ...

Page 63: ...59 List display 11 5 Toolbar Multiple selection Click icon Multiple folders can be selected at the same time ...

Page 64: ... Encryption 1 Enable password protection Long press to select the file or folder to be protected click encryption enter the password to confirm After the file is encrypted you cannot delete copy cut rename etc the file 2 Remove the password Long press to select the protected file or folder click decrypt enter the password to unlock the password of the file or folder ...

Page 65: ...ansmission function of the projection device and the projected device note mobile phones tablets or computers need to be on the same local area network 12 2 Operating instructions 1 Click multi screen interaction icon to open the multi screen interaction interface and the application display interface is as shown 2 Function activation Activate it only through connecting network if you have purchas...

Page 66: ...tware Apple mobile phone does not need to download 2 The mobile phone needs to use the same network as the all in one The Android mobile phone can open the E share to cast the screen and the Apple mobile phone can open the Air Play to cast the screen 12 3 Special instructions for multi screen interaction interface Device name Click icon user can modify the device name ...

Page 67: ... of split screens Show Device Name on Screen the device name is displayed on the screen when it is turned on Airplay visible Airplay visible when it turned on 12 4 Laptop screen sharing The screen sharing of the laptop needs to be used with the IQShare button The IQShare button is as shown below Note Before using the IQShare button wireless screen function user needs to make sure that the hotspot ...

Page 68: ...creen and laptop pairing 1 Start pairing Plug the IQShare button into the laptop s USB port and HDMI port and paired with the laptop The indicator light of the IQShare button is always flashing blue and is being paired with the laptop 2 Pairing completed When the touch screen successfully connects to the laptop the indicator light of the IQShare button will no longer flash blue 3 Screen sharing Pr...

Page 69: ... click input Press INPUT button on the remote control In the signal source page select a channel and press OK or click the channel icon directly to enter it 2 Operate the built in PC in the same way as you operate an ordinary computer 3 Shut down PC before you turn off the panel Do not power off a running PC suddenly to avoid data lose Or you could also press Power button to turn off PC and panel ...

Page 70: ...king List No Name Quantity Set 1 IQTouch 1 2 Wall Mounting Bracket 1 3 Power Cord 1 4 Remote Control 1 5 HDMI Cable 1 6 USB Cable 1 7 Colorless Writing Pen 2 8 User Manual 1 9 Warranty Card 1 10 Certification 1 ...

Page 71: ...or use a pen with larger covering area Check if infrared frames are obscured Remove the interference source or change the using environment No display or no sound No sound is played and no image is displayed Check whether the power plug is inserted into the power socket and whether the panel is powered on Check whether the rocker switch on the interactive panel is switched on Check whether panel i...

Page 72: ...68 This is the general user manual for IQTouch TB1000 interactive touch screens Some details may be different from the actual product ...

Page 73: ......

Reviews: