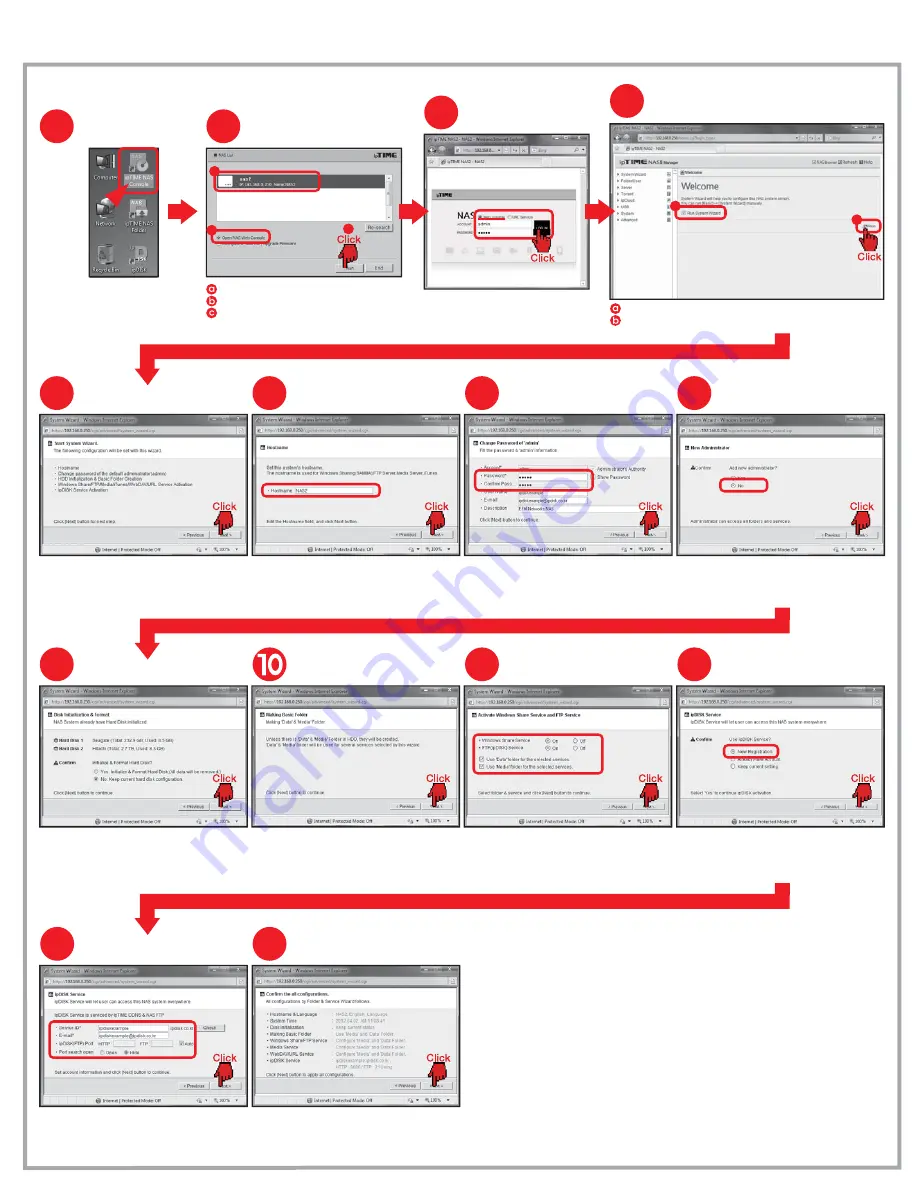
Configuring the NAS
Four.
Some of the configuration stages are omitted.
1
Run ipTIME NAS console
Double Click [ipTIME NAS console]
in the Desktop screen.
2
Select NAS
Choose NAS from searching list.
Choose [Open NAS Web Console].
Click [Run] button.
4
Run System Wizard
Check [Run System Wizard].
Click [Run] to start the wizard.
3
Login
a
b
c
a
b
Login to the selected NAS
as a
※ The default password for admin is
“admin” account.
‘admin’
.
5
Start System Wizard
Click [Next] button to begin the wizard.
6
Enter the hostname
Enter the hostname wanted
and click [Next] button.
7
Change the
default password for admin
Change the password for admin
and click [Next] button.
8
Add a new administrator
9
Initialize and Format Disk
Choose Yes or No for initialize & Format Hard Disk
and click [Next] button.
※ Formatting is not needed
if the disk is already formatted.
Creating default folders for service
Activate the shared folders
for Windows and FTP
Turn on the FTP and Window service
and click [Next] button.
11
Register ipDISK service
Select [New Registration] for ipDISK service
and click [Next] button.
12
13
Configure ipDISK service
Fill Service ID and E-mail.
Select ipDISK(FTP) port as an Auto.
※ To select ipDISK port as an Auto,
use ipTIME IP router with firmware higher than 7.40.
14
Finish the configuration
Review the configurations
and click [Next] button to finish.
Choose Yes or No for adding a new administrator account
and click [Next] button.
※ Adding a new administrator account can be done later,
Choose“No”
and continue the wizard.
Be sure the default folders
for service will be created.
“Data”and “Media”


