IPGARD SDVN-16S User Manual Download Page 10


Advanced 8/16 Port DVI-I Secure KVM Switch 


 10 

CAC (COMMON ACCESS CARD, SMART CARD READER) INSTALLATION 

The following steps are intended for the system administrator or IT manager only. 


If you have the optional CAC ports there will be 2 ports on a 2 host ports KVM and 4 ports on a 4 host 
ports KVM. 
CAC connection to the computer requires a USB cable connection separate from the keyboard and 
mouse. This allows the CAC to be connected and controlled independently from the keyboard and mouse. 
It also allows the user to select whether CAC for a certain computer is supported or not.  
  
1.  Ensure that power is turned off or disconnected from the unit and the computer.  
2.  Use a USB cable (Type-A to Type-B) to connect a USB port on a computer to its respective CAC USB 

ports on the KVM. Do not connect the USB cable if CAC functionality is not needed for that computer. 

3.  Connect a CAC (smart card reader) to the CAC port in the user console interface. 
4.  Power on the KVM by connecting a 12VDC power supply to the power connector, and then turn on all 

the computers. 

5.  To disable CAC for any channel (all CAC ports are enabled as default), use the front panel buttons to 

switch the KVM to the channel whose CAC mode you wish to change. Once the channel is selected, 
the button LED for this specific channel should be on (CAC port enabled). Press and hold the button 
for 3 seconds until the button LED turns off. The CAC port is now disabled for this channel. 

6.  To enable CAC for any channel, use the front panel buttons to switch the KVM to the channel whose 

CAC mode you wish to change. Once the channel is selected, the button LED for this specific channel 
should be off (CAC port disabled). Press and hold the button for 3 seconds until the button LED turns 
on. The CAC port is now enabled for this channel. 


CAC PORT CONFIGURATION 

The following steps are intended for the system administrator and operators (users). 

Note: Only one computer connected to port 1 is required for this operation 

 
CAC port Configuration is an optional feature, allowing registration of any USB peripheral to operate with 
the KVM. Only one peripheral can be registered and only the registered peripheral will operate with the 
KVM. By default, when no peripheral is registered, the KVM will operate with any Smart Card Reader. 
 
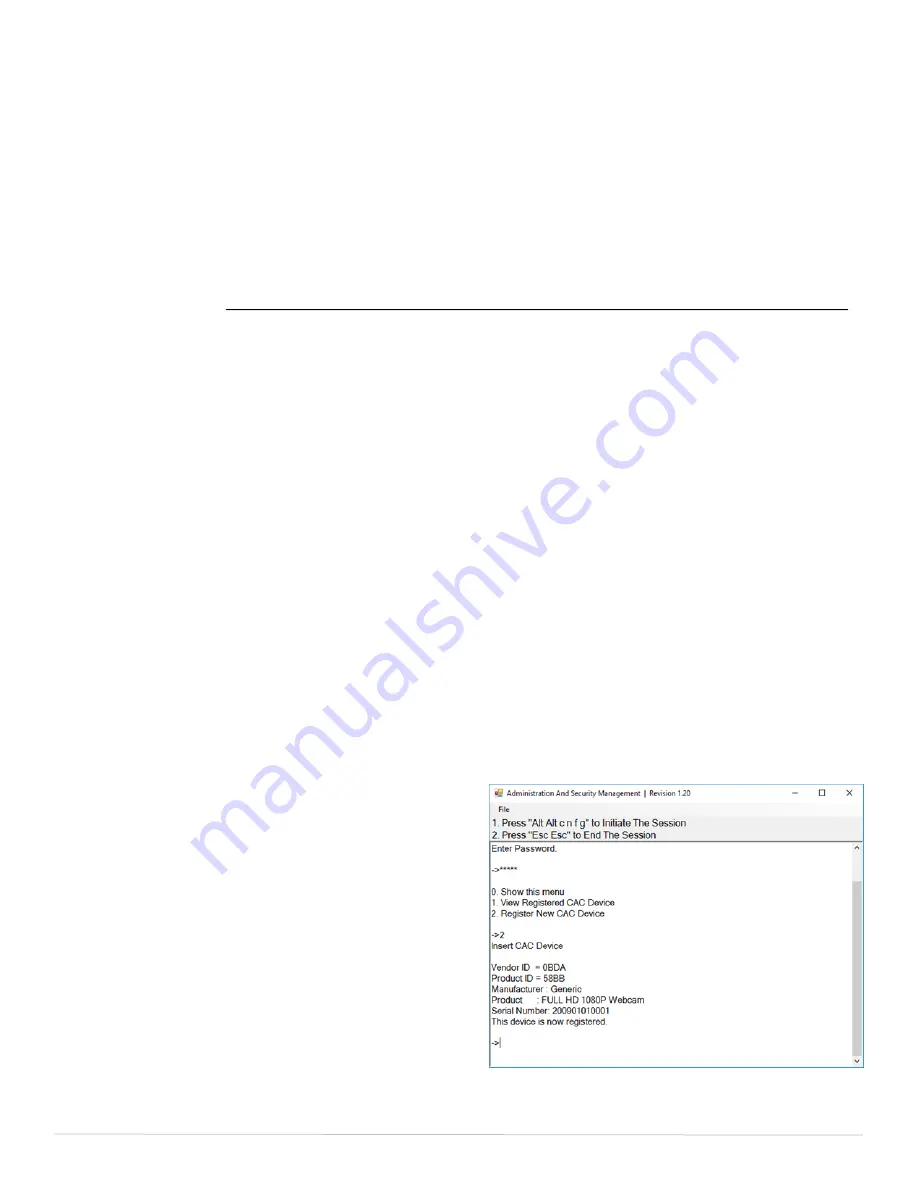
Configure the CAC Port via User Menu Options 
1.  Open the Administration and Security Management Program. 
2.  Using the keyboard, press the Alt key twice and type 

“cnfg”. 

3.  At this stage the mouse connected to the KVM/KM 

will stop functioning. 

4.  Enter the default username “user” and press Enter. 
5.  Enter the default password “12345” and press 

Enter. 

6.  Select option 2 from the menu on your screen and 

press Enter. 

7.  Connect the peripheral device to be registered to 

the CAC USB port in the console side of the KVM/
KM and wait until the KVM /KM is reading the new 
peripheral information. 

8.  The KVM/KM will list the information of the 

connected peripheral on the screen and buzz 3 
times when registration is completed. 


Figure 10-1 User Menu 

Summary of Contents for SDVN-16S

Page 1: ...on 1 10 Release Date November 13th 2016 SDVN 8S 8 Port Secure DVI I KVM with Audio SDVN 8D 8 Port Secure Dual Head DVI I KVM with Audio SDVN 8S P 8 Port Secure DVI I KVM with Audio and CAC Support SDV...

Page 2: ...MART CARD READER________________________ 10 CAC PORT CONFIGURATION__________________________________________________________ 10 AUDITING Dumping the Event Log via User Menu Options____________________...

Page 3: ...0 Keyboard and Mouse only USB 2 0 for CAC connection Type A to B SDVN 8S SDVN 8D 8 SDVN 8S P SDVN 8D P SDVN 16S 16 SDVN 16S P 32 User Console Interface 2 USB Type A for keyboard and mouse connection...

Page 4: ...unctionality Tamper Evident Seal The enclosure of the unit is protected with a tamper evident seal to provide a visual evidence if the unit has been opened Protected Firmware The controller of the uni...

Page 5: ...le Port Authorized Devices Keyboard Wired keyboard and keypad without internal USB hub or composite device functions unless the connected device has at least one endpoint which is a keyboard or mouse...

Page 6: ...each computer to the corresponding DVI I IN ports of the unit 3 Use a USB cable Type A to Type B to connect a USB port on each computer to the respective USB ports of the unit 4 Optionally connect a...

Page 7: ...he audio output of the computer to the AUDIO IN ports of the unit 5 Connect the monitors to the DVI I OUT console ports of the unit using DVI cables Figure 7 2 The DVI I IN ports on one row will be sw...

Page 8: ...Advanced 8 16 Port DVI I Secure KVM Switch 8 INSTALLATION Continued Figure 8 2 SDVN 16S P Shown Figure 8 1 SDVN 8D P Shown...

Page 9: ...n the LEDs stop flashing the EDID learn process is done If the KVM has more than one video board such as dual head and quad head models then the unit will continue to learn the EDIDs of the connected...

Page 10: ...C port is now disabled for this channel 6 To enable CAC for any channel use the front panel buttons to switch the KVM to the channel whose CAC mode you wish to change Once the channel is selected the...

Page 11: ...nter 5 Request a Log Dump by selecting option 5 in the menu Shown in Figure 11 1 See Administration and Security Management Tool Guidance for detailed information RESET Restore Factory Defaults The fo...

Page 12: ...pheral is connected Status Description 1 Off Non selected port 2 On Selected port 3 Flashing EDID learn in process Status Description 1 Off CAC port is disabled or non selected port 2 On CAC port is e...

Page 13: ...necting the USB on the computer to a different port Make sure that the keyboard works when directly connected to the computer Replace the keyboard Note The NUM CAPS and SCROLL Lock LED indicators on t...

Page 14: ...ct to IPGARD Any replacement product could be new or like new provided that it has functionality at least equal to that of the product being replaced IPGARD limited warranty is valid in any country wh...

Page 15: ...d fitness for particular purpose iPGARD will not be liable for errors contained herein or for incidental or consequential damages in connection with the furnishing performance or use of this material...

Reviews: