background image


16


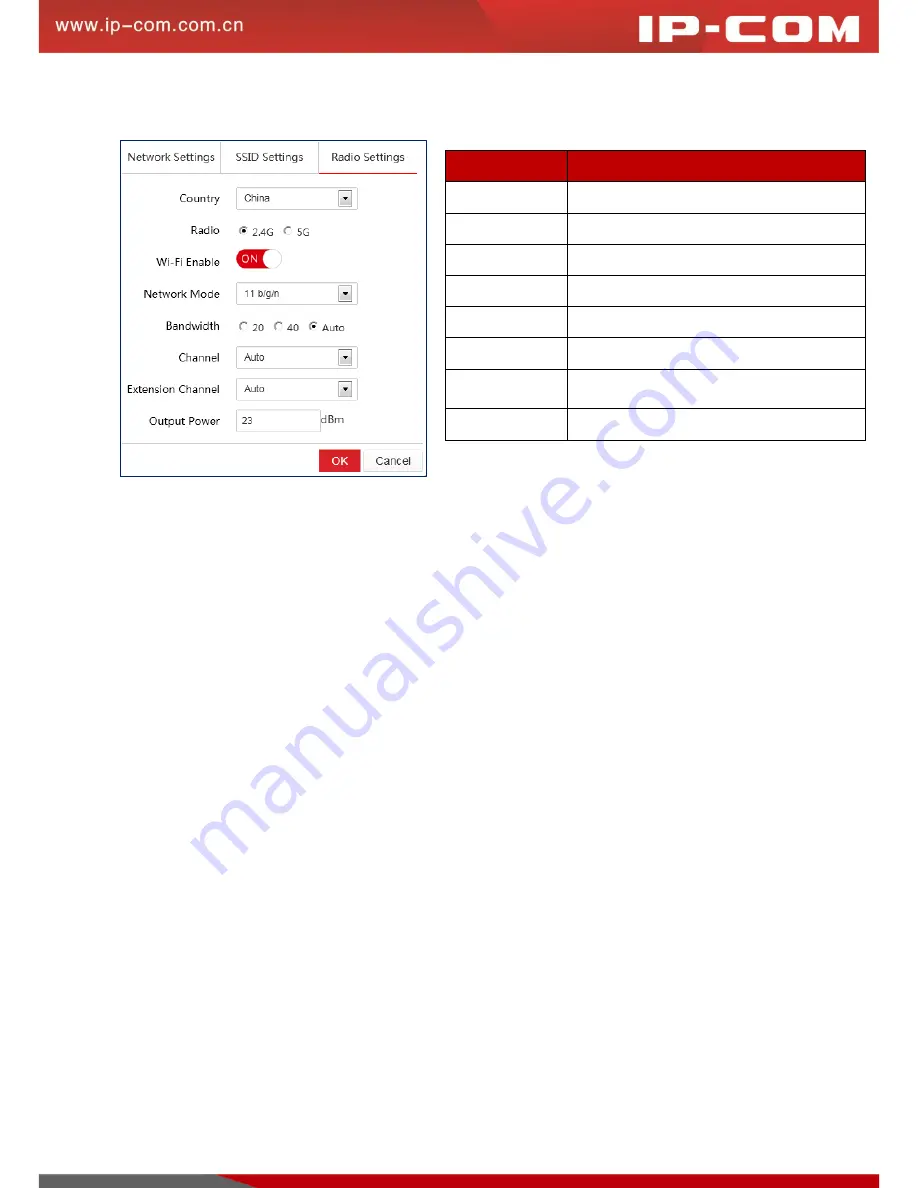
Radio Settings 


Here you can configure radio settings for your AP. 


Batch Modify 

To batch modify settings for your APs, select APs you wish to modify and click 

Batch Modify

. Up to 100 entries 

can be displayed on each page, thus, you can batch manage 100 APs at most at a time. 

Note:

 The Batch Modify 

action can only be applied to configure SSID settings for your APs. 

Modify All 

To modify all information for your APs, click

 Modify All

Note:

 The Modify All action can only be applied to 

configure SSID settings for your APs. 

Reboot   

To reboot an AP, select the AP you wish to reboot and click 

Reboot

. Up to 100 entries can be displayed on each 

page, thus, you can reboot 100 APs at most at a time. 

Upgrade 

To upgrade the AP that is connected to the AC, select the AP and click 

Upgrade

. If you want to perform the batch 

upgrading action, all connected APs must be of the same model. Up to 100 entries can be displayed on each page, 

thus, you can upgrade 100 APs at most at a time. 

Reset   

To reset an AP, select the AP you wish to reset and click 

Reset

Delete   

To delete offline APs information, select the AP you wish to delete and click 

Delete

. In case that offline APs take 

up too much space which will affect AP management, it is advisable to delete some offline APs. 


Parameter   

Description   

Country   

Select your country 

Radio   

Select the frequency band for your AP 

WiFi Enable 

Enable/Disable the WiFi of the AP 

Network Mode 

Select network mode for your AP 

Bandwidth   

Configure bandwidth for your AP: 20, 40, auto. 

Channel   

Configure wireless channel for your AP 

Extension 
Channel 

Configure extension channel for your AP 

Output Power 

Adjust wireless power for your AP 

Summary of Contents for CW1000

Page 1: ......

Page 2: ...the prior written permission of IP COM Networks Co Ltd Disclaimer Pictures images and product specifications herein are for references only To improve internal design operational function and or reli...

Page 3: ...tatus System Status Symbols in this User Guide Item Meaning Note This format is used to highlight information of importance or special interest Ignoring this type of note may result in ineffective con...

Page 4: ...2 Device Installation 4 3 Web Login 7 Web Login 7 Web Logout 8 Web Layout 9 4 Function Description 10 Discover AP 10 SSID Policy 11 Manage AP 14 User Status 17 Maintain Policy 18 Maintain 21 License...

Page 5: ...matic AP discovery and AP connection without any configuration on the AP i e support centralized management for all connected APs Support 802 1Q VLAN which can manage APs among multiple VLANs Support...

Page 6: ...red to its factory defaults LED Color Status Description POWER Green Solid Proper connection to power supply Off Improper connection to power supply or malfunction occurs SYS Green Solid The system is...

Page 7: ...ress Default login IP address for accessing this AC s web manager 2 Username Password Default login username and password for accessing this AC s web manager 3 Power Power specification of this AC 4 S...

Page 8: ...uation Rack Installation With the included L shaped brackets and screws you can install this AC in a 19 inch standard rack Make sure the rack is well earthed and stable Fasten the two L shaped bracket...

Page 9: ...a flat desktop Attach four anti slip footpads to the corresponding circular grooves on the bottom of the AC Place the switch face up on the desktop Step 2 Connect the LAN port of the AC to the remote...

Page 10: ...t the following phenomena will occur one by one At the very beginning all LEDs become lighted for a few seconds for self checking Then the PWR LED keeps on the SYS LED starts blinking and other LEDs a...

Page 11: ...ith the following default login information Login Info Default Setting IP Address 192 168 10 1 User Name admin Password admin Connect your PC to one of the LAN ports of the AC directly or to the switc...

Page 12: ...h for example After successful login you can click navigation bars on the left side of the page to view or configure corresponding functions For more advanced functions see Function Description Web Lo...

Page 13: ...e Configuration Section This section allows you to configure and view settings here Commonly Used Buttons Button Menu Description Refresh To update displayed info click Refresh on the top left corner...

Page 14: ...nfo for its identification IP Address The IP address the AP has obtained MAC Address AP s MAC address Online Limits Online Wireless clients currently connected to the AP Limits Maximum wireless client...

Page 15: ...in total In the configuration section configured SSID info will be displayed Specific parameters are described below Parameter Description SSID WiFi name Security Key The password of your WiFi Channe...

Page 16: ...ings for your SSID Parameters for Basic Settings Parameter Description SSID WiFi name Security Mode Select the security mode for your WiFi Encryption Select the encryption protocol for your WiFi By de...

Page 17: ...SSID can intercommunicate with each other SSID Hidden Enable Disable SSID Hidden function Enable The AP will not broadcast its SSID i e its SSID will not be displayed in available wireless network lis...

Page 18: ...need to enter it manually Disable The AP will broadcast its SSID i e its SSID will be displayed in available network lists It is disabled by default APSD APSD Automatic Power Save Delivery is an effic...

Page 19: ...upport 5GHz 5GHz will not be available And configurable number of SSIDs also depends on the AP itself Parameter Description AP AP s model IP Type Internet setup type for your Dynamic IP The AP will ob...

Page 20: ...connected to the AC select the AP and click Upgrade If you want to perform the batch upgrading action all connected APs must be of the same model Up to 100 entries can be displayed on each page thus...

Page 21: ...ing to Total RX Total RX of wireless clients RSSI RSSI Received Signal Strength Indicator reflects wireless clients receiving signal strength from the AP In this way you will know the WiFi quality and...

Page 22: ...olicies can be configured on this device Note This section is only used for configuring relevant policy rules for your APs To activate these rules you need to go to the Maintain section Parameter Desc...

Page 23: ...sable the reboot function Reboot Type Configure reboot type for your AP Circularly Every day the AP will reboot at the set time Schedule The AP will only reboot at the set time Reboot Interval Configu...

Page 24: ...P failure occurs AP failure alarm will be sent out AP Traffic Alarm Enable Disable the AP traffic alarm function When it is enabled and the set value has been reached AP traffic alarm will be sent out...

Page 25: ...Remarks Location description of the AP MAC Address AP s MAC address SSID AP s primary SSID LED AP s LED status Reboot Reboot policy of the AP Alarm Alarm policy of the AP Status Connection status betw...

Page 26: ...licy settings for your APs select APs you wish to cancel and click Default Settings Delete To delete some offline APs information select APs you wish to delete and click Delete License Only when the A...

Page 27: ...t IP end IP and lease time for the DHCP server Device Maintenance Upgrade reboot backup restore and reset your device User Management Configure this AC s username and password Time Setting Configure s...

Page 28: ...etting This page lets you configure LAN settings and VLAN settings for your AC LAN Setting In this section you can configure LAN IP address subnet mask gateway preferred DNS and alternate DNS optional...

Page 29: ...Ns and different VLANs can be separated with commas For example 3 10 12 indicates from VLAN 3 VLAN 4 VLAN 5 VLAN 6 VLAN 7 VLAN 8 VLAN 9 VLAN 10 and VLAN 12 In total 9 VLANs To delete a VLAN click the...

Page 30: ...our problem Note While upgrading do not disconnect power supply of your AC otherwise damage may be done to your AC If sudden power interruption occurs please re upgrade the AC if you are unable to log...

Page 31: ...ormance in this case you can restore the device to its previous configurations Click Select a file select and upload your previous configuration files to the AC and then follow onscreen instructions R...

Page 32: ...to re access its web manager Tips The default login timeout for this AC is 5 minutes not configurable When time is up you need to type in the username and password to re access its web manager Time Se...

Page 33: ...way for the AC to access the Internet click Manage AC Network Setting to configure its IP address subnet mask gateway and DNS server Manual Setting Configuration Steps NTP Network Time Uncheck the Ena...

Page 34: ...tem Log to enter page below where you can refresh export and clear logs For the convenience of monitoring real time network status and troubleshooting networking problems you d better verify that the...

Page 35: ...efault 192 168 10 1 username and password to try again Q How to restore my device to factory default settings when I can t access this AC s web manager When the AC is functioning properly press it wit...

Page 36: ...nutes immutable LAN Setup IP Address 192 168 10 1 Subnet Mask 255 255 255 0 Gateway 192 168 10 254 Primary DNS Server 192 168 10 254 Alternate DNS Server DHCP Server Status Enable immutable Start IP 1...

Page 37: ...commercial environment This equipment generates uses and can radiate radio frequency energy and if not installed and used in accordance with the instruction manual may cause harmful interference to r...

Reviews: