3
iOptron Corp. | 6E Gill Street | Woburn, MA 01801 USA | (781) 569-0200 | www.iOptron.com
1.
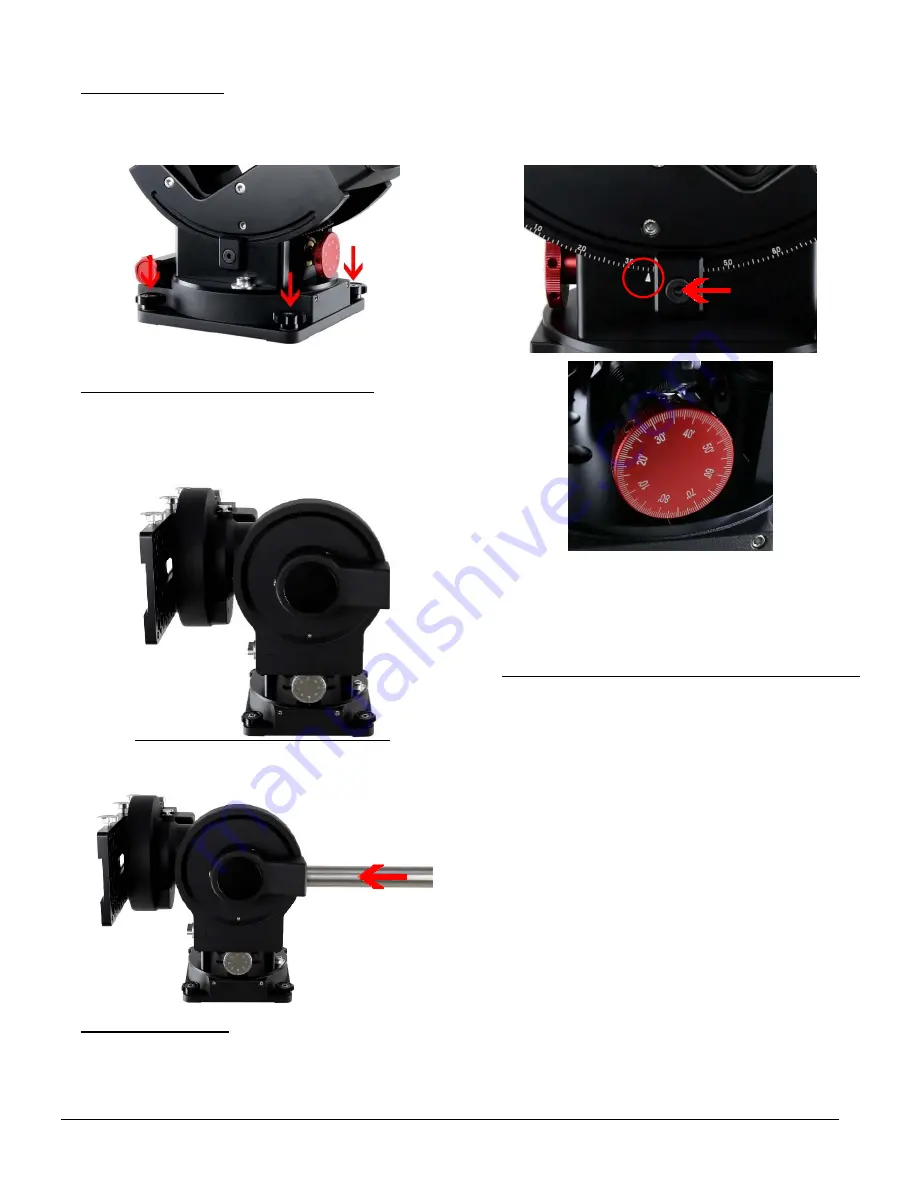
Attaching the Mount:
Make sure that the RA axle is
at the locking position. Remove the mount from the
package. Put it onto a pier/tripod top and secure it
with four included Base Mounting Screws.
2.
Installing the Counterweight (CW) Shaft:
Hold the
mount head with one hand, pull the RA Axle Locking
Knob outward, slowly rotate the mount RA 90 degree
to level position. Release the RA Axle Locking Knob to
lock the RA axis again.
Remove the CW shaft from the package and threaded
into the CW shaft mounting house.
3.
Setting the Latitude:
Loosen the Latitude Locking
Clamps about a quarter (1/4) turn with a 5mm Allen
wrench.
Turn the Latitude Adjustment Knob until the arrow
points to your current latitude on the Latitude Scale.
There are fine scales on the Knob, as shown in the
photo.
Tighten the Latitude Locking Clamps when done.
[
NOTE
: For those low latitude places between 0° to
10°, special low latitude CWs (#7326LL) are needed.
Please specify when order. ]
4.
Installing the Counterweight(s) and Telescope
:
Before installing the Counterweight(s), make sure
that mount is at Zero Position,
i.e.
, CW shaft is
pointing to ground. Both R.A. and DEC Axle Locking
Knobs are at the locking position (refer to Figure. 1).
Remove the CW Safety Cap at the end of CW Shaft.
Guide the CW over the shaft. Tighten the CW Locking
Screw to hold the CW in place. Place the Safety Cap
back onto the shaft.
You may need more CW for heavier payload, or
smaller size CW for lighter scope.


