background image


21 


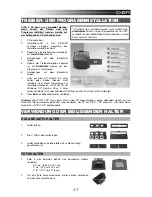
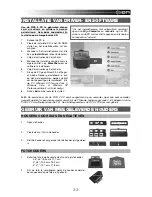
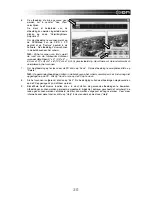
INSTALLAZIONE DRIVER E SOFTWARE 


Per poter utilizzare il PICS 2 PC occorre 
innanzitutto installare i driver ed il 
software.  Entrambi si trovano nel CD in 
dotazione. 

 
1.


Accendere il computer. 

2.


Inserire il CD d’installazione nel drive CD-
ROM: apparirà il menu d’installazione.  *


3.


Quando compare il menu d’installazione, 
cliccare su 

Install Driver (installa driver)

4.


Seguire le istruzioni su schermo. 

5.


Una volta completata l’installazione dei 
driver, cliccare su 

BlazePhoto

 per installare 

il software. 

6.


Seguire le istruzioni su schermo. 

7.


Se sul computer non sono installati DirectX 
versione 9.0 o superiore o Adobe Reader, 
cliccare su queste voci per installarle. (

Se il 

computer utilizza Windows XP Service Pack 
2 o superiore, Windows Vista, o Windows 
XP Professional, ciò non è necessario.

)


8.


Cliccare su 

Exit (esci)

 per chiudere la 

finestra.  


Nota bene: 

la prima volta che si collega il PICS 2 PC al computer, occorre attendere alcuni secondi, fino a 

quando non compare una finestra di dialogo recante la scritta "Found New Hardware" (“Trovato nuovo 
hardware”) (ciò significa che il computer riconosce il PICS 2 PC). Dopo aver visualizzato la finestra di 
dialogo, il PICS 2 PC è pronto per l’uso. 


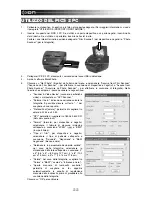
UTILIZZO DEI SUPPORTI IN DOTAZIONE 


PORTA DIAPOSITIVE E PORTA NEGATIVI 

 
1.


Aprire il supporto. 


2.


Inserirvi una diapositiva / una pellicola.   


3.


Chiudere il supporto e assicurarsi che sia ben chiuso.  


PORTAFOTO 

 
1.


Far scivolare la foto nello slot superiore del supporto 
adeguato:  

3,5" x 5" (8,9 cm x 12,7 cm) 


4" x 6" (10,2 cm x 15,2 cm) 


5" x 7" (12,7 cm x 17,8 cm) 


2.


Per rimuovere la foto, basta rovesciare il supporto e 
lasciare che questa scivoli fuori. 

Se il menu d’installazione non compare 

automaticamente, aprire 

Risorse del computer

 e fare 

doppio clic sul drive CD del computer per aprire il disco, 
quindi cliccare su "autorun". 

Summary of Contents for PICS 2 PC

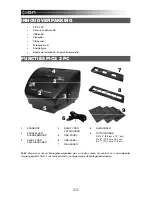
Page 1: ...PICS 2 PC USER GUIDE ENGLISH 1 6 GUÍA DEL USUARIO ESPAÑOL 7 12 GUIDE D UTILISATION FRANÇAIS 13 18 GUIDA UTENTE ITALIANO 19 24 BEDIENUNGSANLEITUNG DEUTSCH 25 30 GEBRUIKERSHANDLEIDING NEDERLANDS 31 36 ...

Page 2: ......

Page 3: ...ssly recommended for PICS 2 PC may lead to overheating distortion of the equipment fire electrical shock or other hazards PICS 2 PC may become slightly warm during use This does not indicate malfunction If the exterior of PICS 2 PC needs cleaning wipe it with a soft dry cloth FCC NOTICE This equipment has been tested and found to comply with the limits for a Class B digital device pursuant to Part...

Page 4: ...FEATURES 1 SCAN BUTTON 2 SCANNER MODE SWITCH 3 FILM SLIDE HOLDER SLOT 4 PHOTO HOLDER SLOT 5 USB PORT 6 USB CABLE 7 SLIDE HOLDER 8 FILM HOLDER 9 PHOTO HOLDERS 3 5 x 5 4 x 6 5 x 7 Note Please make sure your film negatives mounted slides and cover trays are clean before inserting into the copier Dust or dirt will affect the quality of your scanned images 1 2 2 3 4 5 6 7 8 9 ...

Page 5: ...higher Windows Vista or Windows XP Professional this is not necessary 8 Click Exit to close the window Note The first time you connect PICS 2 PC to your computer wait a few seconds until you see a dialog box that says Found New Hardware this means the computer recognizes the PICS 2 PC After you see this PICS 2 PC is ready to use USING THE INCLUDED HOLDERS SLIDE NEGATIVE HOLDERS 1 Open the holder 2...

Page 6: ... that appears you may see the following items Scanner Video Device This should be set to OVT Scanner Save Files In This is where your pictures will be saved You can click the button to choose a new location Color Depth Choose between 24 bit and 32 bit color DPI Choose between 1800 and 3600 DPI dots per square inch Format For slides and negatives select the format of each scanned image JPEG jpg or ...

Page 7: ...rop this out when you scan it 7 To save the image to your computer click Save To delete it click Delete Note The scanned images will appear in the bar at the top of the screen are not yet stored on your computer You must click Save to save them to your computer 8 When you are done scanning click Exit After exiting you will see the images you scanned and saved on your computer 9 BlazePhoto has seve...

Page 8: ... compatible Check all your USB ports to find the 2 0 compatible ports Warning from Windows that device has not passed Microsoft logo testing This is normal OK to continue Choose Continue anyway The image copier will not harm your computer Windows certification is in process for this software I am having trouble loading the software and or driver Possible incompatible operating system Ensure that y...

Page 9: ...presamente para el PICS 2 PC puede causar recalentamiento deformación del equipo incendio electrocución u otros riesgos El PICS 2 PC puede calentarse ligeramente durante el uso Esto no indica falla Si el exterior del PICS 2 PC necesita limpieza pásele un paño blando y seco AVISO DE LA FCC Este equipo fue probado y se comprobó que cumple los límites correspondientes a un dispositivo digital clase B...

Page 10: ...MODO DEL ESCÁNER 3 RANURA PARA EL SOPORTE DE PELÍCULA O DIAPOSITIVAS 4 RANURA PARA EL SOPORTE DE FOTOGRAFÍAS 5 PUERTO USB 6 CABLE USB 7 SOPORTE DE DIAPOSITIVAS 8 SOPORTE DE PELÍCULA 9 SOPORTES DE FOTOGRAFÍAS 3 5 x 5 8 9 cm x 12 7 cm 4 x 6 10 2 cm x 15 2 cm 5 x 7 12 7 cm x 17 8 cm Nota Asegúrese de que sus negativos y diapositivas montadas y las bandejas estén limpias antes de insertarlas en la cop...

Page 11: ...io 8 Haga clic en Exit Salir para cerrar las ventana Nota La primera vez que conecte el PICS 2 PC a la computadora espere algunos segundos hasta ver un cuadro de diálogo que diga Found New Hardware Encontrado nuevo hardware esto significa que la computadora reconoce el PICS 2 PC Cuando lo vea PICS 2 PC está listo para usar CÓMO USAR LOS SOPORTES INCLUIDOS SOPORTES DE DIAPOSITIVAS Y NEGATIVOS 1 Abr...

Page 12: ...tana que aparece podrá ver los siguientes elementos Escáner y dispositivo de video Ajústelo a OVT Scanner Guardar archivos en Éste es el lugar donde se guardarán sus imágenes Puede hacer clic en el botón para elegir una nueva ubicación Profundidad de color Elija entre colores de 24 y 32 bits DPI Elija entre 1800 y 3600 DPI puntos por pulgada cuadrada Format Formato Para diapositivas y negativos se...

Page 13: ...amente cuando escanea 7 Para guardar la imagen en la computadora haga clic en Save Para eliminarla haga clic en Delete Nota Las imágenes escaneadas aparecen en la barra de la parte superior de la pantalla y todavía no se guardan en la computadora Debe hacer clic en Save para guardarlas 8 Cuando termine de escanear haga clic en Exit Salir Después de salir verá las imágenes que escaneó y guardó en l...

Page 14: ...puertos USB para encontrar los compatibles con 2 0 Advertencia de Windows de que el dispositivo has not passed Microsoft logo testing no paso la prueba del logo de Microsoft Esto es normal Puede continuar Elija Continue anyway Continuar igualmente La copiadora de imágenes no dañará a su computadora La certificación de Windows de este software está en proceso Tengo problemas para cargar el software...

Page 15: ...er uniquement les accessoires d alimentation recommandés Utiliser des sources d alimentation qui ne sont pas recommandées pour le PICS 2 PC pourrait provoquer une surchauffe une distorsion de l équipement un incendie un choc électrique ou d autres dangers Le PICS 2 PC devient légèrement chaud pendant l utilisation Cela ne signifie pas une défectuosité Si l extérieur du PICS 2 PC nécessite un netto...

Page 16: ...N 3 EMPLACEMENT POUR PORTE NÉGATIF PORTE DIAPOSITIVE 4 EMPLACEMENT POUR PORTE PHOTO 5 PORT USB 6 CÂBLE USB 7 PORTE DIAPOSITIVES 8 PORTE NÉGATIFS 9 PORTES PHOTO 3 5 po x 5 po 8 9 cm x 12 7 cm 4 po x 6 po 10 2 cm x 15 2 cm 5 po x 7 po 12 7 cm x 17 8 cm Remarque Veuillez vous assurer que les supports ainsi que les négatifs diapositives ou photos sont propres et dépourvues de poussière avant de les in...

Page 17: ...rmer la fenêtre Remarque La première fois que vous branchez le PICS 2 PC à votre ordinateur attendez quelques minutes jusqu à ce que la boîte de dialogue Ajout de nouveau matériel détecté s affiche indiquant que l ordinateur reconnait le PICS 2 PC Une fois ce message affiché le PICS 2 PC est prêt à utiliser UTILISATION DES SUPPORTS PORTE DIAPOSITIVES ET PORTE NÉGATIFS 1 Ouvrez le porte diapositive...

Page 18: ...options suivantes s affichent Scanner Vidéo Equipement Ce paramètre doit être réglé sur OVT Scanner Sauvier Fichiers dans Ceci est le fichier où seront sauvegardées les images Vous pouvez cliquer sur afin de sélectionner un nouvel emplacement Profondeur de Couleur Sélectionnez entre couleurs 24 bits et 32 bits DPI Sélectionnez entre 1800 et 3600 DPI points par pouce Format Pour les diapositives et...

Page 19: ... afin de sauvegarder l image sur votre ordinateur Pour la supprimer cliquez sur Delete Remarque Les images qui s affichent dans la barre dans le haut de l écran n ont pas encore été sauvegardées Vous devez cliquer sur Save afin de les sauvegarder sur votre ordinateur 8 Lorsque la numérisation est terminée cliquez sur Exit pour quitter Après avoir quitté vous verrez les images que vous avez numéris...

Page 20: ...n USB 2 0 installé tous vos ports USB peuvent ne pas prendre en charge USB 2 0 Vérifier tous vos ports USB pour déterminer celui qui prend en charge le 2 0 Avertissement de Windows que l appareil a échoué à l évaluation du logo Microsoft Cela est normal Ok pour continuer Sélectionner Continuer Le numériseur n endommagera as votre ordinateur L autorisation de Windows est en cours pour ce logiciel J...

Page 21: ...nti di alimentazione non espressamente raccomandate per lo PICS 2 PC può portare a surriscaldamento distorsione dell apparecchio incendio scossa elettrica o altri pericoli Durante l uso lo PICS 2 PC si può riscaldare leggermente Ciò non è segno di malfunzionamento Se la parte esterna dello PICS 2 PC richiede di essere pulita passarla con un panno morbido e asciutto DICHIARAZIONE FCC Questo disposi...

Page 22: ...SLOT PER PORTA PELLICOLE PORTA DIAPOSITIVE 4 SLOT PER PORTAFOTO 5 PORTA USB 6 CAVO USB 7 PORTA DIAPOSITIVE 8 PORTA PELLICOLE 9 PORTAFOTO 3 5 x 5 8 9 cm x 12 7 cm 4 x 6 10 2 cm x 15 2 cm 5 x 7 12 7 cm x 17 8 cm Nota bene assicurarsi che i negativi le diapositive e i vassoi siano puliti prima di inserirli a loro volta nel dispositivo di copia La polvere o lo sporco influiranno negativamente sulla qu...

Page 23: ...are su Exit esci per chiudere la finestra Nota bene la prima volta che si collega il PICS 2 PC al computer occorre attendere alcuni secondi fino a quando non compare una finestra di dialogo recante la scritta Found New Hardware Trovato nuovo hardware ciò significa che il computer riconosce il PICS 2 PC Dopo aver visualizzato la finestra di dialogo il PICS 2 PC è pronto per l uso UTILIZZO DEI SUPPO...

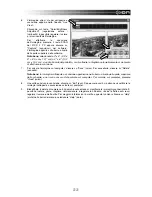
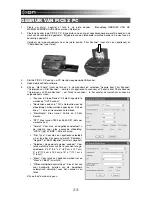
Page 24: ...deo Device scanner e periferiche video va impostato su OVT Scanner Salvare i file in indica dove verranno salvate le fotografie È possibile cliccare sul tasto per scegliere un nuovo punto Profondità di colore permette di scegliere tra colore a 24 bit e a 32 bit DPI permette di scegliere tra 1800 e 3600 DPI dots per square inch Format formato per diapositive e negativi selezionare il formato di cia...

Page 25: ... 7 Per salvare l immagine sul computer cliccare su Save salva Per cancellarla cliccare su Delete cancella Nota bene le immagini sottoposte a scansione appariranno nella barra a livello della parte superiore dello schermo e non sono ancora state salvate sul computer Per salvarle sul computer premere Save salva 8 Una volta conclusa la scansione cliccare su Exit esci Dopo essere usciti si potranno vi...

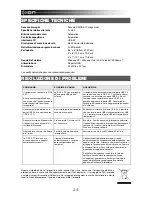
Page 26: ...on USB 2 0 Controllare tutte le porte USB per trovare quelle compatibili 2 0 Ricevuto l avviso da Windows che il dispositivo non ha superato il test logo di Microsoft Ciò è normale Cliccare su OK per continuare Scegliere Continue anyway prosegui ugualmente Il dispositivo di copia delle immagini non danneggerà il computer È in corso il processo di certificazione Windows di questo software Ho proble...

Page 27: ...wenden Sie nur die empfohlenen Netzteile Die Verwendung einer Stromzufuhr die nicht explizit für den PICS 2 PC empfohlen ist kann zu Überhitzung verbogenen Geräteteilen Feuer elektrischem Schlag und anderen Gefährdungen führen Der PICS 2 PC kann sich beim Betrieb leicht erwärmen Hierbei handelt es sich um keine Betriebsstörung Wenn der PICS 2 PC von außen gereinigt werden muss wischen Sie ihn mit ...

Page 28: ...ALTER 3 SCHLITZ F FILM DIAHALTER 4 SCHLITZ F FOTOHALTER 5 USB ANSCHLUSS 6 USB KABEL 7 DIAHALTER 8 FILMHALTER 9 FOTOHALTER 3 5 x 5 8 9 cm x 12 7 cm 4 x 6 10 2 cm x 15 2 cm 5 x 7 12 7 cm x 17 8 cm Hinweis Bitte sicherstellen dass alle Filmnegative Dias und Objektträger sauber sind bevor sie in den Scanner eingeführt werden Staub oder Schmutz beeinträchtigen die Qualität der gescannten Bilder 1 2 2 3...

Page 29: ...ndows Vista oder Windows XP Professional läuft ist dies nicht notwendig 8 Über Exit das Bildschirmfenster schließen Hinweis Wird PICS 2 PC zum ersten Mal an den PC angeschloseen einige Sekunden warten bis die Nachricht Neue Hardware gefunden dies bedeutet der PC hat PICS 2 PC erkannt Erscheint diese Nachricht ist PICS 2 PC betriebsbereit VERWENDUNG DER BEILIEGENDEN HALTER DIA NEGATIV HALTER 1 Halt...

Page 30: ...m daraufhin erscheinenden Dialogfenster sind die folgenden Parameter aufgeführt Scanner Video Device Dieser Parameter sollte auf OVT Scanner gesetzt werden Spechiern von Dateien in Das Verzeichnis in dem die Bilder gespeichert werden Mit einem Klick auf lässt sich diese ändern Farbe Farbtiefe Farbeinstellung wahlweise 24 bit und 32 bit DPI Wahlweise 1800 und 3600 DPI Punkte pro Quadratinch Format ...

Page 31: ... klicken Um es zu löschen auf Delete klicken Hinweis Die gescannten Bilder die in der oberen Leiste des Bildschirms angezeigt werden sind noch nicht auf dem PC gespeichert Sie werden durch Klicken auf Save im PC gespeichert 8 Wenn das Scanvorgang beendet ist auf Exit klicken Nach Verlassen des Programms können die gescannten und auf dem PC gespeicherten Bilder betrachtet werden 9 BlazePhoto besitz...

Page 32: ...kompatibel Überprüfen Sie alle USB Ports und finden Sie heraus welche von ihnen 2 0 kompatibel sind Windows Warnmeldung Gerät hat den Microsoft Logo Test nicht bestanden Das ist normal Sie können weiterarbeiten Wählen Sie Trotzdem fortfahren Der Bildkopierer schädigt Ihren Computer nicht Die Windows Zertifizierung der Software ist noch nicht abgeschlossen Ich habe Schwierigkeiten beim Laden der So...

Page 33: ...itting vervorming van de apparatuur brand elektrische schok of andere gevaren De PICS 2 PC kan tijdens gebruik warm worden Dit is geen storing Als de buitenkant van de PICS 2 PC reiniging behoeft reinig deze dan met een zachte droge doek FCC WAARSCHUWING Deze apparatuur is getest en is in overeenstemming met de limieten voor een digitaal apparaat van klasse B zoals vermeld in Deel 15 van de FCC re...

Page 34: ...NNERMODUS 3 SLEUF VOOR FILM DIAHOUDER 4 SLEUF VOOR FOTOHOUDER 5 USB POORT 6 USB KABEL 7 DIAHOUDER 8 FILMHOUDER 9 FOTOHOUDERS 3 5 x 5 8 9 cm x 12 7 cm 4 x 6 10 2 cm x 15 2 cm 5 x 7 12 7 cm x 17 8 cm N B Zorg ervoor dat uw filmnegatieven geladen dia s en laden schoon zijn voordat ze in de kopieerder worden geplaatst Stof of vuil zal de kwaliteit van uw gescande afbeeldingen beïnvloeden 1 2 2 3 4 5 6...

Page 35: ...ows XP Professional draait is dit niet nodig 8 Klik op Exit om het venster te sluiten N B De eerste keer dat de PICS 2 PC wordt aangesloten op uw computer moet ene paar seconden gewacht worden tot een dialoogvenster verschijnt met Nieuwe hardware gevonden dit betekent dat de PICS 2 PC wordt herkend door de PC Na dit dialoogvenster is de PICS 2 PC klaar voor gebruik GEBRUIK VAN MEEGELEVERDE HOUDERS...

Page 36: ...enster dat verschijnt kunnen de volgende items staan Scanner Video Device Dit dient ingesteld te worden op OVT Scanner Bestanden opslaan in Dit is de locatie waar de afbeeldingen zullen worden opgeslagen Klik op knop om een nieuwe locatie te kiezen Kleurdiepte Kies tussen 24 bits en 32 bits kleuren DPI Kies tussen 1800 en 3600 DPI dots per vierkante inch Format Voor dia s en negatieven selecteert ...

Page 37: ...n bij het scannen 7 Om de afbeelding op te slaan naar de PC klikt u op Save Om de afbeelding te verwijderen klikt u op Delete N B De gescande afbeeldingen zullen in de balk bovenin het scherm verschijnen ze zijn dan nog niet opgeslagen op de PC Klik op Save om ze op de PC op te slaan 8 Als het scannen is afgerond klik dan op Exit Na beëindiging zullen de afbeeldingen die gescand en op de PC opgesl...

Page 38: ...le USB poorten om die poorten te vinden die voor versie 2 0 geschikt zijn Windows waarschuwing dat het apparaat geen Microsoft logotesten heeft doorstaan Dit is normaal Klik op OK om door te gaan Kies Toch doorgaan Het apparaat is niet schadelijk voor de PC Er wordt aan Windows certificering voor deze software gewerkt Er zijn problemen met het laden van de software en of driver Mogelijk ongeschikt...

Page 39: ...Made in China MANUAL VERSION 1 6 ...

Page 40: ...www ionaudio com ...

Reviews: