background image

30

Préparation de l’ordinateur

Préparation de l’ordinateur

Préparation de l’ordinateur

Préparation de l’ordinateur

Préparation de l’ordinateur

1

Retirez les disques (CD-ROM ou disquette) se trouvant
éventuellement dans les lecteurs, placez les commutateurs
d’alimentation de l’ordinateur et de l’imprimante en position

Arrêt

, puis 

débranchez

 le cordon d’alimentation.

AVERTISSEMENT : 

 Avant d’apporter la moindre modification à la configuration

matérielle de l’ordinateur, veillez à toujours débrancher ce dernier du secteur.

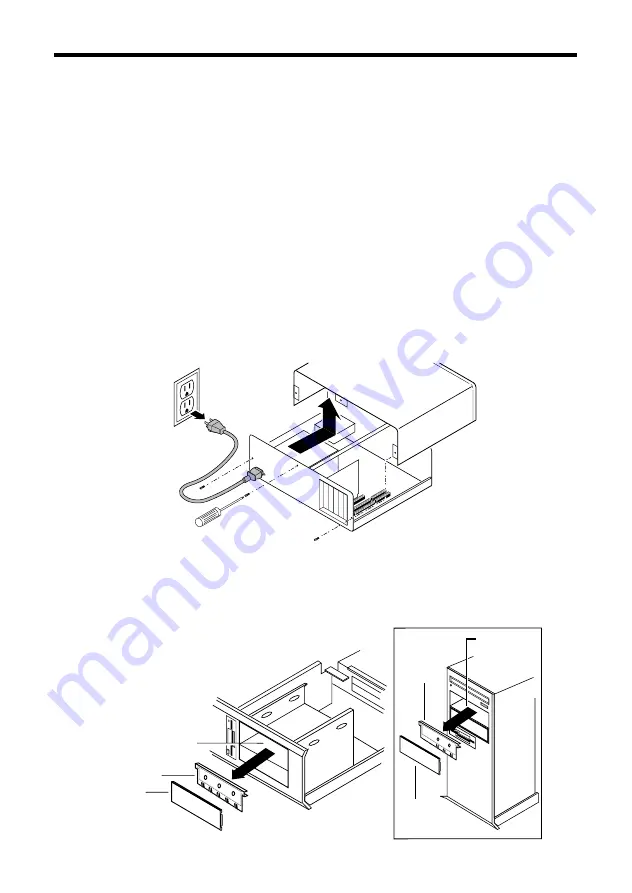
2

Retirez le capot de l’ordinateur.

(Sur la plupart des ordinateurs, le capot est maintenu à l’aide de trois ou quatre vis
sur le panneau arrière.  En cas de doute, reportez-vous au guide qui accompagne
votre ordinateur.)

Débranchez 
 le cordon
d'alimentation 
  

3

Localisez une baie pour lecteur 5,25 pouces disponible.
Retirez la protection en plastique et si nécessaire la
plaque métallique.

plaque métallique

protection en 
   plastique

Baie 5,25 pouces

Modèle en tour

plaque
métallique

protection en 
   plastique

Baie 5,25 pouces

Summary of Contents for Ditto Tape Drive

Page 1: ...stallation des Ditto Bandlaufwerks Installation du lecteur de bande Ditto Installazione dell unità a nastro Ditto Het Ditto tapestation installeren Installation av Ditto bandstation dittoTM Because it s your stuff Internal Tape Drive ...

Page 2: ......

Page 3: ... Contents Ditto Tape Drive Installation 4 Installation des Ditto Bandlaufwerks 16 Installation du lecteur de bande Ditto 28 Instalación de la unidad de cinta Ditto 40 Installazione dell unità a nastro Ditto 52 Het Ditto tapestation installeren 64 Installation av Ditto bandstation 76 ...

Page 4: ...y simply put the Ditto Tools CD into your CD ROM drive and follow the directions below for your operating system Windows 95 and NT 1 Quit out of the software installation that may start when you insert the CD 2 Click the Start button and choose Run 3 Type X video32 exe where X is the letter for your CD ROM drive and click OK Windows 3 1 and higher 1 Choose Run from the Program Manager s File menu ...

Page 5: ...w driver and perhaps a flathead screwdriver We also recommend that you set your computer on a table not the floor to install the drive If you are installing a Ditto Dash accelerator card see the Ditto Dash Installation Guide and install the card before installing the drive Getting Started Getting Started Getting Started Getting Started Getting Started Unpack the tape drive and accessories onto a t...

Page 6: ...nnect computer electrical power at the power source before beginning any computer hardware change 2 Remove the computer cover Most computers have three or four screws on the rear panel that hold the cover Refer to your computer manual if removal is unclear Disconnect power 3 Locate a vacant 51 4 inch drive bay Remove the plastic cover and if necessary the metal shield Metal Shield Plastic Cover 51...

Page 7: ...Dash DX Accelerator Card If you did not purchase a Ditto Max tape drive go directly to step 10 If you did purchase a Ditto Max tape drive you received an additional piece of hardware a Ditto Dash DX accelerator card You should now install the Ditto Dash DX 5 Locate a vacant 16 bit expansion slot and remove the expansion slot cover Use the 16 bit expansion slot Expansion Slot Cover remove Computers...

Page 8: ... shown below Tape Cable Accelerator Card 8 Install the accelerator card into the 16 bit expansion slot by pushing firmly on the accelerator edge until it clicks into the slot secure with a screw Accelerator Card Ditto Dash Tape Cable 16 Bit Expansion Slot ...

Page 9: ...ind where it connects to your computer You can trace the cable from the rear of your floppy drive to its connection on the computer 11 Now look at the cable and find the striped edge making a note of how the stripe on the cable is oriented to the connector Is it on the left or right side top or bottom 12 After identifying the striped edge of the floppy drive cable unplug it from the computer Co Fl...

Page 10: ...ble Be sure maintain the stripe orientation Floppy Drive Cable Computer Tape Drive Note The most common mistake made when installing a tape drive occurs when the cables are connected improperly To avoid this problem be sure to plug the striped edge into Pin One and plug the cable onto the pins properly ...

Page 11: ...14 Next connect the floppy cable to the tape cable so that the stripe is on the same side Tape Drive Cable Floppy Drive Cable 15 Feed the free end of the tape cable out through the open bay of the computer ...

Page 12: ...or P P P P Preparing the Tape Drive reparing the Tape Drive reparing the Tape Drive reparing the Tape Drive reparing the Tape Drive 17 Check your computer s mounting requirements your drive bay may require side rails Hint Use the same mounting hardware as on similar drives in your system See your computer dealer for any special hardware ...

Page 13: ...Tape Drive 18 Connect the tape cable to the back of the tape drive with the stripe towards the power connector Stripe Edge of Cable Stripe Edge of Cable Ditto Easy 3200 Tape Drive or Ditto 2GB Tape Drive Ditto Max Tape Drive or Ditto Max Professional Tape Drive 19 Slide the tape drive into the drive bay 51 4 inch Installation ...

Page 14: ...ack of the drive Ditto Easy 3200 Tape Drive or Ditto 2GB Tape Drive Ditto Max Tape Drive or Ditto Max Professional Tape Drive Power Supply Ca Power Supply Cable 21 If necessary secure the drive in the drive bay using the screws shipped with your drive Drive Bay Mounting Screws ...

Page 15: ...23 Reconnect the power cord turn on the power switch and wait for DOS or Windows to start Now use your Software Installation Guide to install the software Note If you are using Windows 95 the Found New Hardware window will display as soon as Windows 95 starts Simply cancel that window and follow the software installation instructions ...

Page 16: ...für Ihr Betriebssystem aus Windows 95 und NT 1 Beenden Sie die Software Installation die beim Einlegen der CD eventuell gestartet wird 2 Klicken Sie auf die Schaltfläche Start und wählen Sie Ausführen 3 Geben Sie X video32 exe ein wobei X für den Buchstaben Ihres CD ROM Laufwerks steht und klicken Sie auf OK Windows 3 1 und höher 1 Wählen Sie Ausführen im Menü Datei des Programm Managers 2 Geben S...

Page 17: ...ollten Sie den Computer zur Installation des Bandlaufwerks auf einen Tisch nicht auf den Boden stellen Wenn Sie eine Ditto Dash Beschleunigungskarte haben lesen Sie bitte den Ditto Dash Installation Guide und installieren Sie die Karte bevor Sie das Bandlaufwerk in Betrieb nehmen Erste Schritte Erste Schritte Erste Schritte Erste Schritte Erste Schritte Nehmen Sie das Bandlaufwerk und die Zubehört...

Page 18: ...s Computers ab bevor Sie Änderungen an der Hardware lhres Computers vornehmen 2 Nehmen Sie die Computerabdeckung ab An den meisten Computern ist die Abdeckung durch drei oder vier Schrauben an der Rückseite befestigt Schlagen Sie in lhrem Computerhandbuch nach falls Sie Hilfe benötigen Aus der Steckdose ziehen 3 Wenn Sie einen freien 5 25 Zoll Laufwerkschacht gefunden haben nehmen Sie die Plastik ...

Page 19: ...unigungskarte Installation der Ditto Dash DX Beschleunigungskarte Wenn Sie nicht das Ditto Max Bandlaufwerk erworben haben gehen Sie direkt zu Schritt 10 Wenn Sie ein Ditto Max Bandlaufwerk erworben haben haben Sie eine zusätzliche Hardware erhalten eine Ditto Dash DX Beschleunigungskarte Sie sollten jetzt diese Beschleunigungskarte installieren 5 Suchen Sie einen freien 16 Bit Erweiterungssteckpl...

Page 20: ...schleunigungskarte an wie im folgenden gezeigt Ditto Dash Bandbeschleuniger Bandlaufwerk Kabel 8 Installieren Sie die Beschleunigungskarte im 16 Bit Erweiterungssteckplatz indem Sie sie fest auf der Seite andrücken bis sie in den Steckplatz einrastet Befestigen Sie sie mit einer Schraube Ditto Dash Bandbeschleuniger ...

Page 21: ...aus wo es an Ihren Computer angeschlossen ist Sie können das Kabel von der Rückseite Ihres Diskettenlaufwerks bis zu seinem Anschluß an Ihrem Computer verfolgen 11 Sehen Sie sich nun das Kabel an Auf einer Kabelseite befindet sich ein farbiger Streifen Merken Sie sich wie der Streifen zum Anschluß hin ausgerichtet ist Befindet er sich links oder rechts oben oder unten 12 Nachdem Sie den farbigen S...

Page 22: ...werkkabel entfernt haben Behalten Sie die richtige Streifenausrichtung bei Diskettenlaufwerkkabel Computer Bandlaufwer Hinweis Der häufigste Fehler bei der Installation eines Bandlaufwerks ist das unsachgemäße Anschließen der Kabel Dieses Problem vermeiden Sie indem Sie die farbige Kante auf Stift 1 und das Kabel richtig auf die Stifte stecken ...

Page 23: ... Diskettenlaufwerkkabel so an das Bandlaufwerkkabel an daß sich der Streifen auf derselben Seite befindet 15 Führen Sie das lose Ende des Bandlaufwerkkabels durch den offenen Schacht des Computers Diskettenlaufwerkkabel Bandlaufwerkkabel ...

Page 24: ...eiten Das Bandlaufwerk vorbereiten Das Bandlaufwerk vorbereiten Das Bandlaufwerk vorbereiten Das Bandlaufwerk vorbereiten 17 Überprüfen Sie die Installationsanforderungen Ihr Laufwerk benötigt eventuell Befestigungsschienen Tip Verwenden Sie die gleiche Installationshardware wie bei ähnlichen Laufwerken in lhrem System Die nötige Hardware ist bei lhrem Computerhändler erhältlich ...

Page 25: ...e das Bandlaufwerkkabel an der Rückseite des Bandlaufwerks mit dem Streifen in Richtung Stromanschluß an Ditto Easy 3200 Bandlaufwerk Ditto 2GB Bandlaufwerk Ditto Max Tape Bandlaufwerk Ditto Max Professional Bandlaufwerk Markierte Seite des Flachbandkabels Markierte Seite des Flachbandkabe 19 Schieben Sie das Bandlaufwerk in den Laufwerkschacht 5 25 Zoll Installation ...

Page 26: ...dlaufwerks an Ditto Easy 3200 Bandlaufwerk Ditto 2GB Bandlaufwerk Ditto Max Bandlaufwerk Ditto Max Professional Bandlaufwerk Netzkabel Netzkabel 21 Befestigen Sie das Laufwerk falls nötig mit den Schrauben die mit der Halterung geliefert wurden Halterungsschrauben für Laufwerkbucht ...

Page 27: ...N und WARTEN Sie bis DOS oder Windows auf lhrem Computer erscheinen 24 Legen Sie die CD mit der Backup Software in das CD ROM Diskettenlaufwerk ein Sie müssen die mit dem Laufwerk gelieferte Backup Software installieren 25 Weitere Informationen finden Sie im Backup Softwarehandbuch im Abschnitt zur Installation der Backup Software DOS oder Windows Das Backup Softwarehanbuch enthält außerdem Inform...

Page 28: ... les instructions ci dessous suivant le système d exploitation utilisé Windows 95 et NT 1 Quittez le programme d installation qui peut s afficher lors de l insertion du CD 2 Cliquez sur le bouton Démarrer et choisissez Exécuter 3 Tapez X video32 exe X étant l identificateur de votre lecteur de CD ROM et cliquez sur OK Windows 3 1 et supérieure 1 Choisissez l option Exécuter du menu Fichier du Gest...

Page 29: ...d un tournevis à tête conique Nous vous conseillons également de poser l ordinateur sur une table et non à même le sol Si vous installez la carte accélératrice Ditto Dash reportez vous au Guide d installation Ditto Dash et installez la carte avant le lecteur de bande Mise en route Mise en route Mise en route Mise en route Mise en route Déballez le lecteur de bande et ses accessoires Attention Avan...

Page 30: ...tion à la configuration matérielle de l ordinateur veillez à toujours débrancher ce dernier du secteur 2 Retirez le capot de l ordinateur Sur la plupart des ordinateurs le capot est maintenu à l aide de trois ou quatre vis sur le panneau arrière En cas de doute reportez vous au guide qui accompagne votre ordinateur Débranchez le cordon d alimentation 3 Localisez une baie pour lecteur 5 25 pouces d...

Page 31: ...itto Installation de la carte accélératrice Ditto Dash DX Dash DX Dash DX Dash DX Dash DX Si vous n avez pas le lecteur de bande Ditto Max à installer passez directement à l étape 10 En revanche si vous avez acheté ce lecteur vous disposez d un élément supplémentaire la carte accélératrice Ditto Dash DX qu il vous faut installer maintenant 5 Recherchez un emplacement d extension 16 bits disponible...

Page 32: ...stré ci dessous Cable Accélérateur de bande Ditto Dash 8 Placez la carte accélératrice dans l emplacement d extension 16 bits en appuyant fermement sur le bord de la carte jusquà ce qu elle s y embo te parfaitement Utilisez un tournevis pour la maintenir en place Accélérateur de bande Ditto Dash un connecteur d extension 16 bits ...

Page 33: ... repérez le câble du lecteur de disquette ainsi que le port auquel il est connecté sur l ordinateur Il vous suffit pour cela de remonter le long du câble de l arrière du lecteur de disquette jusqu à son point de connexion sur l ordinateur 11 Prenez le câble et notez l orientation de la rayure sur l arête du câble Se trouve t elle à gauche à droite au dessus ou au dessous 12 Après identification de...

Page 34: ... disquette Veillez à respecter l orientation de la rayure Câble du lecteur de disquette Ordinateur Cåble du l de bande Remarque Les erreurs les plus fréquemment commises lors de l installation d un lecteur de bande sont souvent dues aux connexions incorrectes Pour éviter tout problème veillez à faire coïncider la rayure avec la broche 1 et à bien enfoncer le connecteur sur les broches ...

Page 35: ...tte à celui du lecteur de bande de sorte que les rayures soient du même côté Cåble du lecteur de diquette Cåble du lecteur de bande 15 Faites passer l extrémité non connectée du câble du lecteur de bande à travers l ouverture de la baie de l ordinateur ...

Page 36: ...Préparation du lecteur de bande réparation du lecteur de bande réparation du lecteur de bande réparation du lecteur de bande réparation du lecteur de bande 17 Vérifiez les exigences de montage de votre ordinateur la baie du lecteur peut nécessiter des rails latéraux Conseil Utilisez le même matériel de montage que sur les lecteurs similaires de votre système Si vous avez besoin d un équipement spé...

Page 37: ... de bande Connexion du lecteur de bande Connexion du lecteur de bande 18 Connectez le câble du lecteur de bande à l arrière du lecteur comme illustré ci dessous Lecteur de bande Rayure sur l atête du câble 19 Insérez le lecteur de bande dans la baie Installation du lecteur 5 25 pouces ...

Page 38: ...entation que vous avez trouvé à l étape 16 Ditto Easy 3200 Ditto 2GB Ditto Max Ditto Max Professional Câble d alimentation Câble d aliment 21 Si nécessaire fixez le lecteur dans la baie à l aide des vis fournies Vis de montage de l emplacement de lecteur ...

Page 39: ...ttez l ordinateur sous tension et attendez le démarrage du DOS ou de Windows 24 Insérez le CD ROM du logiciel de sauvegarde dans le lecteur de CD ROM Vous devez impérativement installer le logiciel de sauvegarde livré avec le lecteur 25 Passez maintenant à la section Installation du logiciel Cette section traite également en détail de l utilisation du lecteur de bande et du logiciel en vue d obten...

Page 40: ... exe donde X representa la letra de la unidad de CD ROM y haga clic en Aceptar Use el vídeo tantas veces como sea necesario y a la vez Use el vídeo tantas veces como sea necesario y a la vez Use el vídeo tantas veces como sea necesario y a la vez Use el vídeo tantas veces como sea necesario y a la vez Use el vídeo tantas veces como sea necesario y a la vez siga los pasos en la guía impresa recuerd...

Page 41: ...ecomendamos que para instalar la unidad sitúe el PC sobre una mesa no sobre el suelo Si instala una tarjeta de aceleración Ditto Dash consulte la guía de instalación de Ditto Dash e instale la tarjeta antes de instalar la unidad Procedimientos iniciales Procedimientos iniciales Procedimientos iniciales Procedimientos iniciales Procedimientos iniciales Desempaquete la unidad de cinta y los accesori...

Page 42: ...io de hardware en el PC 2 Retire la cubierta del PC La mayoría de los PCs tienen tres o cuatro tornillos en el panel posterior que sujetan la cubierta Consulte el manual del PC si no entiende bien cómo retirar la cubierta Desconectar 3 Localice un compartimento de unidad disponible de 5 25 pulgadas Retire la cubierta de plástico y si es necesario retire también el protector de metal Protección met...

Page 43: ...itto Dash DX Instalación de la tarjeta aceleradora Ditto Dash DX Si usted no compró la unidad de cinta Ditto Max continúe con el paso 10 Si usted compró la unidad de cinta Ditto Max también ha recibido una pieza de hardware adicional una tarjeta aceleradora Ditto Dash DX Le recomendamos instalar Ditto Dash DX en este momento 5 Localice una ranura de expansión disponible de 16 bits y retire la cubi...

Page 44: ...a como se muestra a continuación Cable Acelerador de cinta Ditto Dash 8 Instale la tarjeta aceleradora en la ranura de expansión de 16 bits empujando firmemente el borde de la misma hasta que ésta encaje en la ranura asegúrela con un tornillo Acelerador de cinta Ditto Dash Usted puede utilizar una ranura de expansión de 16 bits ...

Page 45: ... de la unidad flexible y verifique dónde se conecta a la computadora Puede rastrear el cable desde la parte posterior de la unidad flexible hasta su conexión a la computadora 11 A continuación mire el cable y busque la línea coloreada tomando nota de la dirección en que dicha línea coloreada está conectada está en el lado izquierdo o derecho arriba o abajo 12 Despúes de identificar la línea colore...

Page 46: ...ese de que la línea coloreada mantiene la misma dirección Cable de la unidad de disco PC Cable de l unidad de Nota Los errores más comunes al instalar una unidad de cinta se producen porque los cables no se han conectado adecuadamente Para evitar este problema asegúrese de conectar la línea coloreada en la patilla uno y conectar el cable en las patillas de forma adecuada ...

Page 47: ...e de la unidad flexible al cable de la unidad de cinta de forma que la banda esté en la misma parte Cable de unidad de disco Cable de unidad de cinta 15 Pase el extremo libre del cable de la cinta hacia fuera a través de la bandeja del PC ...

Page 48: ...a unidad de cinta Preparación de la unidad de cinta Preparación de la unidad de cinta Preparación de la unidad de cinta Preparación de la unidad de cinta 17 Revise los requisitos de montaje es posible que su unidad requiera rieles laterales Sugerencia Use el mismo hardware de montaje que utiliza con otras unidades similares en su sistema Llame a su distribuidor de PCs para cualquier hardware espec...

Page 49: ...ta Conexión de la unidad de cinta 18 Conecte el cable de la cinta a la parte posterior de la unidad de cinta como se muestra a continuacición Ditto Easy 3200 Ditto 2GB Ditto Max Ditto Max Professional Cinta coloreada Cinta coloreada 19 Deslice la unidad de cinta en el compartimento de la unidad Instalación de 5 1 4 pulgadas ...

Page 50: ...e la unidad Ditto Easy 3200 Ditto 2GB Ditto Max Ditto Max Professional Cable de alimentación Cable de alim 21 Si es necesario asegure la unidad en el compartimento de unidad utilizando los tornillos que se le enviaron con el soporte corredero del disco Tornillos de montaje del compartimento de la unidad ...

Page 51: ...el interruptor de alimentación y espere a que DOS o Windows se muestre en la pantalla 24 Inserte el CD del software de backup en la unidad de CD ROM usted debe instalar el software de backup que se le envió con la unidad 25 Ahora consulte su manual de software de backup y la sección acerca de la instalación de su software Su manual de software de backup tiene otras secciones que describen cómo opt...

Page 52: ...istruzioni presentate di seguito relative al sistema operativo in uso Windows 95 e NT 1 Interrompere l installazione del software che potrebbe essere stata avviata quando è stato inserito il CD 2 Fare clic sul pulsante Avvio e scegliere Esegui 3 Digitare X video32 exe dove X è la lettera che identifica l unità CD ROM e fare clic su OK Windows versione 3 1 e successive 1 Scegliere Esegui dal menu F...

Page 53: ...e a lama piatta Per montare l unità si consiglia anche di sistemare il computer su un tavolo non sul pavimento Se si installa una scheda acceleratrice Ditto Dash vedere la Guida di installazione di Ditto Dash e installare la scheda prima dell unità a nastro Come iniziare Come iniziare Come iniziare Come iniziare Come iniziare Togliere l unità a nastro e gli accessori dalla confezione Attenzione Pr...

Page 54: ...ma di intraprendere qualsiasi modifica ai componenti 2 Togliere il coperchio del computer Nella maggior parte dei computer il coperchio è bloccato con tre o quattro viti sul pannello posteriore Per qualsiasi problema consultare il manuale del computer Staccare l alimentazione 3 Individuare un alloggiamento libero per unità da 5 1 4 Smontare la mascherina in plastica e se necessario lo schermo meta...

Page 55: ...lla scheda acceleratrice Ditto Dash DX Dash DX Dash DX Dash DX Dash DX Se non è stata acquistata l unità a nastro Ditto Max andare direttamente al punto 10 Se è stata acquistata l unità a nastro Ditto Max insieme con questa è stata ricevuta anche la scheda acceleratrice Ditto Dash DX 5 Individuare uno slot di espansione a 16 bit libero e rimuovere la piastrina di protezione dello slot E possiblile...

Page 56: ...come mostrato nella figura seguente Cable Aceleratore per nastro Ditto Dash 8 Installare la scheda acceleratrice nello slot di espansione a 16 bit premendo con forza sulla scheda finché non è completamente inserita nello slot quindi fissarla con una vite Aceleratore per nastro Ditto Dash slot d espansione 16 bit ...

Page 57: ...e non si dispone di una scheda acceleratrice Ditto Dash DX individuare il cavo dell unità a dischetti e scoprire dove è collegato al computer Seguire il cavo partendo dal retro dell unità a dischetti fino a raggiungere il punto di collegamento al computer 11 Prendere nota dell orientamento del bordo colorato del cavo rispetto al connettore 12 Scollegare l unità dal computer ...

Page 58: ...l unità a dischetti Mantenere l orientamento del bordo colorato Cavo del floppy drive Computer Cavo del d a cassette Nota Un collegamento errato del cavo è uno degli errori più comuni durante il montaggio dell unità a nastro Accertarsi di aver collegato il bordo colorato del cavo al piedino 1 e che il connettore sia inserito correttamente sui piedini ...

Page 59: ...dischetti al cavo dell unità a nastro in modo che il bordo colorato si trovi sullo stesso lato Cavo del floppy drive Cavo del drive a cassette 15 Far uscire l estremità libera del cavo piatto attraverso l apertura dell alloggiamento sul computer ...

Page 60: ...ione dell unità a nastro Preparazione dell unità a nastro Preparazione dell unità a nastro Preparazione dell unità a nastro 17 Verificare i requisiti d installazione potrebbe essere necessario l uso di staffe Suggerimento Utilizzare lo stesso tipo di staffe usate per le altre unità installate nel computer Per gli eventuali accessori d installazione rivolgersi al rivenditore del computer ...

Page 61: ... a nastro Collegamento dell unità a nastro 18 Collegare il cavo piatto al connettore posto sul retro dell unità stessa con il bordo colorato dal lato del connettore di alimentazione Striscia Striscia Ditto Easy 3200 Ditto 2GB Ditto Max Ditto Max Professional 19 Inserire l unità nell alloggiamento Installazione da 51 4 pollici ...

Page 62: ...nto 11 al connettore sul retro dell unità a nastro Ditto Easy 3200 Ditto 2GB Ditto Max Ditto Max Professional Cavo di alimentazione Cavo di alime 21 Se necessario fissare l unità all alloggiamento usando le viti fornite Viti di montaggio del compartimento del drive ...

Page 63: ...puter e attendere l avviamento di DOS o Windows 24 Inserire il CD del software per il backup nell unità CD ROM È necessario installare il software per il backup allegato all unità 25 Consultare la sezione del manuale riguardante l installazione del software per il backup Le altre sezioni contenute nel manuale descrivono come usare al meglio l unità a nastro e il software ad essa allegato ...

Page 64: ... volgen voor het besturingssysteem waarmee u werkt Windows 95 en NT 1 Sluit de software installatie af die mogelijk wordt gestart wanneer u de CD plaatst 2 Klik op Start en kies Uitvoeren 3 Typ X video32 exe waarbij X de letter is van het CD ROM station en klik op OK Windows 3 1 en hoger 1 Kies Starten in het menu Bestand van Programmabeheer 2 Typ X video16 exe waarbij X de letter is van het CD RO...

Page 65: ...ruiskop schroevendraaier nodig Bovendien raden wij u aan uw computer op een tafel en niet op de grond te zetten tijdens de installatie van het station Wanneer u ook een Ditto Dash versnellerkaart installeert raadpleeg dan de handleiding bij Ditto Dash en installeer deze kaart voordat u het station installeert Vooraf Vooraf Vooraf Vooraf Vooraf Pak het tapestation en de accessoires uit Let Op Raak ...

Page 66: ...t de hardware gaat werken 2 Verwijder de computerkap Bij de meeste computers zit de de computerkap met drie of vier schroeven op de achterkant vast Raadpleeg de handleiding bij uw computer indien u niet precies weet hoe u de kap moet verwijderen Verbreek stroomvoorziening 3 De computer moet over een ongebruikt 5 1 4 inch compartiment beschikken Verwijder het plastic afdekplaatje en zonodig het met...

Page 67: ...ellerkaart installeren De Ditto Dash DX versnellerkaart installeren Als u geen Ditto Max tapestation hebt aangeschaft gaat u direct door naar stap 10 Als u wel een Ditto Max tapestation hebt aangeschaft hebt u hierbij een Ditto Dash DX versnellerkaart gekregen De Ditto Dash DX moet u nu installeren 5 Zoek een 16 bits uitbreidingsgleuf op en verwijder het afdekplaatje 16 bit uitbreidingsgleuf gebru...

Page 68: ...hieronder wordt afgebeeld Kable Ditto Dash tape accelerator 8 Installeer de versnellerkaart in de 16 bits uitbreidingsgleuf door stevig te drukken op de zijkant van de versnellerkaart totdat de kaart vastklikt in de gleuf Zet de kaart vast met een schroef Ditto Dash tape accelerator 16 bit uitbreidingsgleuf gebruiken ...

Page 69: ...iskettestation is en waar deze op de computer is aangesloten Volg de kabel vanaf de achterkant van het diskettestation tot de aansluiting met de computer 11 Kijk nu op welke manier de kabel op de computer is aangesloten hoe zit de streep op de kabel ten opzichte van de aansluiting Links of rechts boven of onder 12 Nadat u hebt gezien hoe de kabel is bevestigd trekt u deze uit de computer Computer ...

Page 70: ... streep op dezelfde plaats komt Floppy drive kabel Computer Tape drive Opmerking De meest voorkomende vergissing tijdens de installatie van tapestations is het onjuist aansluiten van de kabels U voorkomt dit probleem door de kant met de streep aan te sluiten op Pin 1 One en door ervoor te zorgen dat de kabel goed is aangesloten ...

Page 71: ...ls van het diskettestation en van het tapestation op zo n manier dat de streep aan dezelfde kant zit Floppy drive kabel Tape drive kabel 15 Laat het losse uiteinde van de tapekabel uit de opening van het compartiment hangen ...

Page 72: ...ion voorbereiden Het tapestation voorbereiden Het tapestation voorbereiden Het tapestation voorbereiden 17 Controleer of de montage speciale voorzieningen vereist het is mogelijk dat het compartiment over zijrails moet beschikken Tip Monteer het tapestation op dezelfde manier als de andere stations in uw computersysteem Neem contact op met uw computerleverancier als u speciaal gereedschap nodig he...

Page 73: ...ation aansluiten 18 Sluit de tapekabel aan op de achterkant van het tapestation zoals hieronder voor uw tapestation wordt afgebeeld Streep Streep Ditto Easy 3200 Tape Drive or Ditto 2GB Tape Drive Ditto Max Tape Drive or Ditto Max Professional Tape Drive 19 Schuif het tapestation in het compartiment 51 4 inch installatie ...

Page 74: ...gevonden aan op de achterkant van het station Ditto Easy 3200 Ditto 2GB Ditto Max Ditto Max Professional Stroomvoorzeiningkabel Stroomvoorz 21 Zet zonodig het station in het compartiment vast met de schroeven die bij het station zijn geleverd Drivebakmonteerschroeven ...

Page 75: ...ot u DOS of Windows op uw scherm krijgt 24 Plaats de CD met de reservekopie software in het CD ROM station Installeer de reservekopie software die bij het station werd geleverd 25 Zoek in de handleiding bij de reservekopie software het gedeelte over het installeren van de software Daarnaast vindt u in die handleiding hoe u het maximale voordeel uit uw tapestation en software haalt ...

Page 76: ...itto Tools i din CD romenhet och följ instruktionerna nedan för ditt operativsystem Windows 95 och NT 1 Avsluta installationsprogrammet om det startades när du satte in CD romskivan 2 Välj Kör på Start menyn 3 Skriv X video32 exe där X är bokstaven för CD romenheten och klicka på OK Windows 3 1 och högre 1 Välj Kör på Arkiv menyn i Filhanteraren 2 Skriv X video16 exe där X är bokstaven för CD rome...

Page 77: ...rekommenderar även att du ställer datorn på ett bord inte på golvet när du installerar enheten Om du installerar ett acceleratorkort av typen Ditto Dash följer du instruktionerna i Installationshandboken för Ditto Dash och installerar kortet innan du installerar bandenheten Komma igång Komma igång Komma igång Komma igång Komma igång Packa upp bandenheten med tillbehör Obs Innan du hanterar bandenh...

Page 78: ...strömförsörjning vid strömkällan innan du börjar göra ändringar i datorns maskinvara 2 Avlägsna datorns hölje De flesta datorer har tre eller fyra skruvar på baksidan som fäster höljet Läs i din datorhandbok om det är oklart hur man avlägsnar höljet Drag ut nätsladd 3 Leta reda på ett tomt 5 1 4 tums enhetsfack Ta bort plasten och om nödvändigt skyddsplåten Skyddsplaten Plasten Plasten 51 4 tums e...

Page 79: ...atorkortet Ditto Dash DX Installera acceleratorkortet Ditto Dash DX Hoppa direkt till steg 10 om du inte har köpt bandenheten Ditto Max Om du har köpt bandenheten Ditto Max fick du dessutom med acceleratorkortet Ditto Dash DX Nu är det dags att installera Ditto Dash DX 5 Hitta en ledig 16 bitars kortplats och avlägsna skyddsplåten 16 bitars kortplats Skydd för kortplats avlägsna 6 Hitta randen på ...

Page 80: ...ätt som visas nedan Kabel Ditto Dash bandaccelerator 8 Sätt in acceleratorkortet i kortplatsen genom att trycka nedåt på kanten av acceleratorkortet tills det hamnar på plats du hör ett klick Fäst kortet med en skruv 16 bitars kortplats Ditto Dash bandaccelerator ...

Page 81: ...Dash DX letar du reda på diskettenhetens kabel och tittar efter var den ansluter till datorn du kan spåra kabeln från baksidan av diskettenheten till anslutningen 11 Titta på kabeln hitta randen på kanten och kom ihåg hur randen på kabeln ligger i förhållande till kontakten Är den på den vänstra högra övre eller nedre sidan 12 Koppla ur diskettenhetens kabel Dato Diskettenhet Kabel till diskettenh...

Page 82: ... att randen hamnar på samma ställe som förut Kabel till diskettenhet Dator Kabe band Obs Det vanligaste misstaget när man ansluter bandenheter är att kablarna kopplas fel Undvik det problemet genom att se till att kanten med randen kopplas till stift 1 och se till att kabeln hamnar rätt över stiften ...

Page 83: ...teg är att koppla diskettenhetens kabel till bandenhetens kabel med ränderna på samma sida Kabel till diskettenhet Kabel till bandenhet 15 Mata ut den lösa änden av bandenhetens kabel genom datorns öppna enhetsfack ...

Page 84: ...römförsörjiningssladd Förbereda bandenheten Förbereda bandenheten Förbereda bandenheten Förbereda bandenheten Förbereda bandenheten 17 Kontrollera monteringskraven för din dator sidskenor kan behövas Tips Använd samma monteringstillbehör som för liknande enheter datorn Kontakta din datorförsäljare för speciella tillbehör ...

Page 85: ...bandenheten 18 Koppla bandenhetens kabel till bandenhetens baksida på det sätt som visas för din bandenhet nedan Rand Rand Ditto Easy 3200 Tape Drive or Ditto 2GB Tape Drive Ditto Max Tape Drive or Ditto Max Professional Tape Drive 19 Skjut in bandenheten i enhetsfacket 51 4 tums installation ...

Page 86: ...steg 16 till bandenhetens baksida Ditto Easy 3200 Ditto 2GB Ditto Max Ditto Max Professional Strömförsörjiningssladd Strömförsörji 21 Säkra bandenheten i enhetsfacket med skruvarna som medföljde bandenheten om det behövs Monteringsskruvar för enhetsfak ...

Page 87: ...ömbrytaren och vänta tills DOS eller Windows har startats 24 Sätt i CD romskivan med kopieringsprogrammet i en CD romenhet Du måste installera kopieringsprogrammet som medföljde bandenheten 25 Gå nu till avsnittet Installera programvaran i den här handboken Andra avsnitt i handboken för beskriver hur du utnyttjar din bandenhet och programvara till fullo ...

Page 88: ...rademarks of and Ditto and the graphic eye hand and swirl and trademarks of Iomega Corporation All other company and product names mentioned in this document are trademarks of their respective companies Copyright 1997 Iomega Corporation ML179803 ...

Reviews: