background image

14140 NE 200th St.   Woodinville, WA. 98072   PH: (425) 398-8282   FX: (425) 398-8383

FlexJet Carriage upgrade

Tools Required:


Philips screwdriver


9/64 (3.5mm) Allen wrench


5/16 (8mm) open end wrench


Small flat tipped screwdriver

Notices:

Warning!

 Ensure that all AC power cables are removed from the printer before attempting these procedures.

Attention!

 The discharge of static electricity may damage the carriage and logic board components. Use the included 

ground strap during all procedures. Keep plastic objects away from the carriage and logic board assemblies. 

Warning!

 The FlexJet is heavy and could cause serious injury or death if it falls or rolls over. Make sure that a minimum of 

two people move it, especially when detached from the stand.

Prepare the printer

a) Turn the FlexJet power off.

b) Clear paper from around the carriage.

c) Remove inkjet cartridges. Do NOT cover the 

cartridge heads with anything.

d) Remove the AC power cable and any other 

cables connected to the rear of the printer.

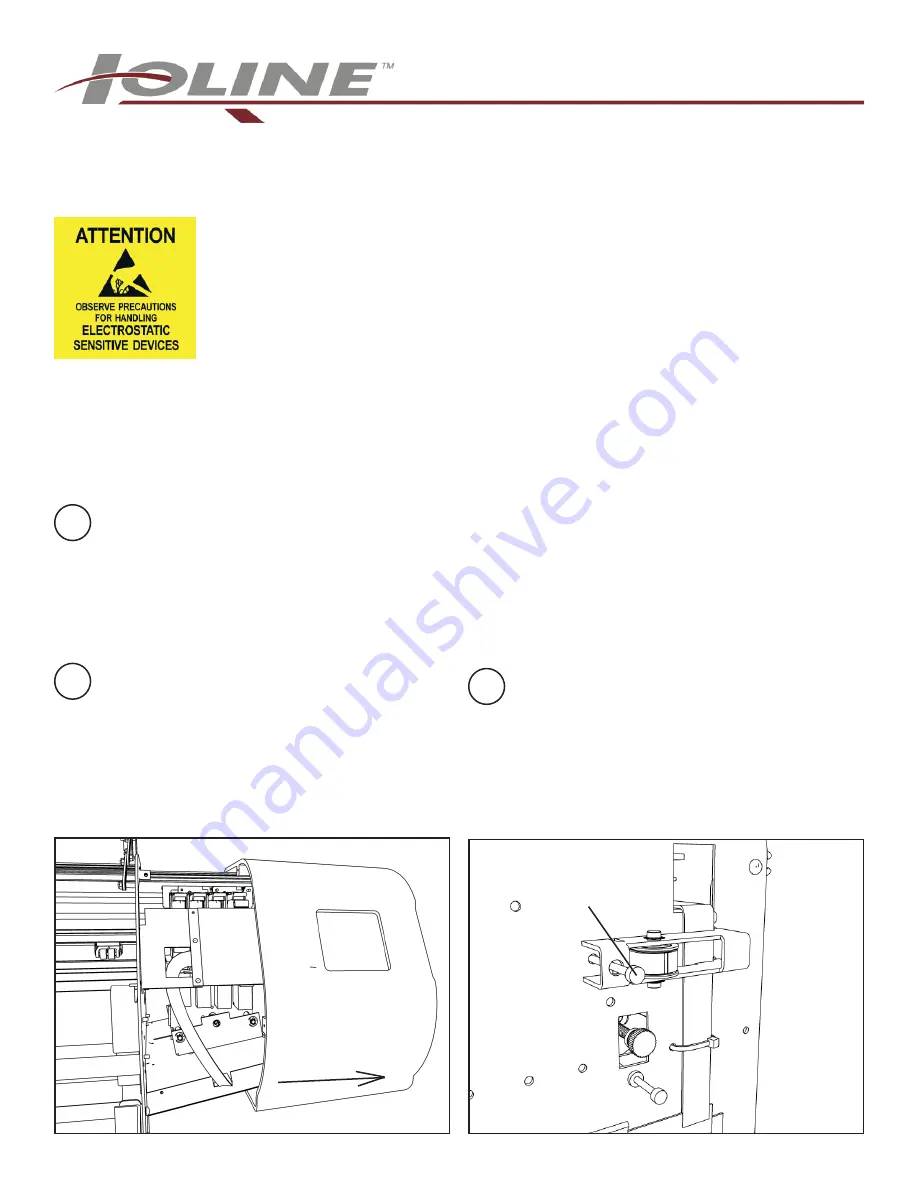
Remove the end cover

a) Unplug the roll feed motor under the right end 

cover.

b) Remove the 5 screws that hold the plastic end 

cover on to the right end of the printer. There 

are two on the flat surface of the endplate, 

one screw in the back, and 2 screws on the 

bottom.

Loosen the Carriage Belt

a) Find the belt tensioner on the right side above 

the white cables.

b) Loosen the carriage belt tensioner by rotating 

the 9/64” HEX screw 4 full counterclockwise 

turns.

1

2

3

Included with the upgrade kit

1) Screws for mounting the new board (3)

2) New daughter board

3) Standoffs (2 short, 1 long)

4) Flex cables (1 short, 4 long)

5) Carriage assembly with flex cables

6) Belt tensioner assembly

7) Tyraps (8)

8) Double stick foam tape

9) Grounding wrist strap

10) This procedure

Remove Cover

Loosen this screw

(9/64”)

P/N: 108384 R0

Summary of Contents for FlexJet Series

Page 1: ...per from around the carriage c Remove inkjet cartridges Do NOT cover the cartridge heads with anything d Remove the AC power cable and any other cables connected to the rear of the printer Remove the end cover a Unplug the roll feed motor under the right end cover b Remove the 5 screws that hold the plastic end cover on to the right end of the printer There are two on the flat surface of the endpl...

Page 2: ...gic board cover plate Attention The cover will swing down when the last screw is removed Make sure to support it with one hand and let it slowly rotate b Unplug the roll feed motor power and encoder cables from the logic board then set the logic board cover aside Remove the Old Flex Cables a With the carriage secured clip the plastic ties that hold the white flex cables against the right side of t...

Page 3: ... v wheels on the tra verse gently push the carriage down and rotate the bottom of the carriage towards the front of the machine until the lower v wheels slip off of the lower traverse rail g Lift the carriage up and away from the machine The long flex cable bundle should follow the carriage as you pull it off Set the whole assembly aside c Unclip the carriage belt ends at the left and right sides ...

Page 4: ...he carriage Lightly press the loop into the groove at the back of the traverse so that it is in the cable channel c Move to the center of the machine and hold the new carriage up near the traverse with the blue lever s facing up and away from the machine e Ensure that the black drive belt is between the tra verse rails and behind the carriage base Hold the car riage at the right and left side of t...

Page 5: ...late and in front of the traverse e Hold the new carriage belt tensioner so that the 2 tabs and screw tip rest in the holes and detent in the right endplate To the left of the Service Station area hold both webs of the carriage belt to maintain slight belt tension so that the carriage belt tensioner doesn t move out of place f While maintaining tension on the carriage belt Attach the carriage belt...

Page 6: ...st touches the small round bum pers look at the ribbon cable bundle loop It should leave a small gap between the sleeving and the left endplate no further than 08 2mm away as the carriage base touches the bumpers 11 Secure and Arrange the Ribbon Cable Bundle Part 2 a Continue to smooth the ribbon cable bundle toward the right end plate to stretch the black sheathing so that it lays relatively flat...

Page 7: ...n g Insert the four longer flex cables into the daughter card connectors NOTE It is very important that the conductive side of the cables align with the conductive pads in the connector h Press the locking collar back down after each cable is inserted i Insert the shorter flex cable into the white connector on the bottom of the daughter card as shown It is very important that the conductive side o...

Page 8: ...h the blue cable edge facing away from the printer f Continue attaching cables in the order that they are stacked making sure that the connectors are folded as shown Attach the Ribbon Cables Attention The ribbon cable connectors are small Make sure that the connector is correctly aligned with the header pins before inserting a Pull the ribbon cables out straight from the right endplate and pull th...

Page 9: ... the logic board cover edges are OUT SIDE of the service station frame on the front and back b Make sure the ribbon cable bundle fits through the slot at the end of the cover and in the daughter card If needed shift the cables to the side to avoid pinching them c Connect the take up motor power and encoder cables as shown in 16 Plug in Take up wires ...

Page 10: ... complete 8 Follow steps for the next procedure Y fine adjustment for the service station Manually Updating the firmware Note Use this procedure if your current firmware is lower than version 253 2 Prepare to Update the Firmware 1 Power on the PC and FlexJet 2 Ensure that the serial cable connects the PC to the FlexJet 3 Copy the firmware file to a folder like c Ioline Firmware or another location...

Page 11: ...the process is complete the carriage will go through the power on sequence then enter the ser vice station TeraTerm will show that the new soft ware is installed by displaying the version number Reset Calibration Values 1 Turn power off on the FlexJet 2 Manually pull the carriage out of the storage position to the middle of the machine 3 Copy the factory calibration values from the white sticker i...

Page 12: ... cover One screw on the right side un clip the back right and left sides 4 Make sure the ink cartridges are installed and power the machine on Keypad Screw Pull out on the tabs to remove the cover 1 Notices Attention The discharge of static electricity may damage the keypad and components Use the included ground strap during all procedures Keep plastic objects away from the keypad and logic board ...

Page 13: ... don t appear in the middle of the holes turn the plastic thumbscrew on the side of the service station clock wise if the lines are to the right Counter Clockwise if the lines are to the left 9 Turn the power off and remove the ink cartridges WARNING After removing the ink cartridges lower the blue ink doors before continuing Spit well centering thumb screw Tape covering the holes in the spit well...

Page 14: ... the gap further by adding smaller numbers Note A Y fine adjust change of 25 mils results in a gap change that is equivalent to the thickness of a piece of paper 10 Press and hold the UP arrow on the keypad of the plotter While holding the button turn the machine back on When the carriage starts to move let go of the button 11 Once the carriage is back in the service station check the gap one more...

Page 15: ...h the nut while the carriage is in the service station Otherwise tighten the nut enough to hold the bracket and move the carriage out of the service station to 4 If you are happy with all the adjustments turn the power off on the machine 5 Let the FlexJet sit for 10 seconds then turn the power back on while holding the Up arrow on the keypad When the carriage starts to move let go of the button 6 ...

Reviews: