background image

36

Web Administration

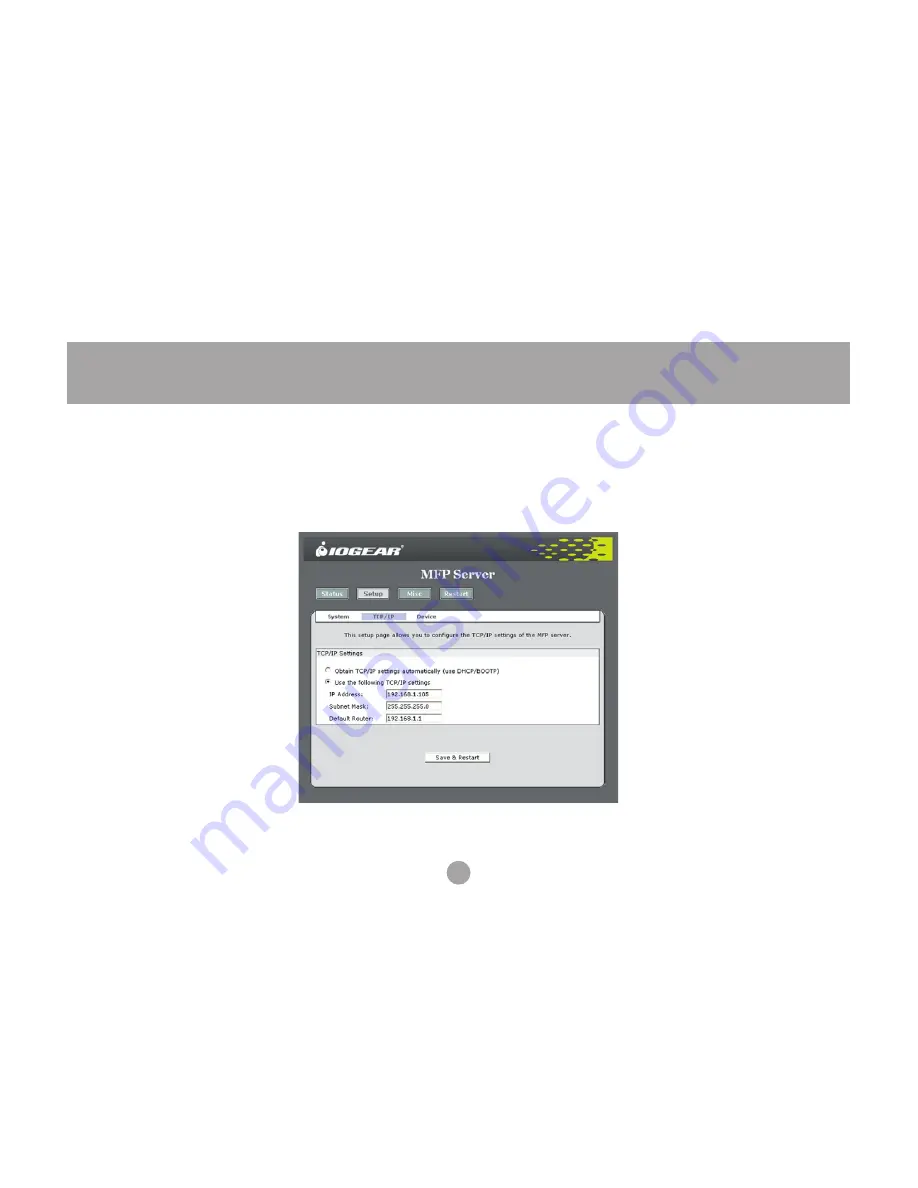
Changing the IP address

Normally the server requests an IP address automatically from your router or other DHCP server on the 
network.  If you would prefer to specify an address, you can do so by clicking the 

Setup button, then on 

the 

TCP/IP tab.

Make sure the network settings you enter are valid, or the print server may become inaccessible.  When 
you are sure everything is correct, click 

Save & Restart to apply the changes.

Summary of Contents for GMFPSU01

Page 1: ...User Manual GMFPSU01 USB Print Server ...

Page 2: ......

Page 3: ...l enjoy using your Print Server and find it to be a useful solution 2006 IOGEAR All Rights Reserved PKG M0319 IOGEAR the IOGEAR logo MiniView VSE are trademarks or registered trademarks of IOGEAR Inc Microsoft and Windows are registered trademarks of Microsoft Corporation IBM is a registered trademark of International Business Ma chines Inc Macintosh G3 G4 and iMac are registered trademarks of Appl...

Page 4: ... Contents Package Contents 05 Features 06 System Requirements 07 Introduction 08 Hardware Setup 09 Software Installation 10 Software Configuration 22 Web Administration 33 Technical Support 41 Limited Warranty 42 ...

Page 5: ...ts This package contains 1 USB Multi Function Print Server 1 CAT5 patch cable 1 User manual 1 Installation CD 1 Warranty registration card 1 Power adapter If any items are damaged or missing please contact your dealer ...

Page 6: ...s without compromising quality Fax documents over the network and at the convenience of your desk without the clutter Scan documents or photos in high resolution color format One USB port compliant with USB 1 1 specification One network port for support of 10 100Base T networks Web interface allows for easy configuration and monitoring Firmware upgradeable via web interface ...

Page 7: ...7 System Requirements This USB print server supports Windows 2000 XP Printer with USB connection ...

Page 8: ...Printer This elimi nates the need to purchase multiple expensive MFPs as all you need to share the printer is a connection to the print server s network port It complies with USB 1 1 specifications and provides users with an auto sensing 10 100Base T port The print server will even automatically identify your printer make model upon connection The built in web management feature provides more conve...

Page 9: ...utlet near the multifunction printer 2 Plug the network port of the print server into a network switch or available LAN port on a router using standard Ethernet patch cable 3 Plug the USB cable from your multifunction printer into the USB port on the print server and make sure the printer is powered on ...

Page 10: ...10 Software Installation Software Installation repeat on each networked computer 1 Insert the Setup CD into your computer 2 Click the Installation button on the window that opens ...

Page 11: ...11 Software Installation 3 Choose a language to use for installation and click OK ...

Page 12: ...12 Software Installation 4 Click Next at the first screen of the setup wizard ...

Page 13: ...13 Software Installation 5 Choose a folder to install the print server software or just click Next ...

Page 14: ...14 Software Installation 6 Choose a folder in the start menu to launch the software from or just click Next ...

Page 15: ...allation 7 On Windows XP a window may come up warning you that this software has not been tested by Microsoft and certified by their Windows Logo program If so simply click Continue Anyway to continue with installation ...

Page 16: ...16 Software Installation 8 When the installation is complete click OK ...

Page 17: ...17 Software Installation 9 If you would like the print server software to run automatically when starting your computer recom mended leave the box checked and click Finish ...

Page 18: ...Found New Hardware wizard may pop up during installation You will need to do the following to complete the driver installation 1 If asked if Windows can connect to the internet to search for software click the No not this time option and then click Next ...

Page 19: ...19 Software Installation 2 When asked how the wizard should install software leave Install the software automatically selected and click Next ...

Page 20: ...20 Software Installation 3 If you see another warning that the software has not been Windows Logo certified by Microsoft click Continue Anyway ...

Page 21: ...21 Software Installation 4 Click Finish to complete the Found New Hardware wizard ...

Page 22: ...22 Software Configuration Software Configuration repeat on each networked computer 1 Launch the IOGear MFP Utility program from the start menu or icon on the desktop ...

Page 23: ...enabled you will see this window pop up when the Utility is first launched Make sure you click the Unblock button to allow communication with the print server Other software firewalls may display similar options make sure the print server software is allowed to bypass such programs ...

Page 24: ...k for the print server and display it in the window If no print server is found please make sure any third party firewalls such as Norton Internet Security McAfee Personal Firewall or ZoneAlarm have been disabled or bypassed and click the Search button to try again ...

Page 25: ...f your printer software has already been installed skip ahead to step 7 Otherwise once the print server has been found close the window with the X button in the top right corner NOT the one labeled Exit to hide the Utility for now ...

Page 26: ...guration 5 Install the software that came with your printer When the drivers for the printer have finished installing OR the software asks you to plug in the printer using a USB cable you are ready to connect the device ...

Page 27: ...27 Software Configuration 6 You should see a small USB icon like this in the tray in the lower right corner of your screen Double click on the icon to open the Utility window again ...

Page 28: ...28 Software Configuration 7 Click the plus in front of the print server name to show the name of the attached printer Then select the printer name and click the Connect button in the Utility ...

Page 29: ...tware Configuration 8 The printer should be detected as if it was plugged directly into the computer Finish any remaining setup needed by the printer software Your multifunction printer should be ready to use ...

Page 30: ...his printer to be restored automatically when the Utility software launches you will need to add the device to your favorites list Click the plus in front of Connected devices and right click the name of the printer Choose Add to favorites from the menu that pops up ...

Page 31: ...31 Software Configuration 10 Click OK to confirm that the printer is in your favorites list ...

Page 32: ...nt server you can close the Utility window Be sure to use the close box with an X in the top right corner so that the Utility continues to run in the background The large button labeled Exit will shut down the Utility and disconnect your computer from the printer ...

Page 33: ...to override these default settings for another reason you may do so using the Web Administration tool This tool may also be used to upgrade the firmware on your print server which may be needed if your printer model is very new Simply select the server from the MFP Utility and click the Web Admin button Internet Explorer will launch and connect to the built in web interface on your print server ...

Page 34: ...nt server s name to something more meaningful such as Front Office or Accounting Scanner you can do so with the Web Admin tool First click the Setup button then make sure the System tab is selected Here you can type in whatever name you like for the print server click Save Restart and future searches with the MFP Utility will identify the server with its new name ...

Page 35: ...sh a password from the same System tab of the Setup section shown above Type in your password twice to confirm it then click Save Restart When the server reboots and for all future access to the Admin tool you will be prompted for a username and password Type admin for the username and then the password you created to proceed to the Web Admin tool ...

Page 36: ...r or other DHCP server on the network If you would prefer to specify an address you can do so by clicking the Setup button then on the TCP IP tab Make sure the network settings you enter are valid or the print server may become inaccessible When you are sure everything is correct click Save Restart to apply the changes ...

Page 37: ...tore all settings on the print server to their original configuration and can still access the Web Admin tool simply click on the Misc button and make sure the Factory Default tab is selected Clicking OK will immediately reset all options to their defaults and reboot the print server ...

Page 38: ...re experiencing any compatibility issues please check the Support section of the IOGEAR website at http www iogear com for firmware upgrade files Download the latest version to your computer and make sure that you unzip it if necessary The file name should end in BIN when you are done Then click the Misc button in the Web Admin tool Click Firmware Upgrade and you should see the following page ...

Page 39: ...39 Web Administration Click the Browse button and you will be asked to locate the firmware upgrade file you just downloaded Select it and click Open ...

Page 40: ...40 Web Administration You will see the location you selected in the box next to the Browse button Click the button at the bottom labeled Firmware Upgrade to load the new firmware onto the server ...

Page 41: ... IOGEAR T I L was designed to provide you with the latest technical information about our products Most of the answers to your ques tions can be found here so please try it out before contacting technical support Technical support is available Monday through Friday from 8 00 am to 5 00 pm PST and can be reached at 866 9 IOGEAR or 866 946 4327 Technical Support ...

Page 42: ...akes no warranty or representation expressed implied or statutory with respect to the contents or use of this documentation and especially disclaims its quality performance merchant ability or fitness for any particular purpose The direct vendor also reserves the right to revise or update the device or documentation without obliga tion to notify any individual or entity of such revisions or updates...

Page 43: ......

Page 44: ...Contact Info Hubble Irvine CA 92618 P 949 453 8782 F 949 453 8785 www iogear com ...

Reviews: