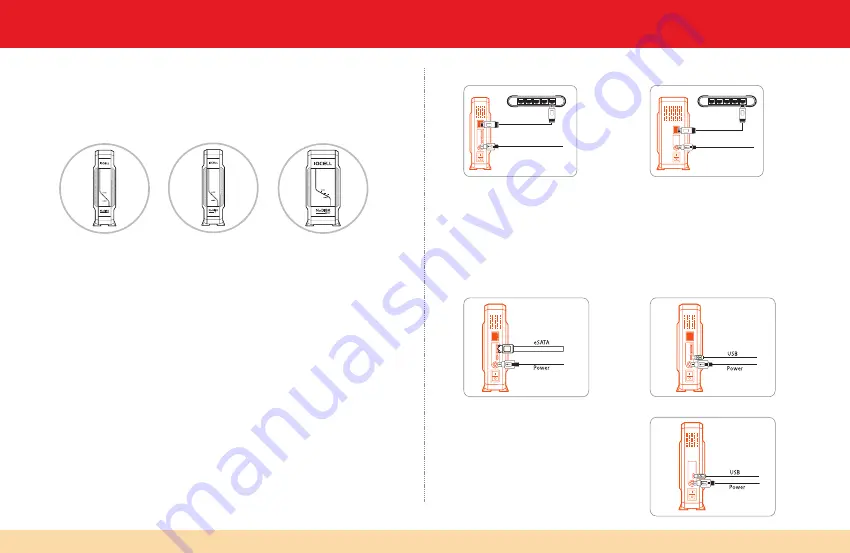
NDAS® Mode( Model : 351UNE / 352ND)
Connect NetDISK® to your router with included Ethernet cable.
Router
Power
Ethernet
NetDISK® 351UNE
Router
Power
Ethernet
NetDISK® 352ND
Connect NetDISK® to your wireless router or access point with included Ethernet cable.
Make sure the power cord is connected firmly and press the ON/OFF switch to the ON position.
eSATA Mode (Model : 351UNE)
Connect NetDISK® directly to your PC’s eSATA port
using included eSATA cable.
Make sure the power cord is connected firmly and
press the ON/OFF switch to the ON position.
Step 1 : NetDISK
®
Hardware Installation
352ND
351UNE
351UN
352U
351U
251U
351UE
251UE
Congratulations on your purchase of the NetDISK®
This NetDISK® Quick Installation Guide includes information on the following models:
NetDISK® 351UNE, NetDISK® 351U, NetDISK® 352ND
NetDISK® Modes
NDAS® Mode
In NDAS® Mode, NetDISK® is directly attached to a 100 Mbps, 1000Mbps / Full Duplex Fast
Ethernet Switch or Wireless Access Point. Each user on the network can use NetDISK® as if
it was a local disk drive.
USB 2.0 Mode
In USB 2.0 Mode. NetDISK® is directly attached to a PC’s USB 2.0 Port
eSATA Mode
In eSATA Mode. NetDISK® is directly attached to a PC’s eSATA Port.
System Requirements
Windows® 98SE/ME/2000/XP/Server2003
• 233MHz Pentium® II or higher
• 64 MB RAM (128 MB recommended)
• USB 1.1 Port (USB 2.0 recommended)
• CD-ROM drive for installation
• 10/100/1000Base-T full duplex switch for NDAS® mode
Mac® OS X
• G4 Power Mac with OS 10.3 / 10.4 / 10.5
• Intel Mac with OS 10.4 / 10.5
• 128 MB RAM (256 MB recommended)
• USB 1.1 Port (USB 2.0 recommended)
• CD-ROM drive for installation
• 10/100/1000Base-T full duplex switch for NDAS® mode
NetDISK® 351UNE
NetDISK® 351UNE
NetDISK® 351U
USB Mode (Model : 351UNE, 351U)
Connect NetDISK® directly to your PC’s USB port us-
ing included USB cable.
Make sure the power cord is connected firmly and
press the ON/OFF switch to the ON position.


