background image


Model : IW-RS216-07 Slim Hybrid Backplane User Manual   


PAGE    7    OF    12   


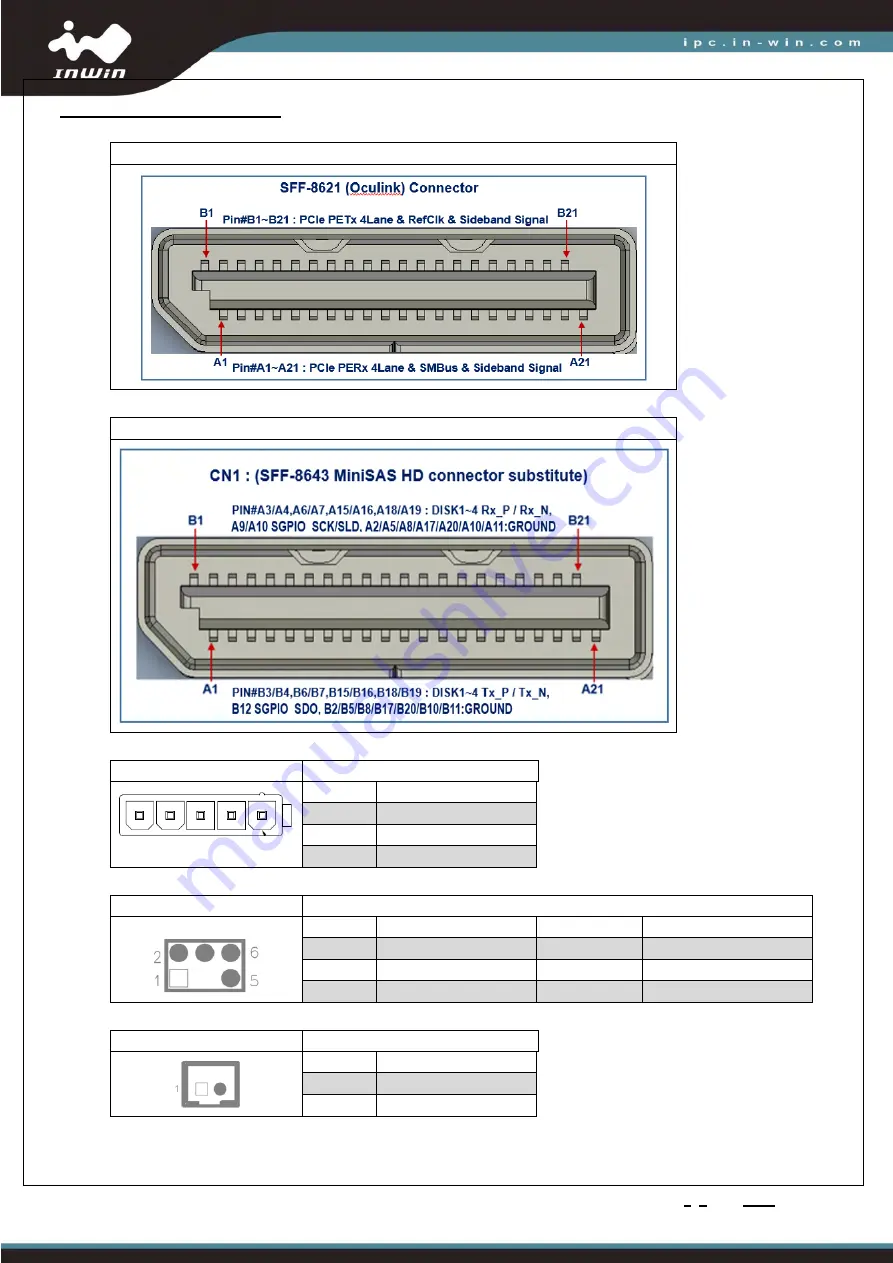
Connector Pin Definitions 

NVME1~NVME4 


CN1 


PW1 

Power 5-Pin Connector 


PIN # 

Definition 

+5V 

2 & 3 

Ground 

4 & 5 

+12V 


JD1 

Firmware Programming Connector 


PIN # 

Definition 

PIN No# 

Definition 

ICE_CLK 

VCC 

ICE_DATA 

#Key 

ICE_RST 

Ground 


JB1 

P2.0 2-Pin Connector 


PIN # 

Definition 

LINK_CLK 

2   

LINK_DAT 


Summary of Contents for 2RAKVI009100

Page 1: ...Model IW RS216 07 Slim Hybrid Backplane User Manual PAGE 1 OF 12 IW RS216 07 SLIM HYBRID BACKPLANE USER MANUAL P N 2RAKVI009100 Model IW RS216 07 SLIM 4BAY HYBRID BACKPLANE V MODULE Version V1 0 ...

Page 2: ...Model IW RS216 07 Slim Hybrid Backplane User Manual PAGE 2 OF 12 Revision History Version Changes Date V1 0 Official Release 2021 05 25 ...

Page 3: ...3 OF 12 TABLE OF CONTENTS Overview 4 Physical Outlook 4 Mechanical 5 Connector Locations and LED Indicators 6 Connector LED Indicators 6 Connector Pin Definitions 7 Hardware Specification 8 LED Behavior 9 Disk Bay LED 9 System Alarm LED 10 Firmware Upgrade 11 ...

Page 4: ...he passive backplanes support state of the art SAS3 12Gbps HDD SSD and also backward compatible with SAS 6Gbps SATA 6Gps and SATA 3Gps HDD SSD The backplane supports NVMe SSD through OcuLink x4 connectors Basically one single SFF 8621 SFF 8643 MiniSAS HD connector substitute connector can support up to 4 disk bays 2 of them are so called Hybrid that further support NVMe SSD via Oculink x4 connecto...

Page 5: ...Model IW RS216 07 Slim Hybrid Backplane User Manual PAGE 5 OF 12 Mechanical ...

Page 6: ...terface SAS3 CN1 6 M S BP Selection Switch S1 3 Firmware Programming Header JD1 7 M058 Micro controller IC1 4 Main Power Connector PW1 8 System Failure LED indicator DB2 Connector LED Indicators Location SAS U 2 Drive Number DISK1 DISK2 SATA SAS Disk or NVMe SSD 1 2 DISK3 DISK4 SATA SAS Disk or NVMe SSD 3 4 Location Hard Drive Power Activity Failure Locate LEDs D1 D2 D3 D4 DISK1 DISK4 Power Activi...

Page 7: ...in Definitions NVME1 NVME4 CN1 PW1 Power 5 Pin Connector PIN Definition 1 5V 2 3 Ground 4 5 12V JD1 Firmware Programming Connector PIN Definition PIN No Definition 2 ICE_CLK 1 VCC 4 ICE_DATA 3 Key 6 ICE_RST 5 Ground JB1 P2 0 2 Pin Connector PIN Definition 1 LINK_CLK 2 LINK_DAT ...

Page 8: ...ctivity LED Blinking Blue When HDD is Access Fail LED Steady Red When HDD Failure Locate LED Blinking Red When HDD Locate Environment Control Temperature Sensor RTB1 RTB2 Monitor HDD bay inside temperature M S Link Connector JB1 for Synchronous signal connection between two backplane Connector SFF 8621 OCULINK 42PIN Connector 1 CN1 for SAS_12G HOST Interface SFF 8621 OCULINK 42PIN Connector 4 NVME...

Page 9: ...locating Disk RAID rebuild and RAID consistent check There are 2 parts of LED Management on the backplane One is for SAS and another is for NVMe Please note that the disk slots can only accommodate SAS SATA or NVMe disk at a time since they share the same disk connector For SAS application The LEDs behave by following SGPIO signal coming through sideband bus inside the SFF 8643 to SFF 8621 cables ...

Page 10: ...C signal supports 2 pieces of NVMe disks LED management The I2C bus is leaded to odd number NVMe connector Oculink or SlimSAS to manage its corresponding and the following NVMe disks For example NVMe1 and NVMe2 LED management signal is form NVMe1 connector s sideband I2C bus NVMe3 and NVMe4 LED management signal is from NVMe3 connector s sideband I2C bus and etc System Alarm LED There is a FAIL LE...

Page 11: ...control and system fail alarm These MCUs are preprogrammed in manufacturing In most cases the MCUs are not required to reprogram unless there is issue needed to fix How to upgrade firmware 1 Require Nuvoton ARM Cortex M0 programming tool Nu Me or Nu Link and install Nuvoton ICP Programming tool software 2 Connect Nu Link USB end to a host and the SWD end to Backplane ICE connector for ...

Page 12: ...E 12 OF 12 each MCU 3 Make sure device is connected and select the binary file being programmed and then click on Start button to program firmware 4 Please refer to http www nuvoton com resource files NuLink_Adapter_User_Manual_EN_V1 01 pdf for more details ...

Reviews: