background image

Chapter 3 — Configuring the CV30

CV30 Fixed Mount Computer With Windows CE User’s Manual

57

2

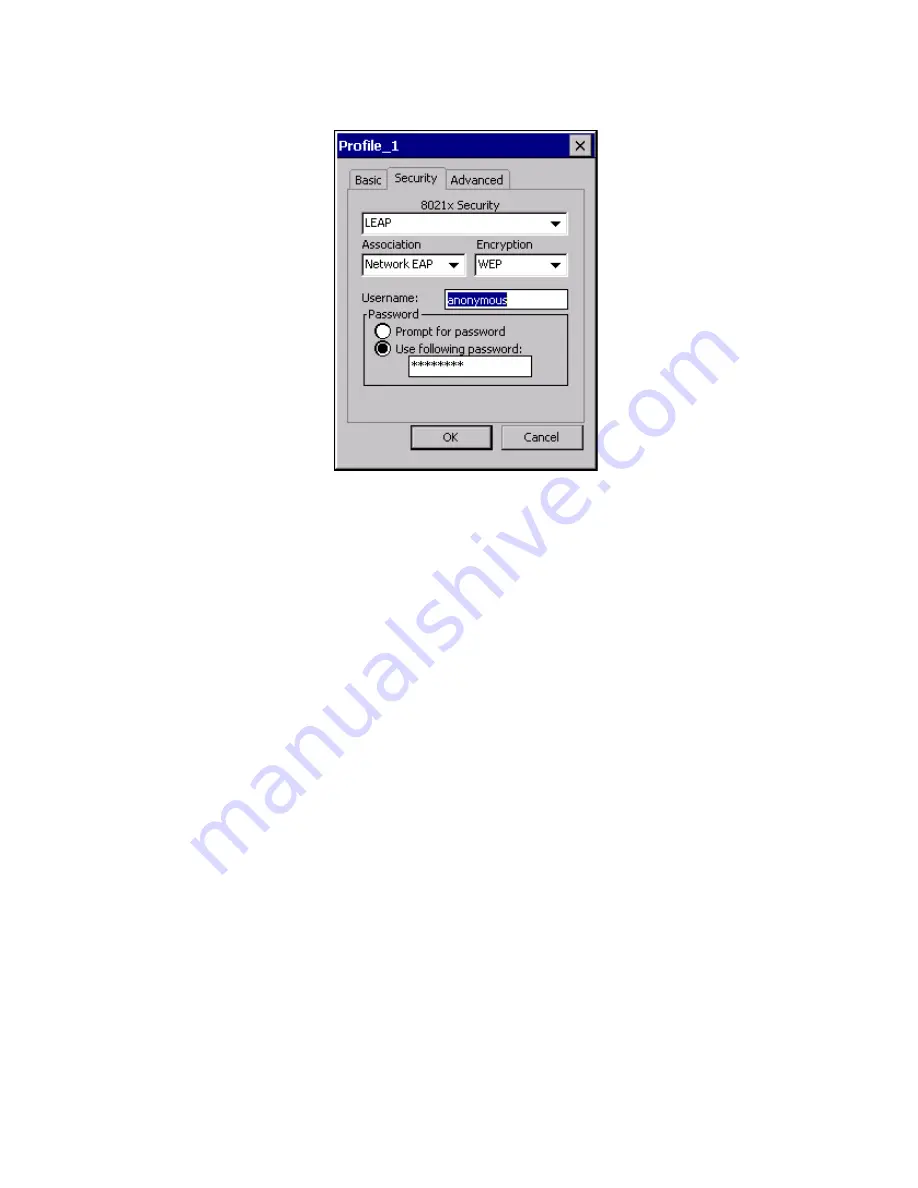
For 

8021x Security

, choose 

LEAP

.

3

For 

Association

, choose 

Open

WPA

WPA2

, or 

Network 

EAP

.

4

For 

Encryption

, choose 

TKIP 

or

 AES 

if you selected WPA2 

for association, or 

WEP

 or 

CKIP

 if you selected Network 

EAP for association.

5

For 

Username

, type a unique username for this protocol.

6

In the 

Password

 field, type a unique password for this 

protocol.

7

Select 

Prompt for password

 to have the user enter this 

password each time to access the protocol, or select 

Use 

following password

 to use the protocol without entering a 

password each time you use the CV30.

8

Tap 

OK

.

Summary of Contents for CV30

Page 1: ...CV30 Fixed Mount Computer With Windows CE User s Manual ...

Page 2: ...ion 2007 by Intermec Technologies Corporation All rights reserved The word Intermec the Intermec logo Norand ArciTech Beverage Routebook CrossBar dcBrowser Duratherm EasyADC EasyCoder EasySet Fingerprint i gistics INCA under license Intellitag Intellitag Gen2 JANUS LabelShop MobileLAN Picolink Ready to Work RoutePower Sabre ScanPlus ShopScan Smart Mobile Computing SmartSystems TE 2000 Trakker Anta...

Page 3: ...Understanding the Features of the CV30 2 Using the Power Button 5 Magnifying a Portion of the Screen 5 Adjusting the Screen Brightness 5 Adjusting the Volume 6 Using the Touch Screen 6 Navigating the Touch Screen 7 Aligning the Touch Screen 7 Attaching the CV30 to Power 8 Understanding the Backup Power System 9 Resetting the CV30 9 Using the Power Button to Reset the CV30 10 Using the Reset Button...

Page 4: ...ly Configuring the CV30 Using SmartSystems Foundation 29 Setting Up Ethernet Communications 29 Setting Up Bluetooth Communications 30 Configuring the CV30 to Communicate With a Wireless Scanner 31 Configuring Bluetooth Communications for Wireless Printing 33 Creating an Application That Lets You Print Wirelessly 34 Selecting the Current Wireless Printer on the CV30 34 Connecting to a Bluetooth Aud...

Page 5: ...a Web Based Application 69 Converting a Trakker Antares Application for the CV30 69 Installing Applications on the CV30 70 Installing Applications Using SmartSystems Server 71 Installing Applications Using Microsoft ActiveSync 71 Installing Applications Using Your SD Card 72 Installing Applications Using Wavelink Avalanche 73 Freeing Up Virtual Memory for Applications 74 Launching An Application A...

Page 6: ...vi CV30 Fixed Mount Computer With Windows CE User s Manual A Specifications 93 Physical and Environmental Specifications 94 Accessories for the CV30 94 Index 97 ...

Page 7: ...r handling optical parts Global Services and Support Warranty Information To understand the warranty for your Intermec product visit the Intermec web site at www intermec com and click Service Support Warranty Web Support Visit the Intermec web site at www intermec com to download our current manuals in PDF To order printed versions of the Intermec manuals contact your local Intermec representativ...

Page 8: ...c products Place an order Ask about an existing order 1 and then choose 2 Order Intermec media Order printer labels and ribbons 1 and then choose 1 Order spare parts Order spare parts 1 or 2 and then choose 4 Technical Support Talk to technical support about your Intermec product 2 and then choose 2 Service Get a return authorization number for authorized service center repair Request an on site r...

Page 9: ...pport Manuals 3 In the Select a Product field choose the product whose documentation you want to download To order printed versions of the Intermec manuals contact your local Intermec representative or distributor Patent Information Product is covered by one or more of the following patents 4912309 4940974 5216233 5289378 5345146 5349678 5401591 5404493 5416463 5440315 5457629 5465207 5473242 5487...

Page 10: ...Before You Begin x CV30 Fixed Mount Computer With Windows CE User s Manual There may be other U S and foreign patents pending ...

Page 11: ...to familiarize yourself with the CV30 Fixed Mount Computer In this chapter you will find these sections Introducing the CV30 Fixed Mount Computer Attaching the CV30 to Power Understanding the Status Lights Installing an External Antenna Installing an External Keyboard Connecting a Scanner Increasing Memory Storage ...

Page 12: ...d supports the use of terminal emulation applications browser based applications or custom applications The CV30 is certified by the Cisco Certified Extensions CCX 2 program to be interoperable with a Cisco Wireless LAN WLAN infrastructure CV30 Fixed Mount Computer Understanding the Features of the CV30 The CV30 includes these standard features Touch screen heater Two USB ports two serial ports an...

Page 13: ...ese options are available for the CV30 TE 2000 terminal emulation application including 3270 5250 and VT ANSI Secure Digital SD memory card for memory expansion For additional help using the terminal emulation application see the TE 2000 Terminal Emulation Programmer s Guide P N 977 055 xxx Understanding the Buttons on the CV30 CV30 Zoom Brightness Volume down Power Volume up Headphones ...

Page 14: ...ects the CV30 to an AC or DC DC power supply AUX Connects USB devices to the CV30 You can purchase a single or double USB cable assembly that attaches to the AUX connector and turns the port into one or two USB host connectors You can also purchase a developer USB cable that turns the port into a USB 1 1 Client connection COM3 Connects the CV30 to other RS 232 devices such as PCs or printers COM1 ...

Page 15: ...agnify a portion of the screen if you need to see details To zoom in on a portion of the screen Press the Zoom button and tap on the area of the screen you want to see Adjusting the Screen Brightness You may want to adjust the brightness depending on the location of the CV30 Use the Brightness button on the CV30 front panel to control the brightness of the screen The Brightness button also toggles...

Page 16: ...n the external surface of the display when moving between sub freezing temperatures and normal temperatures If you are going to use the CV30 in extreme cold conditions 0 C to 30 C or 32 F to 22 F for an extended period of time you should turn on the power at room temperature for at least 15 minutes prior to using it This process of warming up the CV30 helps preserve the lighting on the display The...

Page 17: ...ouch screen 1 Tap Start Settings Control Panel Touch Screen Navigation Action Description Tap Touch the screen once with the stylus or finger to select options open or close applications or launch menus Double tap Double tap the screen with the stylus to launch applications Drag Hold the stylus or your finger on the screen and drag across the screen to select text and images Tap and hold Tap and h...

Page 18: ... through a DC DC power supply or an AC DC power supply The CV30 also has a backup battery to sustain all memory and applications when power is not supplied You must have a power supply connected to the CV30 for it to operate Use the AC power supply and power cord when you are using the CV30 with a desk mounting kit or a wall mounting kit The AC power supply does not provide power for the internal ...

Page 19: ...an amber light on the top of the display turns on You must replace your backup battery immediately if you see an amber light The backup battery must be replaced by a trained Intermec service technician Please contact your local Intermec service representative for more information To check the status of your backup battery Tap Start Settings Control Panel Power Resetting the CV30 You rarely need to...

Page 20: ...cess To reset the CV30 using the Power button Press and hold the Power button for 5 seconds The CV30 systematically shuts down restarts and goes through the initialization process Using the Reset Button to Reset the CV30 If performing the preferred reset method of using the Power button does not restore system operation it may be necessary to use the Reset button Unfortunately using this method to...

Page 21: ...Description Battery Amber The amber light comes on when the backup battery is critically low You need to replace the backup battery as soon as possible Good read Green This light comes on when the CV30 successfully decodes a bar code with an attached scanner Ready to Work indicator Blue The blue light indicates when the CV30 is ready to use in your application typically TE 2000 If you have problem...

Page 22: ... ordering an antenna see Accessories for the CV30 on page 94 Since system performance and antenna polarization are site dependent a permanent mounting location and orientation may require some experimentation In most fixed installations you should mount the antenna initially in a vertically polarized position with the cable from the antenna parallel to the floor ceiling Ready to Work Light States ...

Page 23: ... 13 Attaching an External Antenna Installing an External Keyboard There are two types of keyboards you can install and use with the CV30 The compact keyboard P N VE011 2002 Rugged QWERTY large external keyboards For a complete list of available keyboards see Accessories for the CV30 on page 94 Antenna ...

Page 24: ...mpact keyboard see the instructions that ship with it Connecting a Scanner You can attach a tethered scanner to one of the serial COM3 or COM1 connectors on the CV30 if you order the appropriate RS 232 cable USB cable Supported Scanners and Cables Scanner Required Cable 1470 Ships with the scanner 1400 1551E 1553 ASCII 3 604032 05 1800 3 364032 02 SR60 321 642 002 Slot scanner N A ...

Page 25: ...er end of the cable to the tethered scanner 3 On the CV30 go to Start Settings Control Panel Intermec Settings For help using Intermec Settings see Configuring the CV30 Using Intermec Settings on page 28 4 Go to Data Collection Tethered Scanner COM1 or COM3 5 Make sure Enable scanner port is checked 6 Go to Scanner Settings Scanner model and select your scanner from the list Note The SR60 only ope...

Page 26: ...eady to use the scanner Increasing Memory Storage You can use an SD card to increase file storage and install software The CV30 currently supports SD cards that hold up to 2 GB of information The SD card slot is located on the top of the CV30 under the top cover You must remove the top cover to access the SD card slot To insert an SD card 1 Press Power to suspend the CV30 2 Unscrew the six Phillip...

Page 27: ...from the Remote Antenna connector 4 Gently insert the SD card into the CV30 5 Push the SD card into the slot until it latches in place 6 Reattach the antenna cable replace the top cover and attach it with the six screws you removed in Step 2 7 Press Power to resume using the CV30 8 0 2 1 1 Screw 6 places Top cover SD card Antenna cable ...

Page 28: ...Chapter 1 Using the CV30 Fixed Mount Computer 18 CV30 Fixed Mount Computer With Windows CE User s Manual ...

Page 29: ...th Windows CE User s Manual 19 2 Understanding Windows CE This chapter introduces Microsoft Windows CE In this chapter you will find these sections Understanding Windows CE Using Microsoft ActiveSync Using Internet Explorer Mobile ...

Page 30: ...inding Information in Windows CE This chapter describes your CV30 hardware provides an overview of the programs on your CV30 and explains how to connect your CV30 to a desktop a network or the Internet Use the following table to understand more about the CV30 Learning the Basic Skills Learning to use the CV30 is easy This section describes the basic concepts of using and customizing your CV30 Comp...

Page 31: ...ogram name The following is a partial list of programs that are on your CV30 in the order they appear in the Start menu Internet Explorer Microsoft WordPad Windows Media Transcriber Using the Taskbar The taskbar is located at the bottom of the screen It displays the Start menu icon the iConnect icon the current time the Desktop icon and the Input Panel icon Use the taskbar to switch to programs an...

Page 32: ...put Panel icon The Input Panel menu appears 2 Tap LargeKB The large keyboard displays on the desktop On the soft keyboard that displays tap the keys with your stylus The soft keyboard works just like a standard qwerty keyboard Here are a few tips for using the soft keyboard To type lowercase letters tap the keys with the stylus Understanding the Ways to Enter Information Enter Information By Descr...

Page 33: ...scriber change the written characters to typed characters To use Transcriber 3 Write anywhere on the screen Pause and let Transcriber change the written characters to typed characters For help using Transcriber tap the question mark in the lower right hand corner of the Input Panel Finding and Organizing Information You can use Windows Explorer to find files on your CV30 and organize these files i...

Page 34: ...ion compares the data on the CV30 with your desktop PC and updates both computers with the most recent information You can also perform these functions with ActiveSync Copy files between the CV30 and the desktop Back up and restore the CV30 data Control when synchronization occurs by selecting a synchronization mode Select which information types are synchronized and control how much data is synch...

Page 35: ...nc tap Start Help and then select a topic Using Internet Explorer You can use Internet Explorer to run web based applications and view pages downloaded to the CV30 You can also connect to the internet through an ISP or a network connection You can make connections using a modem a wireless network or Ethernet You can use a modem connection to set up connections with an external modem To use Interne...

Page 36: ...Chapter 2 Understanding Windows CE 26 CV30 Fixed Mount Computer With Windows CE User s Manual Default Internet Explorer Web Page ...

Page 37: ...to understand how to configure the CV30 to communicate in your network In this chapter you will find these sections Configuring the CV30 Operating Parameters Setting Up Ethernet Communications Setting Up Bluetooth Communications Setting Up 802 11 Radio Communications Configuring Security on the CV30 ...

Page 38: ...allows you to set all of the operating parameters in one place Configuring the CV30 Using Intermec Settings Use Intermec Settings to configure the CV30 and to view system information You access Intermec Settings from the Control Panel To open Intermec Settings Tap Start Settings Control Panel Intermec Settings For detailed information on the commands available in Intermec Settings see the Intermec...

Page 39: ...ilable from the Intermec web site To download SmartSystems Foundation go to www intermec com SmartSystems For information on how to use the SmartSystems server see the online manual Setting Up Ethernet Communications You can use the CV30 directly in an Ethernet network by connecting the network to the RJ45 10BaseT 100BaseT full duplex connector on the bottom of the CV30 To use the CV30 in an Ether...

Page 40: ...e You can use the Bluetooth radio to connect to these wireless devices Scanners Printers Headsets To turn the Bluetooth radio on 1 Select Start Settings Control Panel Intermec Settings 2 Go to Communications Bluetooth Power 3 Tap On Intermec Settings prompts you to save settings 4 Tap Yes 5 Exit Intermec Settings Once Bluetooth is enabled it stays enabled through a warm or cold boot and maintains ...

Page 41: ...ec Settings at the end of this section To configure Bluetooth communications on the CV30 1 Select Start Settings Control Panel Intermec Settings 2 Select Communications Bluetooth 3 If you want to allow incoming connections from wireless scanners you must enable these two parameters Discoverable Connectable Bluetooth Settings Setting Description Power Set and view whether the Bluetooth radio is on ...

Page 42: ...nter the passcode for your scanner The default passcode for Intermec Bluetooth scanners is 0000 3 Tap Finish To connect to the wireless scanner using the Bluetooth Scanner Wizard 1 Select Start Programs Windows Explorer Program Files Intermec Network Bluetooth 4 Select how you would like to set your scanner the default is Search and then tap Next The CV30 starts discovering scanners 5 Select the s...

Page 43: ...t Start Programs Windows Explorer Program Files Intermec Network Bluetooth Bluetooth Scanner Wizard 2 Tap Remove Device 3 Select the Bluetooth scanner from the DCE Device s list that you want to disconnect and then tap Disconnect The scanner you wanted to remove no longer appears in the list 4 Tap Finish Configuring Bluetooth Communications for Wireless Printing This section explains how to config...

Page 44: ...s printer on your CV30 as described in the next section The Wireless Printing applet performs these tasks on the CV30 Helps you select the current wireless printer Stores the current wireless printer in the registry Registers deregisters the wireless printing COM port Stores the wireless printing COM port in the registry as the WPort Specifically the current wireless printer is registered and dere...

Page 45: ...rinters discovered within range appear in the devices list 3 Select the printer you want to connect to and then tap OK If your preferred printer does not appear make sure the printer is turned on and discovery is enabled and then repeat Steps 1 through 3 4 Tap Print Test Page The printer prints out the test page 1 Select Start Settings Control Panel Wireless Printing The Wireless Printing wizard a...

Page 46: ... the address of the printer in the Enter Device Address text box and then tap OK The keyword unknown appears in the Device Name field in the Current Wireless Printer box 1 Select Start Settings Control Panel Wireless Printing The Wireless Printing wizard appears 2 Tap Manual The wizard advances to the next screen where you enter the device address ...

Page 47: ...etooth headset 1 Select Start Settings Control Panel Bluetooth Audio 2 Tap Search for devices Discovered audio devices are added to the list with an icon to identify them 3 Double tap a Bluetooth audio device from the list of Connect headsets hands free devices 4 When a pop up menu appears and then select Activate The device icon changes to include a check mark 5 Double tap the device name and the...

Page 48: ... your wireless network Configuring the Network Parameters for a TCP IP Network In a TCP IP network the CV30 communicates with a host computer directly using TCP IP The access point acts as a bridge to allow communications between the wired network and the wireless network To use wireless communications in a TCP IP network 1 Go to Start Settings Control Panel Intermec Settings 2 Configure these net...

Page 49: ...figure these network parameters on the CV30 Network name SSID Controller IP address IP settings if not using DHCP Network port 3 Configure security For help see Configuring Security on the CV30 in the next section 4 Make sure the CV30 is talking to the network and that the network can see the CV30 Checking the Status of Your Wireless Connection After you configure your wireless settings you can us...

Page 50: ...ication server and authenticators are properly configured Understanding the Wireless Network Your wireless radio adapter network interface card connects to wireless networks of two types infrastructure and ad hoc networks Infrastructure networks get you onto your corporate network and the internet The CV30 establishes a wireless connection to an access point which links you to the rest of the netw...

Page 51: ...ill maintain forward compatibility WPA runs in 802 1x Enterprise mode or PSK Pre Shared Key mode In Enterprise mode WPA provides user authentication using 802 1x and an Extensible Authentication Protocol EAP That is an authentication server such as a RADIUS server must authenticate each device before the device can communicate with the wireless network In PSK mode WPA provides user authentication ...

Page 52: ...sing Static WEP Security The CV30 uses the Wired Equivalent Privacy WEP protocol to add security to your wireless network based on the 802 11 standard To use WEP security you need a CV30 with an 802 11b g radio an access point with an 802 11b g radio Using 802 1x Security 802 1x security provides centralized user authentication using an authentication server authenticators access points and suppli...

Page 53: ... use LEAP security you need a RADIUS server Cisco access points LEAP security is not supported with Microsoft security Choosing Between Funk and Microsoft Security The CV30 provides both Funk and Microsoft security choices Funk security is the default setting Use the following sections to set security using either Funk or Microsoft as your security choice Both security choices offer similar featur...

Page 54: ...nd one for the warehouse By default the active profile is Profile_1 To select a profile for Funk security 1 Select Start Settings Control Panel Intermec Settings 2 Select Communications 802 11 Radio Funk Security 3 Select Active Profile choose a profile from the list and save your settings 4 Tap the active profile to expand it 5 Optional Give your profile a meaningful name a Select Profile Label a...

Page 55: ...x or WPA2 802 1x with Funk security 1 Open Intermec Settings 2 Make sure you have configured the communications parameters and selected Funk as your security choice 3 Choose Communications 802 11 Radio Funk Security Profile 4 For Association choose WPA or WPA2 and press Enter Encryption automatically defaults to TKIP if you are using WPA Encryption automatically defaults to AES if you are using WP...

Page 56: ... your level of security 6 Save your settings To enable WPA PSK or WPA2 PSK with Funk security 1 Open Intermec Settings 2 Make sure you have configured the communications parameters and selected Funk as your security choice 3 Choose Communications 802 11 Radio Funk Security Profile 4 For Association choose WPA or WPA2 5 For 8021x choose None 6 For Pre Shared Key enter the pre shared key or the pass...

Page 57: ... value must exactly match the key on the authenticator 7 Save your settings Configuring 802 1x Security With Funk Security 1 Open Intermec Settings 2 Make sure you have configured the communications parameters and selected Funk as your security choice 3 Choose Communications 802 11 Radio Funk Security Profile 4 For Association choose Open 5 For Encryption choose WEP 6 For Authentication choose TTL...

Page 58: ...r settings Configuring LEAP Security on the CV30 1 Open Intermec Settings 2 Make sure you have configured the communications parameters and selected Funk as your security choice 3 From Intermec Settings choose Communications 802 11 Radio Funk Security Profile 4 For 8021x choose LEAP 5 For Association choose Open WPA WPA2 or Network EAP Encryption automatically defaults to TKIP if you choose WPA to...

Page 59: ... for 64 bit WEP or a 13 byte value for 128 bit WEP Hex keys must be preceded by 0x and contain 5 or 13 hex pairs 8 For Transmit key choose the key you want to use for transmitting data 9 Save your settings Configuring Funk Security Using the Profile Wizard You can start 802 11 b g communications on the CV30 using the Profile Wizard A profile contains all the information necessary to authenticate y...

Page 60: ...Profile 4 Optional Give your profile a meaningful name by selecting the text in the Profile Label text box and typing a meaningful name 5 From the Network type list select either Infrastructure or Ad Hoc Select Infrastructure if the network uses access points to connect to the corporate network or internet Select Ad Hoc to set up a private network with one or more participants 6 Enter the SSID Net...

Page 61: ...lect the key you want to use for transmitting data 6 Define a value for the keys you want to use You can define up to four keys Key 1 through Key 4 Enter an ASCII key or a hex key that is either 5 bytes or 13 bytes long depending on the capability of the radio Set a 5 byte value for 64 bit WEP or a 13 byte value for 128 bit WEP Hex keys must be preceded by 0x and contain 5 or 13 hex pairs 7 Tap OK...

Page 62: ...8021x Security choose None 3 For Association choose WPA2 4 For Encryption choose TKIP or AES 5 For Pre Shared Key field enter the passphrase as ASCII The passphrase must be 8 to 63 characters and match the passphrase on the access point 6 Tap OK Configuring PEAP Security With Profile Wizard Protected EAP PEAP performs secure authentication against Windows domains and directory services It is compa...

Page 63: ...ertificates see Loading a Certificate on page 62 9 Tap Additional Settings to assign an inner PEAP authentication and set options for server certificate validation and trust 10 From the Inner PEAP Authentication list choose EAP MS CHAP V2 EAT Token Card or EAP MD5 Challenge 11 Check Validate Server Certificate to verify the identity of the authentication server based on its certificate when using ...

Page 64: ... name for this protocol 6 For User Name type a unique user name for this protocol 7 Tap Get Certificates to obtain or import server certificates For help with certificates see Loading a Certificate on page 62 8 Tap Additional Settings to server certificate validation and trust 9 Check Validate Server Certificate to verify the identity of the authentication server based on its certificate when usin...

Page 65: ...ates To configure TTLS security 1 In the Profile Wizard select the Security page 2 For 8021x Security choose TTLS 3 For Association choose Open WPA WPA2 or Network EAP 4 For Encryption choose TKIP or AES if you selected WPA2 for association or WEP or CKIP if you selected Network EAP for association 5 For Username type a unique username for this protocol 6 In the Password field type a unique passwo...

Page 66: ...2 PAP Token Card or EAP 11 If you select EAP for the inner authentication protocol select and inner EAP protocol form the Inner EAP list 12 Check Validate Server Certificate to verify the identity of the authentication server based on its certificate when using TTLS 13 Tap Root CA select a root certificate and then tap OK 14 Enter the Common Names of trusted servers 15 For Anonymous EAP TTLS Name ...

Page 67: ...lected WPA2 for association or WEP or CKIP if you selected Network EAP for association 5 For Username type a unique username for this protocol 6 In the Password field type a unique password for this protocol 7 Select Prompt for password to have the user enter this password each time to access the protocol or select Use following password to use the protocol without entering a password each time yo...

Page 68: ...not require certificate management To configure EAP FAST with Profile Wizard 1 In the Profile Wizard select the Security page 2 For 8021x Security choose EAP FAST 3 For Association choose Open WPA WPA2 or Network EAP 4 For Encryption choose WEP or CKIP if you selected Network EAP for association 5 For Username type a unique username for this protocol 6 In the Password field type a unique password ...

Page 69: ...ny incoming PACs Prompt before replacing a PAC for notification whether to replace a current PAC with an incoming PAC 12 For Anonymous EAP FAST Name type the outer identity assigned for public usage 13 Tap OK Configuring Microsoft Security The default security setting is Funk If you want to use Microsoft security you need to select it as your security choice After you select Microsoft as your secu...

Page 70: ...t to only preferred networks or search for and connect to any available network You can add a wireless network when the network is detected or manually by entering settings information To determine if authentication information is needed see your network administrator When the CV30 restarts with Microsoft selected as the security choice a dialog box with your wireless network information appears Y...

Page 71: ...tication a Set Authentication to Open if WEP keys are not required or to Shared when WEP keys are required for association b Set Data Encryption to Disabled Follow these steps to enable WEP encryption a Set Authentication to Open if WEP keys are not required or to Shared when WEP keys are required for association b Set Data Encryption to WEP c To change the network key clear The key is provided au...

Page 72: ... can use a third party CA to issue unique client certificates and a root certificate There are three ways to load certificates on the CV30 If you are using Active Directory to issue certificates you can use the Enroll Certificates application to load the certificates If you are using another third party CA you can use the Import Certificates application to load the certificates If you have multipl...

Page 73: ...s telling you that the user certificate has been added 7 Tap OK to close the Enrollment Tool message box 8 Configure your CV30 for WEP WPA or WPA2 security To load certificates if you are using a third party CA 1 From Intermec Settings select Communications 802 11 Radio Certificates 2 Select Import Certificates and tap the Run App button The certificates application appears 3 Tap in the Import pfx...

Page 74: ... Communications 802 11 Radio Certificates 5 Select Import Root Certificates Choose True from the drop down menu 6 Select Import User Certificates Choose True from the drop down menu 7 Save your settings and exit Intermec Settings The certificates are immediately imported a All root certificates in Temp Root are imported into the Trusted Authorities certificate store b All certificate and key files...

Page 75: ...ecurity with your wireless network you can disable it on the CV30 Intermec recommends that you always set security in your network To disable security 1 Open Intermec Settings 2 Choose Communications 802 11 Radio Microsoft Security 3 For Network Authentication choose Open 4 For Data Encryption choose Disabled 5 Close Intermec Settings ...

Page 76: ...Chapter 3 Configuring the CV30 66 CV30 Fixed Mount Computer With Windows CE User s Manual ...

Page 77: ...lications and converting existing Trakker Antares applications for use on the CV30 You will also find information on installing applications and automatically launching them This chapter contains these sections Developing Applications for the CV30 Installing Applications on the CV30 Freeing Up Virtual Memory for Applications Launching an Application Automatically ...

Page 78: ...cations to run on the CV30 The Intermec resource kits are a library of C and NET components grouped by functionality that you can use to create applications for the CV30 The resource kits are part of the Intermec Developer Library IDL and can be downloaded from the Intermec web site at www intermec com idl You need these hardware and software components to use the Intermec resource kits Pentium PC...

Page 79: ...Migration Resource Kit to convert it The Antares Migration Resource Kit is a set of libraries and tools that you use to convert your existing Trakker Antares C applications into C applications for use on the CV30 The CV30 does not support all Trakker Antares functions You may need to rewrite parts of your application when converting it for use on the CV30 See the resource kit for a list of functio...

Page 80: ... disk The Flash File Store is an area of storage which is embedded in a section of the system flash memory This storage is not erased during a reset Although it might be erased during the reflashing process In addition to storing applications and data files you have the option to store persistent registry to the Flash File Store region The optional SD card If you are using an SD card this should b...

Page 81: ... appear in the software vault 3 From the SmartSystems console in the Software Vault drag and drop the application onto each CV30 in your network Installing Applications Using Microsoft ActiveSync You can use Microsoft ActiveSync to establish a connection between your PC and the CV30 ActiveSync transfers files synchronizes files performs remote debugging and other device management activities For m...

Page 82: ...nload to the CV30 and copy it 5 From the Mobile Device window navigate to the folder where you want to paste the cab file 6 Paste the cab file into the desired folder 7 When you are done copying files reset the CV30 8 After the CV30 is done resetting tap Start Programs Windows Explorer to locate the newly copied files 9 Tap the cab files to install them Installing Applications Using Your SD Card I...

Page 83: ...ons Using Wavelink Avalanche You can use the Wavelink Avalanche device management system to install applications on all of your wireless CV30s The CV30 ships with the Avalanche Enabler already loaded on it Each time the Avalanche Enabler is activated typically on a reset the CV30 attempts to connect to the Avalanche Agent When the CV30 connects to the agent the agent determines whether an update i...

Page 84: ...sentative for information about each software feature before making changes To free up virtual memory you select items from the InstallSelect list that you do not want to install When you perform a clean boot the items you selected are not installed However you can reinstall any of these SSPB components at any time with InstallSelect Be sure to back up any releated files that you want before you u...

Page 85: ...led after a clean boot By default components already installed on the CV30 are automatically checked to be installed again after you perform a clean boot 6 Click Apply to initiate the clean boot and install only the files that are selected 7 Click Yes to continue with the clean boot The CV30 performs a clean boot and restarts with all of the checked components installed ...

Page 86: ...y Intermec security supplicant that provides a wireless security solution with several features that are not supported by Microsoft Printer Support Provides Intermec printer driver support SmartSystems Client Intermec Settings Enables the client SmartSystems Server and the use of Intermec Settings on the local computer If you disable this CAB file you cannot use SmartSystems or Intermec Settings l...

Page 87: ...gure AutoRun exe through the AutoRun data file AutoRun dat This script file must be located in the same directory as the program AutoRun supports the following script commands in AutoRun dat AutoRun handles quoted file names for the first parameter which allows you to specify path names or file names that contain white spaces AutoRun only supports one set of quotes per command AutoRun Script Comma...

Page 88: ...Chapter 4 Developing and Installing Applications 78 CV30 Fixed Mount Computer With Windows CE User s Manual ...

Page 89: ...unter any problems while using the CV30 look in this chapter to find a possible solution You will also find information on routine maintenance This chapter contains these sections Calling Product Support Troubleshooting the CV30 Upgrading the CV30 Troubleshooting the Boot Process Clean Booting Cleaning the Screen ...

Page 90: ...duct Support make sure you have the following information ready Operating system version Configuration number If you are using security know the type Funk or Microsoft and the full set of parameters Power management settings If you are using terminal emulation TE know the version and protocol If you are not using TE know the language your custom application was written in and the tools you used to...

Page 91: ...ed contrast level Make sure the backlight is on by pressing the Brightness button Make sure you are connected to a power supply Reset the CV30 For help see Resetting the CV30 on page 9 The Battery light is on The backup battery needs to be replaced immediately The CV30 appears to be locked up and you cannot enter data Try these possible solutions in order Press Power to turn off the CV30 and then ...

Page 92: ...are using the correct static WEP key Sometimes you can see the strong signal strength and that security is enabled even with the WEP key set incorrectly The CV30 indicates that it is not authenticated Make sure that the User Name and Password parameters on the CV30 match the user name and password on the authentication server You may need to re enter the password on both the CV30 and the authentic...

Page 93: ...s manual The CV30 is not communicating with the access point Try these possible solutions in order The CV30 is not connected to the access point Make sure the access point is turned on and operating You may also be using the CV30 out of range of an access point Try moving closer to an access point to reestablish communications Make sure the CV30 is configured correctly for your network The radio p...

Page 94: ...ration command such as Beeper Volume and you hear three low beeps If you are using Intermec Setting you cannot scan configuration commands Exit Intermec Settings to scan configuration commands You scan or enter an option for the Scanner Model configuration command and you hear three low beeps You may have scanned or enter a Scanner Model command that does not apply to the type of scanner that you ...

Page 95: ...a bar code You may need to type this information instead of scanning it You selected 1551E or 1553 and enabled the scanner port but the scanner does not scan Try these possible solutions in order Select ASCII as the scanner model Make sure that you are using the correct cable and that it is attached correctly when you attach the scanner to the port it should emit a single power up beep Try enablin...

Page 96: ...lp see the next section Upgrading the CV30 Using an SD Card You can upgrade your computer using the SmartSystems Server For help see Upgrading Your CV30 Using SmartSystems Server on page 88 You need to download the latest upgrade files from the Intermec web site to your desktop computer To download the upgrade files 1 Start your web browser and go to the Intermec web site at www intermec com 2 Go ...

Page 97: ...h the process of extracting the upgrade files The installation wizard extracts the upgrade files to C Program Files Intermec version Copy all files in this directory to the SD card Do not copy the exe file to the SD card 4 If you are using an SD card reader remove the SD card from the CV30 and place it in the reader 5 Copy the contents of the version folder to the SD card 6 If you are using an SD ...

Page 98: ... CV30 and place it in the reader 5 Copy the contents of the version folder to the SD card 6 If you are using an SD card reader insert the SD card into the CV30 7 Perform a clean boot on the CV30 For help see Troubleshooting the Boot Process Clean Booting on page 89 Upgrading Your CV30 Using SmartSystems Server You can use the SmartSystems server to upgrade the operating system on your CV30 The ser...

Page 99: ...nstalling the upgrade on your CV30 Once the upgrade is done downloading to your CV30 your CV30 replaces the operating system and then automatically cold boots Progress messages appear on the CV30 screen The SmartSystems server will show your CV30 as being offline until the CV30 reboots and reconnects to the system Troubleshooting the Boot Process Clean Booting When you clean boot the CV30 it loads...

Page 100: ...ge appears on the display asking if you want to clean boot the system 4 Press the Volume Up button to start the clean boot process After some programs load you are prompted to calibrate the screen 5 Calibrate the screen and then tap anywhere on the screen to exit the application The CV30 continues with the boot process 6 Reload any custom applications that may have been erased during the clean boo...

Page 101: ... to clean the screen whenever necessary depending on the environment in which you use the computer To clean the CV30 use a solution of ammonia and water To clean the screen 1 Disconnect the CV30 from the power supply 2 Dip a clean towel or rag in the ammonia solution and wring out the excess Wipe off the screen Do not allow any abrasive material to touch these surfaces 3 Wipe dry ...

Page 102: ...Chapter 5 Troubleshooting and Maintaining the CV30 92 CV30 Fixed Mount Computer With Windows CE User s Manual ...

Page 103: ...CV30 Fixed Mount Computer With Windows CE User s Manual 93 A Specifications ...

Page 104: ...cessories for the CV30 You can use these accessories sold and ordered separately with the CV30 To order accessories contact your local Intermec sales representative 2455 CV30 Adapter Plate P N VE011 2011 Use this adapter plate to mount the CV30 in an existing 2455 installation Height 17 65 cm 6 95 in Width 18 92 cm 7 45 in Depth 5 46 cm 2 15 in Weight 1 47 kg 3 25 lbs Operating 6 60 VDC input DC D...

Page 105: ...e this cable to connect two USB devices to the CV30 CV30 Developer Cable Assembly P N VE011 2018 Use this cable to connect the CV30 to the USB port on your desktop PC This cable is to use for ActiveSync connections from your desktop PC to the CV30 CV30 Screen Protector P N VE011 2010 Use the screen protector to keep the touch screen from getting damaged in harsh work environments CV30 Tethered Sty...

Page 106: ... You can purchase these scanner cables to use with the CV30 SR60 RS 232 decoded cable P N 321 642 002 9 pin with power RS 232 cable P N 3 604032 05 Slot Reader P N 858 098 001 or 858 098 002 You can connect either a visible light or infrared light slot reader The slot reader comes with a mounting plate to attach it to the CV30 Universal Power Supply P N 851 082 004 Use the universal power supply t...

Page 107: ...CV30 Fixed Mount Computer With Windows CE User s Manual 97 I Index ...

Page 108: ...ctiveSync 71 using Avalanche 73 using SmartSystems Console 71 using the SD card 72 launching automatically 77 ASCII scanner configuring 16 association label Bluetooth 32 audio device connecting a Bluetooth 37 authentication server defined 41 troubleshooting 82 AutoRun script commands 77 using to launch other processes 77 AutoRun dat 77 AutoRun exe 77 AUX connector described 4 illustrated 4 Avalanc...

Page 109: ...31 clean boot storing files to rebuild system 70 the CV30 89 cleaning the screen 91 cold booting with the Reset button 10 COM1 connector described 4 illustrated 4 COM3 connector described 4 illustrated 4 communications setting up 802 11 radio 38 compact keyboard 13 accessory described 95 mounting kit accessory described 95 configuration number finding 80 configuring 802 11 b g radio communications...

Page 110: ...y 65 discoverable setting for Bluetooth 31 DiskOnChip description 70 storing applications 70 download upgrade files 86 drag and drop using SmartSystems Console 89 dual USB cable assembly 95 E EAP defined 41 EAP FAST security configuring 58 electrical rating 94 enabling Bluetooth radio 30 Enroll Certificates 63 entering information 22 Enterprise mode defined 41 environmental specifications 94 Ether...

Page 111: ...develop applications 68 Intermec Settings finding list of all commands 28 navigating within 29 opening 28 starting 28 using to adjust volume 6 using to configure CV30 28 using to connect a tethered scanner 15 Intermec Value Add IVA functionality 86 internal touch screen heater 8 Internet Explorer default web page 26 using 25 using for web based applications 69 K keyboard compact 13 accessory descr...

Page 112: ...C options 8 Power button illustrated 3 4 pressing to reset 10 troubleshooting 81 using 5 power connector described 4 illustrated 4 power setting for Bluetooth 31 power specifications 94 power supply DC DC 15 96 VDC accessory described 96 DC DC 6 60 VDC accessory described 95 Pre Shared Key mode defined 41 Printer Support InstallSelect component 76 printing wireless 33 Product Support calling 80 pr...

Page 113: ...rity 802 1x overview 42 choice Funk or Microsoft defined 43 configuring 802 1x with Funk security 47 EAP FAST security 58 LEAP 48 LEAP security 56 Microsoft 59 PEAP security 52 TLS security 53 TTLS security 55 WEP security with Funk security 49 with Microsoft 61 WPA security with Microsoft 61 WPA2 802 1x security with Funk security 45 WPA2 PSK security with Profile Wizard 52 WPA 802 1x security wi...

Page 114: ...tethered scanner connecting 14 tethered stylus accessory described 95 third party certificate authority using to issue certificates 63 TLS security configuring 53 overview 42 top cover removing 16 touch screen aligning 7 calibrating 7 default screen 6 internal heater 8 navigating 7 specifications 94 using 6 warming up 6 Trakker Antares application converting to CV30 69 Transcriber using 23 trouble...

Page 115: ... 23 wireless communications checking status 39 configuring 38 troubleshooting 83 wireless printing applet defined 33 icon illustrated 35 choosing the printer from a list 37 configuring 33 current wireless printer selecting 34 Development Guide 30 manually entering printer address 36 wireless scanner configuring CV30 to communicate with 31 connecting with Bluetooth Scanner Wizard 32 removing 33 wiz...

Page 116: ...Index 106 CV30 Fixed Mount Computer With Windows CE User s Manual ...

Page 117: ......

Page 118: ...dwide Headquarters 6001 36th Avenue West Everett Washington 98203 U S A tel 425 348 2600 fax 425 355 9551 www intermec com CV30 Fixed Mount Computer With Windows CE User s Manual 935 012 001 P N 935 012 001 ...

Reviews: