


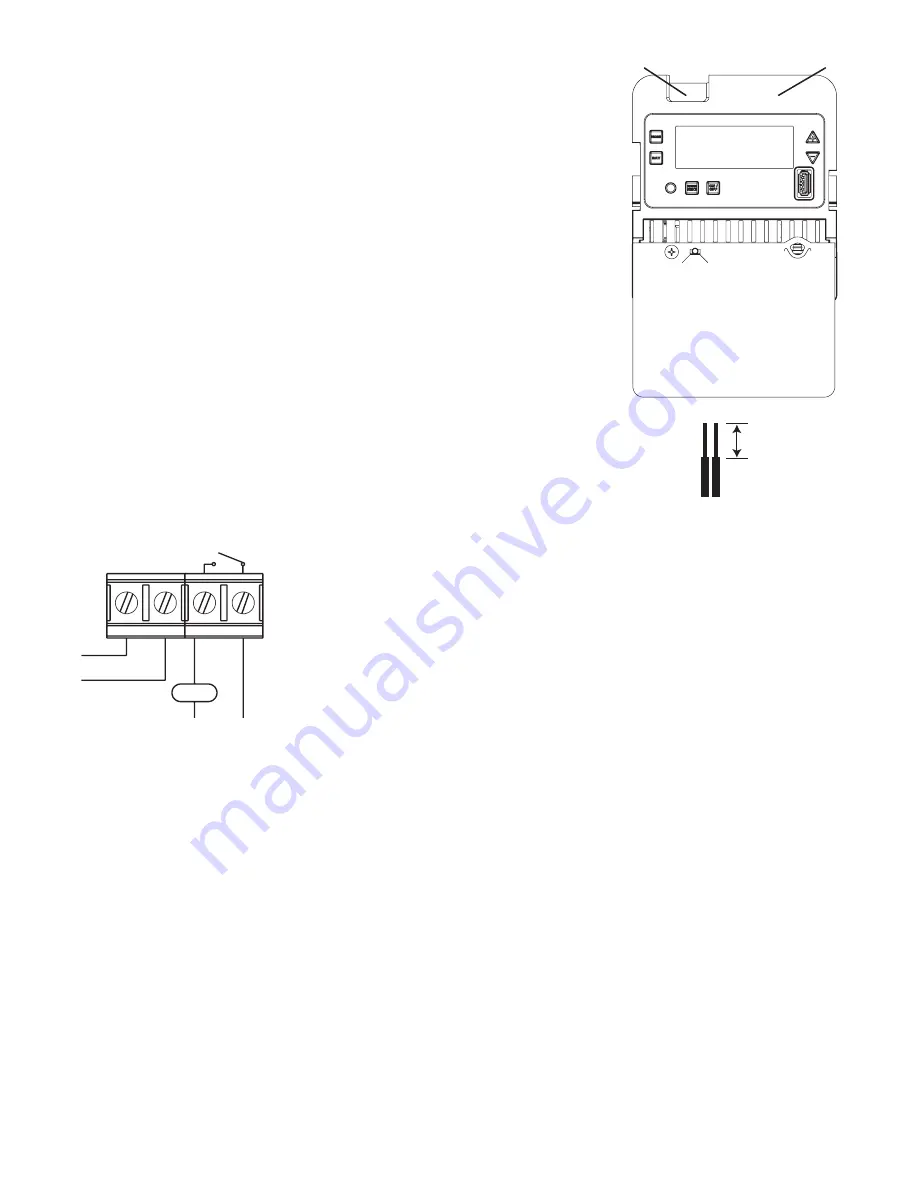
LOAD1
L1
L2/N
N
L
(120/277 VAC LOAD)
CIRCUIT 1
TIMER
POWER
COM1
NO-1
AC IN
OUTPUT CONFIGURATION: IND
Latch location
Tilt top forward
Installation
Follow these instructions to install the time switch.
1. Open the time switch enclosure door.
2. Remove and retain the screw that secures the plastic insulator.
3. Lift the left side of the plastic insulator and pivot away to expose the terminal strip.
4. Press the latch at the top of the enclosure and pull out the mechanism from the
enclosure.
5. Choose and remove the selected knockout(s) from the enclosure.
NOTE:
There are five 1/2 inch to 3/4 inch combination knockouts available. There are
two on the bottom of the enclosure, one on each side, and one on the rear. If a 3/4
inch knockout is needed, remove the 1/2 inch knockout first, then the 3/4 knockout.
6. Place the enclosure in the desired location providing space for the enclosure door to
swing open fully.
7. Securely mount enclosure using provided mounting holes.
8. Use appropriately rated fittings for the installation.
9. Snap the mechanism back into the enclosure.
10. Strip 1/2 inch off the supply and load wires. Use AWG #14-#8 copper conductors
rated at least 105ºC.
11. Connect the wires to the proper terminals on the time switch and tighten the screws
firmly (See wiring diagrams).
12. Connect ground wire to grounding terminal at the bottom of metal enclosures.
13. Return the insulator to its original position and replace the screw.
14. Close enclosure door.
15. Apply power to the time switch.
Wiring Diagrams
1/2 inch
Initial Setup
The following sections provide instructions for the initial setup of the time switch.
Programming Overview
The steps to program the time switch include setting the current date, time, Astro zone, Astro events, fixed events, DST, and holiday
events, setting the time switch’s operation to AUTO mode, ENERGY SAVER mode or MANUAL mode (only MANUAL mode will
appear if there are no scheduled events) and read or write an event schedule from a USB memory stick.
NOTE:
If the time switch is left inactive for five minutes in a programming mode, it will return to the AUTO mode screen (
AUTO
icon
turned on). If no scheduled events are programmed, the time switch will return to MANUAL mode. If the date has not yet been
entered, the time switch will go to the Enter Date Mode.
Setting Date
Follow this procedure below to set the date and time in the time switch.
NOTE:
If necessary, hold + or - to scroll through the digits rapidly.
1. Press MODE to scroll through the mode selections until
SET
and
DATE
icons appear at the top of the display. The month
flashes.
2. Press + or - to select the current month and then press ENTER/NEXT. The day of the month flashes.
3. Press + or - to select the current day of the month, and then press ENTER/NEXT. The year flashes.
4. Press + or - to enter the current year, and press ENTER/NEXT. The month will flash again.
5. Press MODE to move to the next mode selection.


