background image


22 


1. 


Select main menu - Option 4, System Test. 

2. 


Enter your Installer code. 

3. 


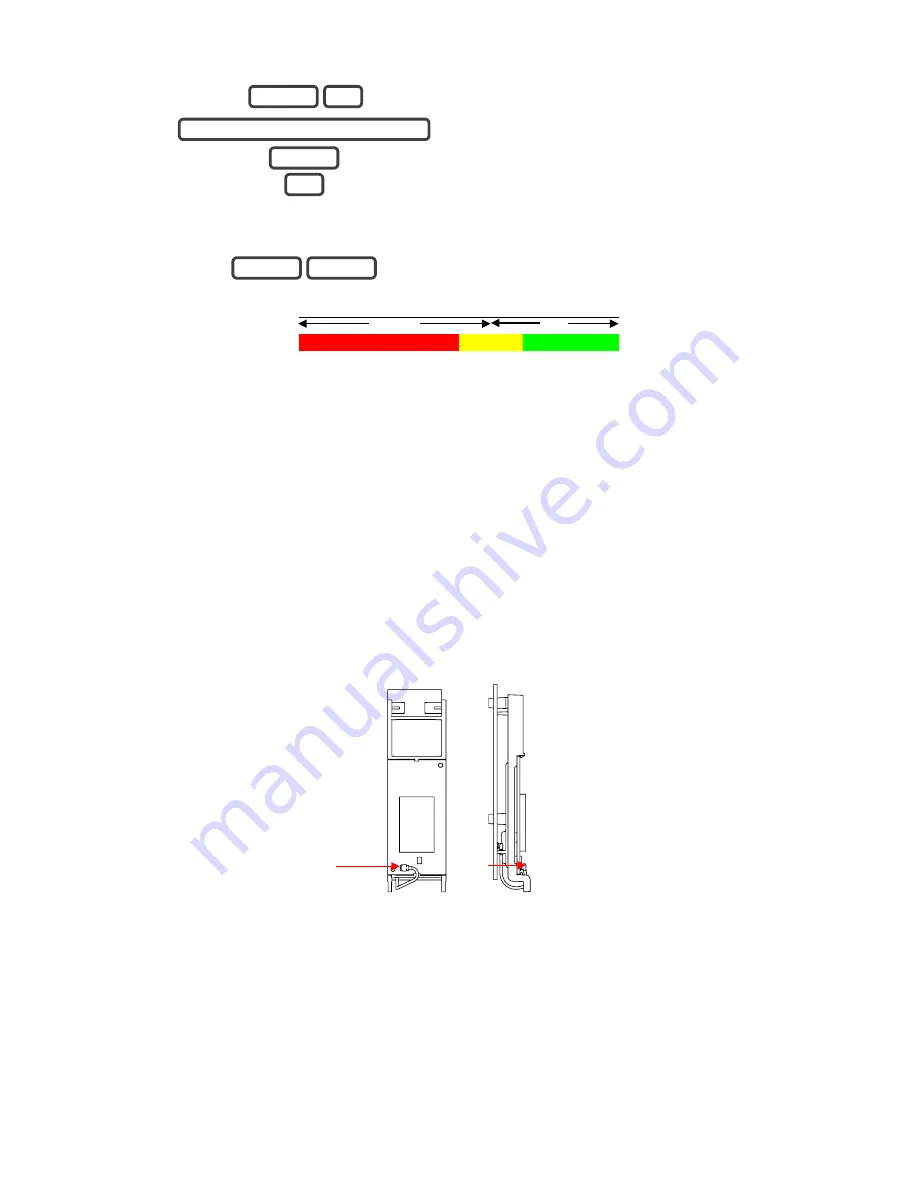
Check Cellular Signal Level 

Menu 5 is only available if the cellular radio has 
adequate reception and the SIM card is registered on 
the network 

4. 


Exit from the Advanced system configuration menu. 


Low 

OK 

-121 

-107 

-98 

-89 

-76 

-51 


•  If the reported value is -88 to -51 then the signal level is OK. 

In this case, skip to the 

Completing Installation section.


•  If the reported value is -121 to -89 then installing an external antenna is recommended.


In this case, follow steps below to install an external antenna to improve the 
signal level. 

Note: 

Remember that signal levels vary day to day and are not absolute values. 

Installing The Optional External Antenna (ZW-ANT3M) 

Complete this section only if signal level is between -121 to -89. Otherwise skip to 
Completing Installation. 

1.  Disconnect power to ZeroWire 

2.  Disconnect the antenna cable from the radio module. 


Front View   

Side View 

3.  Gently push retaining clips outwards and remove rear circuit board. This is the internal 

antenna which will no longer be needed. 

MENU 

MENU 

ENTER 

YOUR 4 TO 8 DIGIT INSTALLER CODE 

MENU 

Summary of Contents for ZEROWIRE ZW-6404

Page 1: ...P N 466 2520 REV I ISS 02NOV16 ...

Page 2: ...10 Notification output signals provided Option D according to EN 50131 1 Tested and certified by Telefication Compliance labelling should be removed or adjusted if non compliant configurations are selected Important This product has not been designed to comply to EN 50134 and EN 54 norms EU compliance EU directives UTC Fire Security hereby declares that this device is in compliance with the applic...

Page 3: ...lar Radio 20 Connecting Power 20 Reset Installer Account 21 Checking Signal Level 21 Installing The Optional External Antenna ZW ANT3M 22 Completing Installation 23 Installing The Battery 24 Installing ZeroWire on Wall 24 Installing ZeroWire on Desk 25 Resetting to Factory Defaults optional 25 Setting Up Connections 26 Selecting a Permanent Connection Mode 26 Wireless LAN Setup 27 Wired LAN Setup ...

Page 4: ...earning Zones into ZeroWire 58 Advanced Zone Walk Test 62 Adding a User Keyfob 63 Changing Keyfob Options 65 Setting Up Reporting 66 Configuring Email Reporting 66 Personalising Your ZeroWire 67 Volume Level 67 Voice Annunciation 67 Full Menu Annunciation 67 Backlight Level 68 Changing Time and Date 68 Adjusting Area Entry or Exit Times 69 Testing Your System 70 System Tests 70 Performing a Walk T...

Page 5: ... 84 Relinquish Primary Control of ZeroWire to another Controller 85 Replacing a Failed Node 87 Removing a Failed Node 88 Programming Soft Keys 89 Send User PINs to Z Wave Door Lock 90 Connecting Inputs 93 Connecting Outputs 95 Customizing Reporting Codes 97 DLX900 Software 99 Upgrading Firmware using DLX900 101 Upgrading Firmware using USBUP 101 System Status Messages 102 UltraSync app and Web Ser...

Page 6: ...ken during the preparation of this manual to ensure the accuracy of its contents UTCFS assumes no responsibility for errors or omissions Product Warnings YOU UNDERSTAND THAT A PROPERLY INSTALLED AND MAINTAINED ALARM SECURITY SYSTEM MAY ONLY REDUCE THE RISK OF EVENTS SUCH AS BURGLARY ROBBERY FIRE OR SIMILAR EVENTS WITHOUT WARNING BUT IT IS NOT INSURANCE OR A GUARANTEE THAT SUCH EVENTS WILL NOT OCCU...

Page 7: ... The equipment should only be operated with an approved power adapter with insulated live pins Caution Risk of explosion if battery is replaced by an incorrect type Dispose of batteries according to the instructions Contact your supplier for replacement batteries Warranty Disclaimers INTERLOGIX HEREBY DISCLAIMS ALL WARRANTIES AND REPRESENTATIONS WHETHER EXPRESS IMPLIED STATUTORY OR OTHERWISE INCLU...

Page 8: ...E INFORMATION IN THIS DOCUMENT IS SUBJECT TO CHANGE WITHOUT NOTICE UTC ASSUMES NO RESPONSIBILITY FOR INACCURACIES OR OMISSIONS AND SPECIFICALLY DISCLAIMS ANY LIABILITIES LOSSES OR RISKS PERSONAL OR OTHERWISE INCURRED AS A CONSEQUENCE DIRECTLY OR INDIRECTLY OF THE USE OR APPLICATION OF ANY OF THE CONTENTS OF THIS DOCUMENT FOR THE LATEST DOCUMENTATION CONTACT YOUR LOCAL SUPPLIER OR VISIT US ONLINE A...

Page 9: ...hat could result in injury or loss of life They tell you which actions to take or to avoid in order to prevent the injury or loss of life Caution Caution messages advise you of possible equipment damage They tell you which actions to take or to avoid in order to prevent the damage Note Note messages advise you of the possible loss of time or effort They describe how to avoid the loss Notes are als...

Page 10: ......

Page 11: ...eb Server Screen shots of the ZeroWire Web Server are also included for your reference Similar screens appear on the UltraSync app Instead of using the keys on the front of the ZeroWire you can also set up the system with the built in web server interface using a browser see Installation Using Web Server on page 57 an application for mobile devices see Installing UltraSync app on page 40 or the DL...

Page 12: ...hone service Z Wave ZeroWire is Z Wave security enabled device allowing control of home automation devices Your new security system Check that everything is complete before beginning your installation If anything is missing please contact the customer service ZeroWire model ZW 6404 ZeroWire Home automation and security system Wall Bracket 9 VDC Power Pack Backup Battery Pack Input Output Lead Quic...

Page 13: ... All zones are ready and the system can be armed in Away or Stay mode Key Colour Description READY Green flashing Zones are currently unsealed but system is force armable If these zones are not sealed by the end of the exit time the system will go into alarm unless set up for automatic bypass BYPASS Press the BYPASS key if you wish to isolate ignore a zone Bypassed zones will not be active when yo...

Page 14: ...lar radio module are located under the cover on the right Panel Tamper Battery Cover Screw Input Output Connector External Antenna Connector Ethernet Connector Cellular Radio Cover Reset Button Power Connector Siren Mounting Bracket Screw Speaker ...

Page 15: ...s unintentional permanent disabling of a zone Central Station A company to which alarm signals are sent during an alarm report Also known as Central Monitoring Station CMS Channel A channel is a communication path for events to be sent from the ZeroWire panel to a selected destination Channels can be set to UltraSync or Email A channel has an associated event list which contains the events it is a...

Page 16: ...ion Output Outputs on the ZeroWire panel can be connected to a siren and strobe when an alarm condition occurs on the system Perimeter Typically this refers to zones located around the boundary of the protected area such as zones on doors and windows and excludes interior motion zones Permission A permission includes a list of features a user or device is allowed to access This includes programmin...

Page 17: ...ervers which then connects you securely to your ZeroWire system and cameras UltraSync Servers A secure cloud service with full redundancy to route encrypted alarm messages from your ZeroWire to a Central Monitoring Station It also provides secure connections between the UltraSync app ZeroWire and cameras No programming email addresses user names or PIN codes are stored on these servers for greater...

Page 18: ...ypad Zone A detection device such as a Passive InfraRed motion zone PIR reed switch smoke detector panic button etc Zones may be physically wired to the ZeroWire system Also known as an input or sensor on other security panels Z Wave ZeroWire is a Z Wave security enabled device allowing control of Z Wave home automation devices ZeroWire can act as a secure Z Wave controller This feature allows rem...

Page 19: ... Location When choosing a location for your ZeroWire there are a number of appliances and areas to avoid which could interfere with the security system Choose a central location for the best reception to all wireless detectors and Z Wave devices If the ZeroWire Cellular Radio is installed select a location with sufficient signal Avoid TV and other electronic appliances Avoid microwave ovens Avoid ...

Page 20: ...r location which has stronger signal levels Note that actual signal level can only be determined using the ZeroWire connected to a specific network which may be different than your phone 2 If a cellular radio module is pre installed skip to the Check Signal Level section If not remove the cover on the right 3 Locate the 10 pin lead inside the ZeroWire and connect this to the radio module Connectin...

Page 21: ...r of the ZeroWire Avoid using multiple power adapters and power boards Note ZeroWire should be connected to a power source at all times The battery is a backup power source and the ZeroWire is designed to run on the battery pack during a power failure only and NOT for prolonged periods of time Reset Installer Account 1 Disconnect power 2 Use a small screwdriver to hold down the reset button 3 Turn...

Page 22: ...talling an external antenna is recommended In this case follow steps below to install an external antenna to improve the signal level Note Remember that signal levels vary day to day and are not absolute values Installing The Optional External Antenna ZW ANT3M Complete this section only if signal level is between 121 to 89 Otherwise skip to Completing Installation 1 Disconnect power to ZeroWire 2 ...

Page 23: ...n below 6 Reconnect power and wait 1 minute for the cellular radio to connect 7 Retest signal level in Menu 4 5 8 Move the ZeroWire or the antenna to another location if the signal is still too low Completing Installation 1 Insert the whole radio module in to the ZeroWire taking care not to crimp any cables 2 Replace the modem cover on the ZeroWire External Antenna Connector ...

Page 24: ...long term power source Plugging in the battery should be followed quickly with the plugging in of the DC power supply Installing ZeroWire on Wall 1 Install the bracket on a wall by using the supplied screws Make sure the power lead can reach the ZeroWire when plugged in to a power source 2 Align the ZeroWire to the top clips on the wall bracket then slide the ZeroWire in to place so it sits flat a...

Page 25: ... optional ZW DS01 table stand to place the ZeroWire on a secure flat surface Cables should route through the hole in the base Ensure the box tamper is off Resetting to Factory Defaults optional Follow these steps to reset your ZeroWire back to factory default settings 1 Select main menu Option 9 2 Enter your Installer code 3 Select resetting to the factory defaults 4 Confirm by pressing the BYPASS...

Page 26: ...e ZeroWire You will need to also provide an Ethernet router and an internet connection for reporting and remote access To select between Wireless LAN or Wired LAN modes 1 Select main menu Option 9 Advanced system configuration 2 Enter your Installer code 3 Toggle between Wireless LAN and Wired LAN connection modes 4 Exits from Advanced system configuration menu 3 3G Cellular Radio Setup this provi...

Page 27: ...enu Option 9 Advanced system configuration 2 Enter your Installer code 3 Turn on WiFi Discovery Mode for 10 minutes 4 Exits from Advanced system configuration menu 2 Enable WiFi on your mobile device 3 On your mobile device browse for available WiFi networks and select the ZeroWire_xxxx network to connect to it Note Some devices have a smart feature which will check if the WiFi point has access to...

Page 28: ...5 Enter your username and password by default this is installer and 9713 6 Click Sign In you should now see a screen similar to the one below Note The set of menus displayed depends on the access rights of the user logged in the system The screen above shows default installer menus but they can be different for a Master User standard user and an installer with Master User rights For more informati...

Page 29: ...onnect to the customer s WiFi network you selected The webpage on your device will stop responding this is normal 12 On your mobile device connect to the same WiFi network you selected in step 10 13 On the ZeroWire press Menu 8 PIN 6 and note the IP address announced If you hear IP address is not configured then wait a further 30 s and repeat this step 14 Open your web browser and enter http IP ad...

Page 30: ...Fi router allows b and g connections Some newer routers will have these off at factory default Some 802 11n access points may not accept 802 11g connections it is within range and has good signal otherwise a WiFi range extender may help the wireless router has DHCP enabled does not have firewall or security rules that prevent additional connections IP addresses are available for example connect a ...

Page 31: ...ice using the IP address announced 2 Click Settings 3 Select Connection Status in the drop down menu 4 Check that a LAN Status should display Connected b LAN Media should display WiFi c UltraSync Status should display Connected d UltraSync Media should display LAN If it does not 1 Check cable connection 2 Check router settings ...

Page 32: ... cable to the rear of the ZeroWire and wait 10 sec for the local router to assign the ZeroWire an IP address 4 On the ZeroWire press Menu 8 PIN 6 and note the IP address announced If you hear IP address is not configured then wait a further 30s and repeat this step 5 Open your web browser 6 Enter http IP address The ZeroWire login screen should appear 7 Enter your username and password by default ...

Page 33: ... 37 The same applies to a connection via the UltraSync app 9 Your ZeroWire is now successfully connected to your Wired LAN network Click Settings or Advanced to program your ZeroWire Check LAN Connection to UltraSync 1 Log in to the ZeroWire Web Server from your mobile device using the IP address announced 2 Click Settings 3 Select Connection Status in the drop down menu 4 Check that a LAN Status ...

Page 34: ...th to the central monitoring station over a cellular network if the Ethernet WiFi connection is not working Your cellular radio module should be pre configured and function once plugged in to the ZeroWire If not please refer the manual that comes with the cellular radio for instructions on how to install it 3G cellular network Mobile Phone Tower To internet ...

Page 35: ...ssword Once connected the ZeroWire will be assigned a fixed IP address of 192 168 1 3 4 Open your web browser and enter http 192 168 1 3 The ZeroWire login screen should appear 5 Enter your username and password by default this is installer and 9713 6 Click Sign In you should now see a screen similar to the one below Note The set of accessible menus depends on the access rights of the user logged ...

Page 36: ... state it should display Connected 2 Wait until cell state displays Connected click Reload to refresh the status 3 Check signal level in Menu 4 5 signal level should be between 91 to 51 4 Contact Tech Support for assistance Check radio module is correctly installed Check radio antenna is correctly installed or move the antenna to a higher location Check cable connection of Ethernet cable Check rou...

Page 37: ...s provider Access rights and available menus The set of accessible menus depends on the access rights of the user logged in the system Main Menu Installer Code The screen above shows the ZeroWire s menu when accessed via installer code when the installer code is NOT set with master user authorities Particularly no User settings are available to the installer Note The Installer type can only be set...

Page 38: ...irst installer login Note The Master Installer type can only be set via the DLX900 software Main Menu User with Master Code Advanced installer menus will be hidden when accessed by a user with a master code This is a default view for the first User 1 login Main Menu Standard User Code When accessed by standard users all menus for changing system settings and settings for other users will be hidden...

Page 39: ...ge Web Access Passcode 4 Enter a new Web Access Passcode 5 CODE FLASHES ON KEYPAD Passcode will flash on keypad for confirmation 6 Exits from Advanced system configuration menu Alternatively you may use the Web Server 1 Log in to the ZeroWire Web Server from your mobile device using the installer account 2 Click Settings 3 Click Network 4 Enter a Web Access Passcode MENU MENU ENTER 8 DIGIT CODE 9 ...

Page 40: ...to edit an existing site 6 Enter the details of your security system The serial number is printed on the back of the ZeroWire unit Alternatively login to ZeroWire Web Server and go to Settings Details to view it The default Web Access Passcode of 00000000 disables remote access To change it login to ZeroWire Web Server and go to Settings Network The default username and PIN code is installer 9713 ...

Page 41: ...rogramming and app to end current session This allows the panel to reconnect on the new mode Check Settings Network Enable UltraSync is ticked Check that your mobile device has access to the internet e g open a web browser Try disabling WiFi on your device once the ZeroWire is configured and using the 3G 4G data connection of your device with the UltraSync app Check the UltraSync servers are corre...

Page 42: ...allows you to activate programmed automation scenes The menu bar is located along the bottom of the app Touch the Zones icon last icon with a dot and wireless signals to view zone status Touch Bypass to ignore a zone or touch it again to restore it to normal operation Touch Chime to add or remove a zone from the Chime feature Touch Notify to receive push notifications when there is activity from t...

Page 43: ...the Camera screen Touch the Play button under each camera to view the last recorded clip by that camera Touch the Share button to save or forward the clip Touch the Record button to request that camera record a short clip which can be retrieved at a later date Video clips can also be accessed from the History screen Touch Menu HISTORY then change Selected Events to Video Touch Press to Play Video ...

Page 44: ...Event Log Events followed with an are for events not intending to be reported to a control room If you have Z Wave devices installed touch the Light or Lock icon to view and control them Master users will have access to the full Users menu for creating and managing users Touch Menu USERS After making any changes remember to click Save To apply custom permission to a user change User Type to Custom...

Page 45: ...aller Code This is the master key to most features Always change this to prevent accidental modifications by end users and an unauthorized access to the security system User 1 PIN code is 1234 at default Always change this to prevent unauthorized access to the security system User 1 username is User 1 at default with a space between User and 1 This is required to provide end user access to the Zer...

Page 46: ...e Web Server UltraSync app and upload download from the DLX900 management software Enable remote access for UltraSync app by changing Web Access Code The default Web Access Passcode of 00000000 prevents remote access To change it login to ZeroWire Web Server and go to Settings Network ...

Page 47: ...ion Manual 47 Enable remote access for DLX900 by changing Download Access Code The default Download Access Passcode of 00000000 prevents remote access To change it login to ZeroWire Web Server and go to Settings Network ...

Page 48: ...us button is pressed it will announce the condition then this phone number Add your phone number under Advanced System Service and Test Options Troubleshooting Problem Solution Cannot get IP address If you are unable to get an IP address then your wireless router may not be configured for automatic DHCP or certain security settings may be enabled Check your router settings and try again Cannot see...

Page 49: ...tructions are for general information only Please refer to the manual included with each detector for further details 1 Remove the detector from packaging 2 Remove a battery cover of the detector 3 Install batteries taking care to insert them correctly Batteries inserted with reverse polarity may damage the detector Installation Suggestions Wireless detectors feature low power transmission to maxi...

Page 50: ...ode 3 Select 1 to add detector 4 Activate the detector learn in sequence see specific wireless detector manual for instructions ZeroWire will announce that the detector or keyfob is detected 5 Assign the detector as zone number 1 or just press Enter to automatically assign a number Press 1 6 for the zone type 6 Exit from the menu Zones Guide A zone sometime referred to as a detector sensor or inpu...

Page 51: ... 7 Silent Panic Smoke Zones Smoke Zone 8 Fire Alarm 5 Fire Configuring Zone Names All zones can be named using library words on page 106 This makes it easier to identify the correct detector in the event of a condition You may enter up to eight words to achieve your desired description Example Configure zone 1 name as Dining Room Zone 1 Select main menu Option 6 Basic system configuration 2 Enter ...

Page 52: ...enu Testing Zone Signal Level Check the signal level of each zone once installed 1 Select Main Menu Option 4 System Test 2 Enter your Installer code 3 Select zone walk test 6 Trip each zone and listen to the voice feedback on the panel 8 Exit from the menu If signal is low then move zone to another location Alternatively move your ZeroWire to a more central location MENU MENU MENU TRIP DETECTOR 4 ...

Page 53: ...to 8 digits in length User name must be assigned to give that user access to the UtraSync app or ZeroWire Web Server The default installer account is User 256 with the user name installer and PIN code 9713 with Master Engineer user type These details are used to login to the ZeroWire Web Server web pages and UltraSync app The default master account is User 1 and PIN 1234 with a space between User ...

Page 54: ...nt history Arm only users can only turn on the security system they cannot disarm or dismiss any system conditions Example Change user 6 to a master user and allow to add remove other users 1 Select User Configuration menu 2 Enter your MASTER code 3 Select 2 to configure user type 4 Select the user number 5 Select 2 for the installer user type available options 1 Standard 2 Master 3 Arm Only 6 Exi...

Page 55: ...ur Master code 3 Select 1 to configure user PIN 4 Select user 4 5 Press Bypass to disable the selected user s PIN code 6 Exit from the menu Adding a Keyfob Example Add a new keyfob and assign it as user 65 1 Select Zone Configuration 2 Enter your Master code 3 Select 1 to add a keyfob 4 Activate the keyfob learn in sequence see specific wireless keyfob manual for instructions ZeroWire will announc...

Page 56: ...Removing a Keyfob Example Remove keyfob user 65 from your system 1 Select Zone Configuration menu 2 Enter your Master code 3 Select 2 to remove a zone or keyfob 4 Select 2 to remove a keyfob 5 Select the keyfob number 6 Exit from the menu MENU MENU MENU ENTER 65 2 2 ENTER YOUR 4 TO 8 DIGIT MASTER CODE 5 MENU MENU MENU MENU ENTER 65 ...

Page 57: ...n strength as they pass through different building materials with brick and concrete absorbing more of the signal Keep detectors away from household appliances and metal surfaces e g refrigerator TV washing machine garage door Metal surfaces will reflect the signal away If you have a double storey property it is suggested the ZeroWire unit be installed on the highest level for the best signal stre...

Page 58: ...your username and password by default this is installer and 9713 then click Sign In 3 You should now see a screen similar to the one shown below This screen displays colour coded system status messages Red critical messages including alarm Yellow zones bypassed Blue system fault conditions present Green system is normal 4 Click Settings 5 Click Zones ...

Page 59: ...ly this is performed by opening the detector s case This will send a tamper signal to ZeroWire 8 The screen will indicate the device has been learnt and a serial number will appear 9 Customize zone settings if required by referring to the Zone Guide Zone Profile Type Guide and Zone Options Guide on the following pages ...

Page 60: ...Entry Exit Delay 2 Auto Bypass Entry 2 Yelping Y N N N Y 11 Instant Auto Bypass Instant Instant Y N N N Y 12 Event Only Event Only Silent N N Y N N 13 Momentary Key Switch Keyswitch Silent N N N Y N 14 Latching Key Switch Keyswitch Silent N N N N N 15 CO Detector Instant Pulsing Y N N N N Disarmed 1 Day Zone Instant Yelping Y N N N N 2 24 Hour Audible Instant Yelping Y N N N N 3 Entry Exit Delay 1...

Page 61: ...y reporting Zone trouble and restore reporting Normally Open Fast Loop Zone Report Event 1 Bypass x x x x x x x 134 BA 2 Bypass Stay x x x x x x x x 130 BA 3 Bypass Forced Arm x x x x x x x x 134 BA 4 Bypass Cross Zone x x x x x x x x 134 BA 5 Fire x x x x x x x 110 FA 6 Panic x x x x x x x 120 PA 7 Silent Panic x x x x x x 122 HA 8 Normally Open no EOL x x x x x x x 130 BA 9 Normally Closed no EO...

Page 62: ...Blank x x x x x x x x 130 BA 26 Blank x x x x x x x x 130 BA 27 Blank x x x x x x x x 130 BA 28 Blank x x x x x x x x 130 BA 29 Blank x x x x x x x x 130 BA 30 Blank x x x x x x x x 130 BA 31 Blank x x x x x x x x 130 BA 32 Blank x x x x x x x x 130 BA Advanced Zone Walk Test Check the signal level of each zone once physically installed in their correct location 1 Click Settings 2 Click Walk Test ...

Page 63: ... levels 6 If signal is low move the detector to another location Alternatively move your ZeroWire to a more central location if multiple zones have poor signal levels Adding a User Keyfob ZeroWire allows you to add up to 40 users Each user is assigned a PIN code and a user number This allows them to interact with the system 1 Connect to the ZeroWire Web Server either via WiFi Discovery Mode WiFi L...

Page 64: ...username and password A master code is required to add users by default this is User 1 with a space between User and 1 and 1234 Then click Sign In 3 You should see a screen similar to the one shown below 4 Click Users ...

Page 65: ...annot create users or review event history Arm only users can only turn on the security system they cannot disarm or dismiss any system conditions Duress users will send a duress event when they are used to arm or disarm the system Custom users can have additional permissions and settings configured 8 Click Save Changing Keyfob Options 1 Log in to ZeroWire Web Server or UltraSync app 2 Click Setti...

Page 66: ... Click Settings 3 Select Channels in the drop down menu 4 Click Select Channel to Configure where the Format is already set to Email 5 Enter an email address in a Destination field 6 Select an Event List 7 Enter a Channel Name for future reference 8 Click Save Installer and Engineer user types can customize Event List for selective reporting ...

Page 67: ...ciation on off Pressing 5 toggles full menu annunciation on off 4 Exit from the menu Full Menu Annunciation Turning this feature On gives full descriptions to all the options within the main menu Turning this feature Off shortens the descriptions 1 Select main menu Option 8 Basic system configuration 2 Enter your Installer code 3 Pressing 4 toggles voice annunciation on off Pressing 5 toggles full...

Page 68: ...eypad light timer expires 1 Select main menu Option 2 Backlight level 2 1 Run mode backlight level 2 Idle mode backlight level 3 Set brightness level to 1 4 Exit from the menu Changing Time and Date Time and date are normally automatically updated with an internet time server Example Setting the time as 9 30 AM and the date as 19 6 2014 1 Select main menu Option 8 Basic system configuration 2 Ente...

Page 69: ...mes Example Setting the entry time as 90 seconds 1 Select main menu Option 8 Basic system configuration 2 Enter your Installer code 3 2 Select area entry time 3 Select area exit time 4 Enter the new entry exit time 5 Exit from the menu MENU MENU MENU ENTER 0 9 2 ENTER YOUR 4 TO 8 DIGIT MASTER CODE 8 MENU MENU MENU MENU ENTER 4 1 0 2 ENTER 6 ...

Page 70: ... This is an important test to use regularly to verify that each detector is working correctly Example How to perform a zone walk test 1 Select main menu Option 4 System Test 2 Enter your Installer code 3 Select zone walk test 4 Walk past each motion detector open and close windows and doors with sensors The ZeroWire will pulse the siren and announce the zone name and the signal level of each senso...

Page 71: ...utomatically test the battery each day If the battery fails then your system can no longer protect your property in a power outage This is why replacing it when needed is very important The battery is a consumable part of the system and should be replaced every 5 years or when the battery test fails whichever is sooner Contact your service provider for replacement parts Example How to perform a ba...

Page 72: ...r security system These events include arming disarming system faults and alarmed zones Ensure your clock is set correctly as all events are time stamped Alarm Memory will announce the last zone s that caused your security system to go into an alarm condition 1 HISTORY Select History Menu 2 3 Listen to the last alarm memory event 4 Exit from History Menu It is recommended you record user names zon...

Page 73: ...y also review all events recorded by your security system 1 HISTORY Select History Menu 2 3 Listen to history events 4 Touch ENTER for next event Touch 0 for previous event 5 Exit from History Menu MENU 2 ENTER YOUR 4 TO 8 DIGIT MASTER CODE ...

Page 74: ... Groups Channel Groups Holidays Schedules Permissions a Groups b Options Timers User a Main b Advanced Permissions Schedules Menus Area Groups Channel Groups Action Groups Menus a Setup b Security c History d Communications e Times Cameras Actions Holidays 32 32 32 16 16 16 4 16 16 40 64 4 Zone Type Zone Options Area Group Schedule User Communicator a General Options b Auto Test c IP Config d Radi...

Page 75: ... 3 9 Event 4 10 Result 9 Arm Disarm 1 Arm Disarm Number 2 Name 3 User Number 4 Schedule Number 10 Devices 1 System Devices 1 Control 2 Interlogix Transmitters 1 Transmitter Number 2 Serial Number 3 User 4 Options 5 Scene 3 Z Wave Devices 1 Name 2 Basic Type 3 Generic Type 4 Specific Type 11 Permissions 1 Permission Number 2 Permission Name 3 Control Groups 4 Permission Options 5 User Timer Options...

Page 76: ...5 Make sure the MAC ID that is automatically populated in the MAC Address field matches the MAC Address printed on the underside surface of the camera 6 Click Save Note The camera may take up to 3 minutes to finalize the association with ZeroWire and display on the Cameras screen of the app 7 Congratulations You have now added the camera to your ZeroWire system Programming event triggered camera c...

Page 77: ...is communicating on network Use a command prompt cmd in Windows to ping the panel and the camera If both reply successfully then your device is connected correctly on the network Alternatively 3rd party network scanning apps and tools may be of assistance during installation Check the Settings Connection Status web page UltraConnect UltraSync Status must show connected If not contact your service ...

Page 78: ...es can function as repeaters to extend the range of Z Wave devices Supported 3rd party Z Wave security devices include selected light switches dimmers thermostats and door locks Door locks which support secure encryption can be used unencrypted locks cannot be added to ZeroWire ZeroWire may natively support setting and retrieving on off states setting and retrieving dimming levels and locking unlo...

Page 79: ...n added before or to another system you must first remove it before adding it to this system To do this click Remove then activate LINK or REMOVE mode on the device 7 Click Rooms 8 Check you can see the device you just added Click a button such as ON or OFF to verify you can control the device Note Access level is required for programming the Z Wave devices into ZeroWire ...

Page 80: ...80 Removing Z Wave Devices 1 Log in to ZeroWire Web Server or UltraSync app 2 Click Settings Z Wave Add Remove ...

Page 81: ...ire Installation Manual 81 3 Click Remove 4 Press the include button on the Z Wave device you want to remove See your Z Wave device s manual for instructions 5 Device will no longer appear in ZeroWire menus ...

Page 82: ...ettings Z Wave Add Remove 3 Start the Add process on the primary controller of the existing network 4 Press the Include button on the Zerowire the secondary device 5 Primary Controller will add ZeroWire to it 6 ZeroWire status will update to indicate it has been added as Secondary Controller 7 Save settings on Primary Controller ...

Page 83: ...pp 2 Click Settings Z Wave Add Remove 3 Start the Remove process on the primary controller of the existing network 4 Press the Exclude button on the Zerowire the secondary device 5 Primary Controller will remove ZeroWire from it 6 ZeroWire status will update to indicate it has been added as Secondary Controller 7 Save settings on Primary Controller ...

Page 84: ...n to ZeroWire Web Server or UltraSync app 2 Click Settings Z Wave Add Remove 3 Start the Control Shift function on the primary controller of the existing network This will typically involve pressing a Shift button 4 Press the Include button on the Zerowire the secondary device ...

Page 85: ...her network is the Secondary Z Wave Controller Relinquish Primary Control of ZeroWire to another Controller 1 Log in to ZeroWire Web Server or UltraSync app 2 Click Settings Z Wave Add Remove 3 Check ZeroWire is the primary controller and a secondary controller is already learnt in to ZeroWire ZeroWire in Primary Controller mode has Add Remove Cancel Shift and Include buttons ...

Page 86: ...86 4 Press the Shift button on ZeroWire the Primary Controller 5 Press the Exclude button on the Secondary Controller ...

Page 87: ...the Exclude button is visible indicating the ZeroWire is Secondary Controller 7 Secondary Controller shifts into Primary Controller Replacing a Failed Node 1 Click Settings Zwave Maintenance 2 On the Failed Device Selector click the node to be replaced 3 Click the Replace button 4 Press the include button on the new node ...

Page 88: ...88 Removing a Failed Node 1 Click Settings Zwave Maintenance 2 On the Failed Device Selector click the node to be removed 3 Click the Remove button 4 Status will show Device Removed when successful ...

Page 89: ...Log in to ZeroWire Web Server or UltraSync app 2 Click Settings Areas This will only be visible to the installer account 3 Uncheck the tick box for Manual Fire Manual Auxiliary and Manual Panic 4 Click Save The SOS buttons are now disabled and the three buttons trigger Key A Key B and Key C events respectively 5 Click Settings Scenes This is accessible to master user accounts 6 Select a Scene To C...

Page 90: ...Scene Action 2 to 16 if desired 13 Click Save 14 Press the Soft Key A B or C on the ZeroWire keypad to run the scene to confirm the behaviour is as desired Send User PINs to Z Wave Door Lock ZeroWire can send user PIN codes to an existing Z Wave Door Lock so the PIN codes on the alarm system can also be used to operate the door lock This feature is available to User Types Engineer Master and Custo...

Page 91: ...es these will not be changed However if they are default standard user PIN codes then ZeroWire will have access to change or remove them Each lock is different and you should test this feature on your specific lock to ensure only the appropriate codes are present 1 Log in to ZeroWire Web Server or UltraSync app 2 Click Settings Lock PIN Share 3 Select the Z Wave Door Lock in the drop down list 4 W...

Page 92: ... on door lock and verify only the codes you want can operate the lock 10 Refer to door lock manual to remove or change installer master codes from door lock As PIN codes can also be changed on the door lock over time there may be a mismatch in PINs on the door lock compared to ZeroWire To avoid this confusion only make PIN code changes via ZeroWire ...

Page 93: ...Set System Menu General Options Double EOL ON for tamper monitoring or OFF for no tamper To enable 4 inputs without tamper monitoring Set System Menu General Options Disable Hardwire Zones OFF Set System Menu General Options Panel Zone Doubling ON Set System Menu General Options Double EOL OFF IMPORTANT NOTES If hard wired inputs are programmed as zone 1 2 3 and or 4 then these will take priority ...

Page 94: ...Y ZONE TERMINAL ANY COM TERMINAL ZONE TAMPER EOL RESISTOR TAMPER CONTACT End Of Line Resistors for Zone Double 4 inputs 3 74K RESISTOR FOR ZONES 1 2 6 98K RESISTOR FOR ZONES 3 4 GROUND TERMINAL 6 98K E O L 3 4 ANY INPUT TERMINAL 3 74K E O L 1 2 3 74K E O L ANY INPUT TERMINAL ANY GROUND TERMINAL ZONE DOUBLED CONFIGURATION USED AS A FIRE ZONE UPPER ZONE 3 4 IS NOT USEABLE Resistor Diagram SINGLE ZON...

Page 95: ...h an action the output will monitor the status of the action When the action logic is true the output will be on When the action is false the output will be off If no action is assigned to an output the default behaviour is Output 1 Siren Output 2 Strobe To program outputs from ZeroWire Web Server 1 Click Advanced Actions 2 Create an Action refer to ZeroWire Reference Guide for more help 3 Click A...

Page 96: ...96 5 Click Access Assignment 6 Click the drop down action menu and select the action you want to control the output 7 The output will now be controlled by the state of the selected action ...

Page 97: ...A Entry Exit Alarm 8 135 BA Day Night Alarm 9 150 UA Non Burglary 24 Hour 10 121 HA Duress Alarm 11 122 HA Silent Panic 12 100 MA Medical Alarm 13 123 PA Audible Panic Alarm 14 137 TA Tamper Alarm 15 602 RP Periodic Test 16 151 GA Gas Detected 17 158 KA High Temp 18 154 WA Water Leakage 19 140 QA General Alarm 20 140 SA General Alarm 21 159 ZA Low Temp 22 158 KH High Temp 23 115 FA Fire Alarm Pull...

Page 98: ... Zone Report Event 5 Select the desired Contact I D SIA Event Code pair from the drop down menu 6 Click Save 7 Click Settings and Zones should appear 8 Assign the customized Zone Options to the Zone 9 Click Save ...

Page 99: ...se the Discover feature for LAN connections the Download Access Code see Troubleshooting section on page 99 and if Always Allow DLX900 is enabled then you will be allowed to connect if Always Allow DLX900 is disabled then you must first put the ZeroWire into program mode this can be changed in Settings Network 1 Install and launch DLX900 software 2 Login to DLX900 with utc 1234 You will need to en...

Page 100: ...ault the Communicator Menu will be hidden and the ZeroWire can be accessed on a LAN using DLX900 with disabled Download Access Code 00000000 Once the installer s PIN has been changed from 9713 the Communicator Menu will be accessible and the Download Access Code must be changed to allow access to DLX900 Check you can ping the ZeroWire Check the Download Access Code Check that remote access is enab...

Page 101: ...hen a system is first installed This is why you must change the Installer Code to protect the system from further changes Once the Installer Code has been changed this feature no longer works and you must have the correct Download Access Code Upgrading Firmware using DLX900 Upgrading firmware can be performed remotely using DLX900 1 Check with your supplier to download the latest firmware file for...

Page 102: ...y be pre installed Carefully remove it from the cavity but leave it connected 6 The 5 pin USBUP header is inside the ZeroWire panel 7 Connect your USBUP to this header using the cable supplied with your USBUP 8 Press and hold the button on the USBUP until the light begins to flash green rapidly Release the button and USBUP will continue the firmware transfer 9 When the light stays lit orange the f...

Page 103: ...rity system time and date need resetting Communication fault The security system has detected a problem with the communication path LAN or GSM interface Monitoring Link Fault 1 The link between the LAN interface to the alarm reporting server ARC is interrupted Monitoring Link Fault 2 The link between the GSM interface to the alarm reporting server ARC is interrupted Fire alarm A fire alarm has bee...

Page 104: ...zone is a wireless device and needs its battery changed UltraSync app and Web Server Error Messages Various error messages may appear on the ZeroWire Web Server and the UltraSync application Advanced Settings Configuration menus You must select a Menu before you can scroll An attempt was made to scroll up or down from the top level menu Select a submenu from the list or select back to access the m...

Page 105: ...ckup mode is active Unavailable Restoring Network An attempt was made to enter an add remove mode when the restore mode is active Busy Try Again Momentarily This message is received when the Z Wave module is attempting to execute a command and a new command was submitted Not primary controller An attempt was made to perform device functions when not a primary controller Device Not found in failed ...

Page 106: ...orced arm 66 foyer 67 freezer 68 front 69 games 70 garage 71 gas 72 gate 73 glass 74 glass break 75 ground 76 guest 77 gun 78 gym 79 hall 80 hallway 81 heat 82 heating 83 hold up 84 home 85 home theatre 86 infra red 87 inside 88 instant 89 interior 90 key switch 91 Keychain 92 kitchen 93 lounge 94 laundry 95 lift 96 light 97 living 98 location 99 master 100 medicine 101 meeting 102 motion 103 nigh...

Page 107: ... Alarm transmission class EN50136 2 Pass through mode operation On board IP SP4 ZW 7000 SP3 ACE Type A Voltage 9 VDC regulated ZB A090020U J Frequency 50 60 Hz Input 100 240 VAC Current maximum without voice 210 mA 165 mA Backup battery 7 2 amp rechargeable Ni MH battery pack 80 recharged in 72 hours Inputs 2x zone inputs up to 6 6 V seal with 3 3k EOL Low battery voltage 6 4V PSU Type Type A to b...

Page 108: ... 50 DLX900 firmware upgrade 101 DLX900 software 99 E enabling camera recording 76 error messages 104 event history 72 external antenna 22 F factory defaults 25 features 11 front of ZeroWire 11 G glossary 15 I inputs 89 93 installation 19 installation using keypad 49 installation using Web server 57 installing battery 24 installing cellular radio 20 installing external antenna 22 K keyfob adding 55...

Page 109: ... 42 UltraConnect app messages 104 unboxing 12 upgrading firmware DLX900 101 user adding 53 users adding 53 removing 55 using UltraConnect 42 V voice library 106 volume level 67 W walk test 62 70 wall bracket 19 Web Server messages 104 welcome 11 what s inside 12 wifi 27 wireless LAN 27 Z ZeroWire menu tree 75 zone names 51 zone options 61 zone types 60 ZW ANT3M 22 Z Wave devices 78 80 ...

Reviews: