background image


User Manual 

8.  

CAM2 R/L


Audio signal input left and right for CAM2


9.  

CAM2 In/OUT


Composite signal input


and output for 

CAM2 

10.  

CAM1 R/L


Audio signal input left and right for 

CAM1 

11.  

CAM1 In/OUT


Composite signal 

input 

and output for 

CAM1 

12. 

S

-

VIDEO OUT Composite signal output


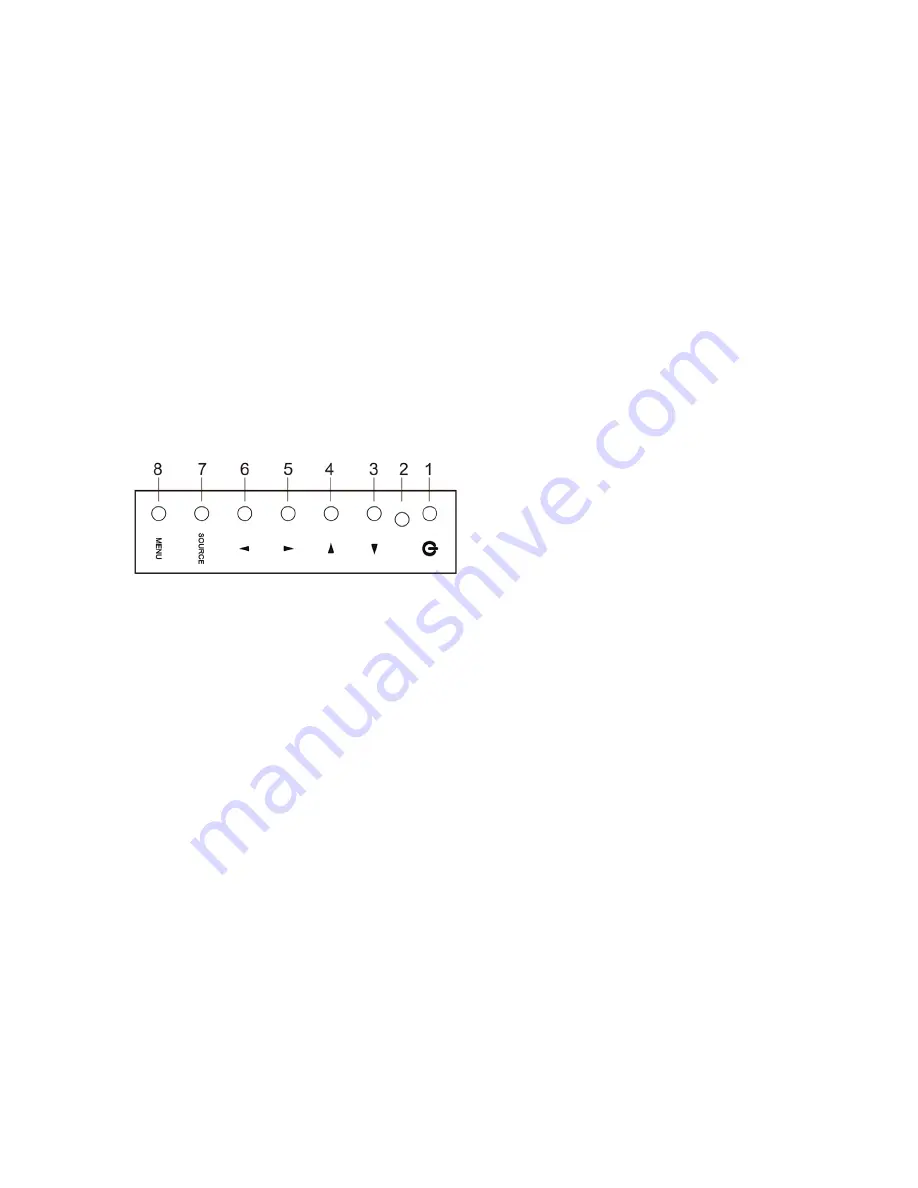
Front panel controls 

Control panel  


1.  POWER 

Switches the monitor on and off.


2.  POWER indicator 
3. 

 Right Arrow (*) 

Primary Function

: Used to increase the 

volume.


Secondary Function

: Moves 

the cursor to 

the right in the OSD


(on

-

screen display)


window and increases the value of any 

selected menu

4. 


Left Arrow (*) 

Primary Function: 

Used to decrease the 

volume.


Secondary Function:

 Moves cursor to the 

left in the OSD window and decreases 

the value of any selected menu

5.  

 Up Arrow (*)  

Primary Function

: Automatically adjusts 

the 

display to the most optimal setting 

possible. (VGA mode only)


Secondary Function

: Allows for vertical 

scrolling in the OSD menu

6. 

 Down Arrow  

Allows for vertical scrolling in the OSD


menu

7.  SOURCE (*) 

Used to select 

different input sources. 


Press the UP or DOWN arrow to scroll 

th

rough the available sources, and press


the 

LEFT or RIGHT arrow to confirm 

selection. 

8. 


MENU


Turns the OSD window on. 


Turns the OSD window off and moves 

from sub menu to top menu in the OSD 

window. 


* Push the menu button for 5 seconds 

when you want to unlock the keypad 

lock. 

(*) = Hot key


Changing a monitor parameter 

1.   Press the 

MENU


button on the front 

panel to obtain the OSD menu screen

2.  Use the LEFT-

RIGHT


button

s to select 

the menu.


3.    Use 

DOWN


button to select the 

submenus.


4.  Use UP-

DOWN


buttons to select

 a 

su

bmenu function.


5.    Press 

SOURCE


button, then using 

LEFT-

RIGHT


buttons you can make


adjustments as necessary

6. 

To exit

, press 

MENU

Summary of Contents for TVM-2700

Page 1: ...TVM 2700 TVM 3200 TVM 4200 Monitor User Manual P N 1072765C EN REV 1 0 ISS 05MAY14...

Page 2: ...ACMA compliance Notice This is a Class A product In a domestic environment this product may cause radio interference in which case the user may be required to take adequate measures Canada This Class...

Page 3: ...tures both hot and cold high humidity direct sunlight excessively dusty surroundings avoid close proximity to other equipment that generates a strong magnetic field 2 Water and moisture Do not use thi...

Page 4: ...it near your monitor for quick reference First please check that the contents of the box correspond with the following checklist LED monitor Power cord VGA cable AC adaptor User manual If any item is...

Page 5: ...mary Function Automatically adjusts the display to the most optimal setting possible VGA mode only Secondary Function Allows for vertical scrolling in the OSD menu 6 Down Arrow Allows for vertical scr...

Page 6: ...unlock the keypad lock R5 LAST CH Not used R6 INFO Information display R7 PICT MODE Recall your preferred picture settings R8 SLEEP Set the sleep timer R9 MENU Display a main menu R10 EXIT Turns the O...

Page 7: ...tery compartment of the remote control Insert the batteries two 1 5 V type R03 or AAA Make sure that the polarity matches with the and marks inside of the battery compartment Note To avoid damage from...

Page 8: ...the screen brightness Turn DCR on or off 4 4 DCC optional The dynamic contrast control DCC automatically adjusts the screen contrast Turns DCC on or off 5 VGA Setting 5 1 Auto adjust Automatically cho...

Page 9: ...OSD 2 Screen Format Select the aspect ratio 16 9 4 3 3 OSD Time out Adjust the display of the OSD menu 5 to 60 seconds 4 OSD Transparency Adjust the OSD transparency 5 Power On Status Not used 6 Blue...

Page 10: ...e display DVI mode is not available 6 Tint cam mode only Adjust the tint of the image 7 Color Tone Choose a different preset color temperature or set your own customized color parameters Normal Warm C...

Page 11: ...the program System Time Setting 1 Menu Language Select the OSD language 2 Screen Format Select the aspect ratio 16 9 4 3 ZOOM1 ZOOM2 FULL HDMI mode only 3 OSD Time out Adjust the display time of the...

Page 12: ...en the applied frequency is under or over normal range Normal range Non interlaced mode only H 30 to 80 kHz V 56 to 77 Hz Press any key to cancel Monitor is turned off when it does not receive any sig...

Page 13: ...ck value carefully until there is no noise displayed No picture Check if the power switch and computer power switch are in the On position Check if the signal cable is correctly connected to the video...

Page 14: ...as been set Check if the video terminal is properly connected No video Check if the video cable is correctly connected to the computer and set to Functions on the OSD picture menu Poor color in the vi...

Page 15: ...x 2 5 W x 2 Speakers Built in Built in Sound features Stereo R L Stereo R L Interface VGA in 15 Pin D Sub 1 1 DVI in 1 1 HDMI in 1 1 CAM in out 2 2 2 2 Audio in RCA type 2 2 S Video in out 1 1 1 1 PC...

Page 16: ...nd 400 x 200 mm 7 87 x 15 75 in and 15 75 x 7 87 in Spacing screw size M4 screw M5 screw Length 8 00 mm 8 00 mm Operating temperature 0 to 40 C 32 to 104 F The specifications can change without any no...

Page 17: ...7 x 636 x 270 mm 38 47 x 25 04 x 10 63 in W x H x D box 1095 x 765 x 330 mm 43 11 x 30 12 x 12 99 in Weight Net without stand 20 3 kg 44 75 lb Net with stand 23 1 kg 50 93 lb Gross box 30 0 kg 66 14 k...

Page 18: ...els 800 x 600 46 875 75 000 all models 1024 x 768 48 360 60 000 all models 1024 x 768 56 476 70 069 all models 1024 x 768 60 020 75 030 all models 1152 x 864 59 986 59 985 all models 1152 x 864 67 500...

Page 19: ......

Page 20: ......

Reviews: