background image


32 

TruVision 6MP and 12MP 360° Camera Configuration Manual 

Parameter 

Description 


Video Standard 

Select 50 Hz or 60 Hz.  

Select the value depending on the video standards; normally 50 Hz for PAL 
standard and 60 Hz for NTSC standard. 


Capture Mode 

It's the selectable video input mode to meet the different demands of field of 
view and resolution. 

Lens Distortion Correction: Select ON / OFF to enable / disable the lens 
distortion correction. The distorted image caused by the wide-angle lens can 
be corrected if this function enabled. 


Note

: Click the 

Default

 button to default all the image settings. 

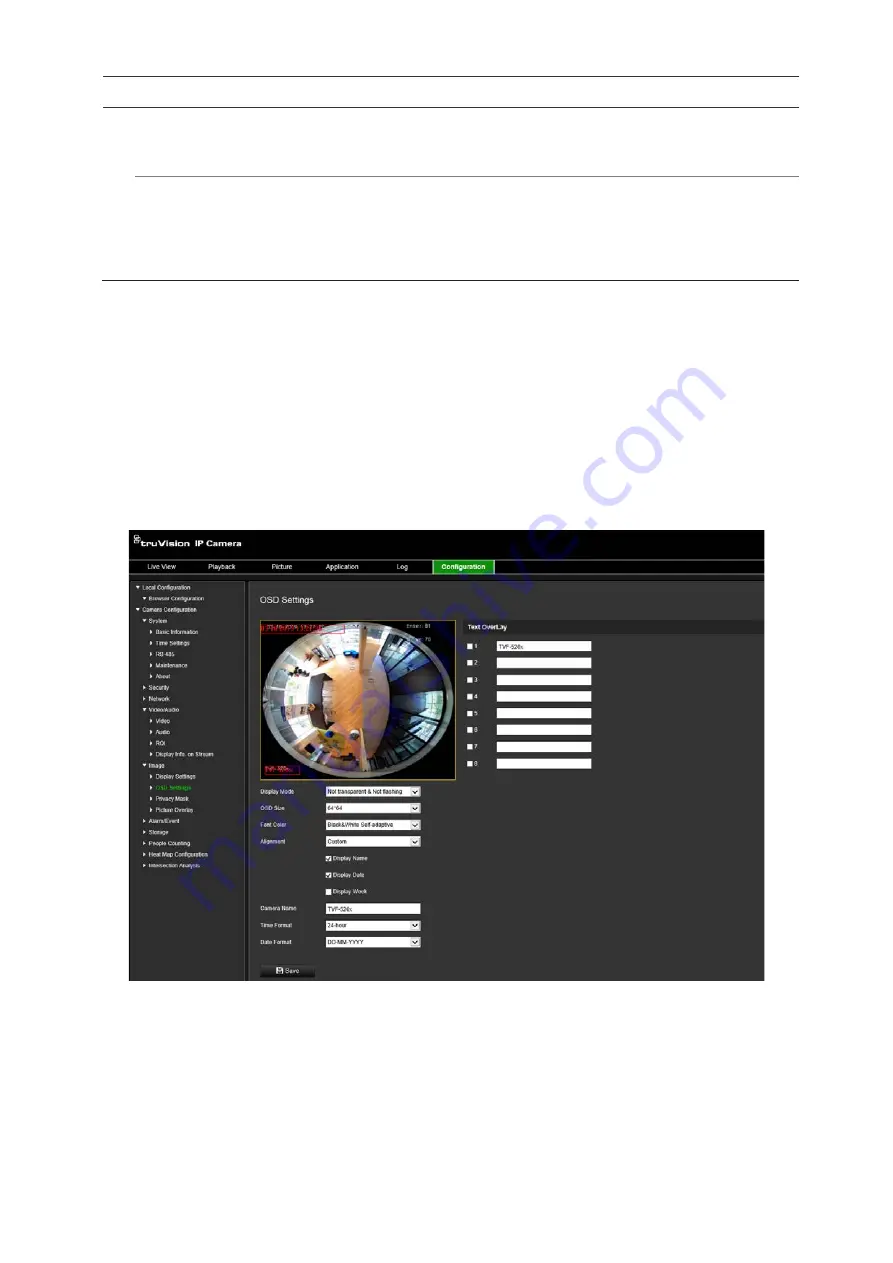
OSD (On Screen Display) 

In addition to the camera name, the camera also displays the system date and time on 
screen. You can also define how the text appears on screen. 

To position the date/time and name on screen: 

1.  From the menu toolbar, click 

Configuration

 > 

Image

 > 

OSD Settings


2.  Select the 

Display Name

 check box to display the camera’s name on screen. You 

can modify the default name in the text box of

 Camera Name

.  

3.  Select the 

Display Date

 check box to display the date/time on screen.  

4.  Select the 

Display Week

 check box to include the day of the week in the on-screen 

display. 

5.  In the 

Camera Name

 box, enter the camera name.  

Summary of Contents for TruVision TVF-5201

Page 1: ...TruVision 6MP and 12MP 360 Camera Configuration Manual P N 1073657 EN REV A ISS 11OCT19...

Page 2: ...tification Product warnings and disclaimers THESE PRODUCTS ARE INTENDED FOR SALE TO AND INSTALLATION BY QUALIFIED PROFESSIONALS UTC FIRE SECURITY CANNOT PROVIDE ANY ASSURANCE THAT ANY PERSON OR ENTITY...

Page 3: ...32 Privacy masks 33 Picture overlay 34 Motion detection alarms 35 Video tampering 40 Alarm inputs and outputs 41 Exception alarms 42 Audio exception detection 43 Intrusion detection 45 Cross line dete...

Page 4: ...ter 77 Defining the security service 78 Restore default settings 79 Import export a configuration file 79 Upgrade firmware 79 Reboot camera 81 Camera operation 82 Log on and off 82 Live view mode 82 P...

Page 5: ...the configuration manual for the following TruVision IP camera models TVF 5201 TruVision 6MPx 360 IP Dome indoor 1 29 mm TVF 5202 TruVision 12MPx 360 IP Dome indoor 1 29 mm TVF 5203 TruVision 6MPx 360...

Page 6: ...web browser To change the web browser s security level 1 In Internet Explorer click Internet Options on the Tools menu 2 On the Security tab click the zone to which you want to assign a web site under...

Page 7: ...browser functionality Activating the camera When you first start up the camera the Activation window appears You must define a high security admin password before you can access the camera There is n...

Page 8: ...irm the password 5 Click OK to save the password and enter the live view interface Activation via TruVision Device Manager 1 Run the TruVision Device Manager to search for online devices 2 Check the d...

Page 9: ...web browser to view record and play back recorded videos as well as manage the camera from any PC with access to the same network as the camera The browser s easy to use controls provide quick access...

Page 10: ...rm Exception and Operation 6 Configuration Click to display the configuration window for setting up the camera 7 Admin Displays current user logged on 8 Help Click to find function 9 Logout Click to l...

Page 11: ...s the close up view of a defined area within the 360 View or Panoramic View Table 1 Description of display control panel Name Description Mount Type Ceiling mount Wall mount Table mount Software displ...

Page 12: ...ability of your PC Hardware display means that the obtained live view video is decoded by the camera itself Note When the selected mount type is Table and the hardware display mode is Live view with...

Page 13: ...TruVision 6MP and 12MP 360 Camera Configuration Manual 11 Live view with a cylinder view Live view with one 360 view and three PTZ views...

Page 14: ...era remotely using your PC Web browser options may vary depending on camera model There are two main folders in the configuration panel Local configuration Configuration Local configuration Use the Lo...

Page 15: ...arget is dynamically displayed near the target in the live image The feature information of different functions are different For example ID and waiting time for Queue Management height for People Cou...

Page 16: ...page 18 for further information 4 Video Audio Defines recording parameters See page 20 for further information 5 Image Defines the image parameters OSD settings overlay text and privacy masking See p...

Page 17: ...s that they are all synchronized To define the system time and date 1 Click Configuration System Time Settings 2 From the Time Zone drop down menu select the time zone that is the closest to the camer...

Page 18: ...to an analog PTZ camera using a 360 camera to control PTZ movement You need to configure these parameters before connecting the camera to any devices To set up RS 485 settings 1 Click Configuration S...

Page 19: ...l or WLAN function Restore action does not restore the related settings of mentioned functions to default 3 Information Export Device Parameters Click to export the current configuration file of the c...

Page 20: ...and 100M Full dup DHCP Enable to automatically obtain an IP address and other network settings from that server IPv4 Address Enter the IPv4 address of the camera IPv4 Subnet Mask Enter the IPv4 subne...

Page 21: ...used for remote internet browser access Enter the port used for the Internet Explorer IE browser Default value is 80 RTSP Port RTSP Real Time Streaming Protocol is a network control protocol designed...

Page 22: ...gs MTU settings and Multicast Address 3 If the DHCP server is available select DHCP 4 If the DNS server settings are required for some applications e g sending email you should configure the Preferred...

Page 23: ...535 3 Enter the IP address and port if you want to upload the alarm information to the remote alarm host Also select the Notify Alarm Recipient option in the normal Linkage of each event page 4 Click...

Page 24: ...d you have the option to use the Device Name Device Number or Device IP for the name of the directory and when the Subdirectory is selected you can use the Camera Name or Camera No as the name of the...

Page 25: ...Confirm Confirm the password Receiver1 The name of the first user to be notified Receiver s Address1 The email address of user to be notified Receiver2 The name of the second user to be notified Rece...

Page 26: ...e certificate to the device To define the QoS parameters 1 From the menu toolbar click Configuration Network QoS 2 Configure the QoS settings including Video Audio DSCP Event Alarm DSCP and Management...

Page 27: ...r descriptions 1 Video Stream Type Specifies the streaming method used Options include Main Stream Normal Sub Stream Note The Third stream is only available when the this function is enabled in System...

Page 28: ...n Profile I Frame Interval A video compression method It is strongly recommended not to change the default value 50 SVC Scalable Video Coding is an extension of the H 264 AVC standard Select OFF ON to...

Page 29: ...interest on the image Up to four regions can be drawn 3 Choose the stream type to set the ROI encoding 4 Enable Fixed Region to manually configure the area Region No Assign a number to the region ROI...

Page 30: ...Audio panel click the Display Info On Stream tab to open its window 2 Select the check box to enable Dual VCA 3 Click Save to save changes Video image You may need to adjust the camera image dependin...

Page 31: ...or both modes The image settings are Image Adjustment Exposure Settings Day Night Switch Backlight Settings White Balance Image Enhancement and Video Adjustment Common Set each image parameter individ...

Page 32: ...is mode Exposure Time The exposure time controls the length of time that the aperture is open to let light into the camera through the lens Select a higher value if the image is dark and a lower value...

Page 33: ...what the color white looks like Based on this information the camera will then continue to display all colors correctly even when the color temperature of the scene changes such as from daylight to fl...

Page 34: ...s function enabled Note Click the Default button to default all the image settings OSD On Screen Display In addition to the camera name the camera also displays the system date and time on screen You...

Page 35: ...xt The text flashes on and off 8 Select the desired OSD size 9 Select the desired font color 10 Select the desired alignment Custom Align Left or Align Right 11 Click Save to save changes Note If the...

Page 36: ...Draw Area 4 Click and drag the mouse in the live video window to draw the mask area Note You are allowed to draw up to four areas on the same image 5 Click Stop Drawing to finish drawing or click Clea...

Page 37: ...s to an alarm triggered when the camera detects motion However the motion alarm is only triggered if it occurs during a programmed time schedule Select the level of sensitivity to motion as well as th...

Page 38: ...ion detection see Figure 9 item 4 Advanced configuration gives you much more control over how motion is detected It lets you set the sensitivity level as well as define the percentage of the motion de...

Page 39: ...t configure email settings before enabling this option See To set up the email parameters on page 22 for further information If you want to send the event snapshot together with the email Select the A...

Page 40: ...rs in real time Note Select Local Configuration Enable Meta Data Overlay Disable if you do not want the detected objects displayed with the green rectangles 3 Select Advanced mode from the Configurati...

Page 41: ...fore enabling this option See To set up the email parameters on page 22 for further information If you want to send the event snapshot together with the email select the Attached Snapshot option Notif...

Page 42: ...lens is covered and to take an alarm response action Figure 10 Video Tampering window To set up tamper proof alarms 1 From the menu toolbar click Configuration Alarm Event Video Tampering 2 Select th...

Page 43: ...inkage method Send Email Send an email to a specified address when there is a motion detection alarm Note You must configure email settings before enabling this option See To set up the email paramete...

Page 44: ...output remains in effect after the alarm occurs 4 Set the arming schedule for the alarm input See To set up motion detection on page 35 for more information 5 Click Save to save changes Exception alar...

Page 45: ...o send the event snapshot together with the email select the Attached Snapshot option Notify Alarm Recipient Send an exception or alarm signal to remote management software when an event occurs Trigge...

Page 46: ...n sound Notes Sensitivity Range 1 100 the smaller the value the larger the change needs to be to trigger detection Sound Intensity Threshold Range 1 100 it can filter the sound in the environment The...

Page 47: ...you must first configure the FTP settings See To define the FTP parameters on page 22 for further information Enable the Upload Type option To upload the snapshot to FTP and NAS when motion detection...

Page 48: ...4 Select the region to be configured from the drop down list and define its time threshold and size sensitivity value Threshold This is the time threshold that the object remains in the region If you...

Page 49: ...s on page 22 for further information Enable the Upload Type option To upload the snapshot to FTP and NAS when motion detection or an alarm input is triggered you must also enable Enable Event triggere...

Page 50: ...d alarms are triggered A B Only an object crossing the pre defined line from the A to the B side can be detected and trigger an alarm B A Only an object crossing the pre defined line from the B to the...

Page 51: ...irst configure the FTP settings See To define the FTP parameters on page 22 for further information Enable the Upload Type option To upload the snapshot to FTP and NAS when motion detection or an alar...

Page 52: ...n Max Size The maximum size of a valid target Targets larger than this will not trigger detection Min Size The minimum size of a valid target Targets smaller than this will not trigger detection 6 Cli...

Page 53: ...Configuration Event Smart Event Region Exiting Detection 2 Select the Enable check box to enable the function 3 Select the region to be configured from the drop down list 4 Click Area Settings Click t...

Page 54: ...ction when at least 40 of the body part enters the region 8 Repeat the above steps to configure other regions Up to four regions can be set You can click the Clear button to clear all pre defined regi...

Page 55: ...ection Sensitivity Range 5 100s Sensitivity stands for the percentage of the body part of an acceptable target that enters the pre defined region Sensitivity 100 S1 ST 100 Where S1 stands for the targ...

Page 56: ...alid target Targets smaller than this will not trigger detection 7 Click Stop Drawing when finish drawing 8 Set the time threshold for object removal detection Threshold Range 5 100 s the threshold fo...

Page 57: ...provides a backup in case of network failure The SD card is not provided with the camera The selected recording schedule applies to all alarm types Figure 12 Record schedule window Pre record time Th...

Page 58: ...ole week All Day recording or for specific days of the week If you have selected All day select one of the record types to record from the drop down list Continuous This is continuous recording Motion...

Page 59: ...you must also define the arming schedule in order to trigger motion detection or alarm input recording Snapshot parameters You can configure scheduled snapshots and event triggered snapshots The captu...

Page 60: ...of the snapshot 5 Enter the time interval between two snapshots Select the unit of time from the drop down list milliseconds seconds minutes hour or day 6 Set the schedule for when you want snapshots...

Page 61: ...Click Save to save changes Formatting the storage devices Use the storage management window to display the capacity free space available and the working status of the HDD of the NAS and the SD card in...

Page 62: ...o activate the settings Configuring NAS settings You can use a network storage system NAS to remotely store recordings To configure record settings please ensure that you have the network storage devi...

Page 63: ...9 If Ceiling Mount is not selected the Application tab will not be visible during setup The people counting option is only available when Ceiling Mount and a 360 View mode are selected Notes The detec...

Page 64: ...directly below the camera and it should cover the entire entrance exit region Draw the detection line where people do not linger to improve the accuracy of the count The detection line should be draw...

Page 65: ...gs 4 Move the mouse to the end of each day A copy dialogue box pops up You can copy the current settings to other days of the week 5 Click Save to save the settings Note The time periods cannot overla...

Page 66: ...t up a daily reset time or you can reset the counter manually by clicking Manual Reset Heat map A heat map is a color coded graphical representation of the movement of people through a scene The color...

Page 67: ...ction 3 Click Stop Drawing when finished drawing 4 Set the validity value The range is between 0 and 100 Validity The camera uses this value to judge if a target it detects is a valid or not An invali...

Page 68: ...shielded area in which no heat map analysis will be done Click to draw a shielded area Draw an area by left clicking the end points in the live view window and right clicking to complete the area draw...

Page 69: ...des Each side of the defined intersection area monitors one direction of flow 3 Adjust the arrow direction on each side of the polygon area The arrow indicates the direction of flow leaving the inters...

Page 70: ...u start You have to configure the People Counting setting before you can view and download the people counting data from the application tab Refer to the section People counting on page 61 for detaile...

Page 71: ...l 69 4 Select the start time and then click Counting The counting result displays in the statistic result area Click Table Bar Chart or Line Chart to display the result in different ways Example of ta...

Page 72: ...s 2 Select the report type from the drop down list Daily Report Weekly Report Monthly Report or Annual Report The daily report calculates the data on the date you selected The weekly report calculates...

Page 73: ...e or People number of the pre defined area is calculated by hour day or month Click the Export button to export the data to an Excel file Figure 17 Example of a time heat map weekly report Note It is...

Page 74: ...from each of the other arrow points In the example below the Flow in is E and the results show the flow of people from E to each of the other five arrows The flow out arrows are always shown in alphab...

Page 75: ...Weekly report Monthly report or Annual report The daily report calculates the data on the date you selected The weekly report calculates for the week in which your selected date belongs The monthly re...

Page 76: ...isted in this manual When new users are added to the list the administrator can modify permissions and password of each user See Figure 19 below Figure 19 User management window Passwords limit access...

Page 77: ...ion of his her own account An operator cannot create or delete other users User This user has the permission of live view playback and log search However they cannot change any configuration settings...

Page 78: ...own Reboot Remote Notify Alarm Recipient Trigger Alarm Output Remote Video Output Control Remote Serial Port Control 7 Click OK to save the settings To delete a user 1 Select the desired user under th...

Page 79: ...on 2 Select the RTSP Authentication type Digest basic or Digest in the drop down list 3 Select the WEB Authentication type Digest basic or Digest in the drop down list 4 Click Save to save the changes...

Page 80: ...Click Clear to delete all the IP addresses 7 Click Save to save the changes Defining the security service This function enables Telnet and let you define its password It is only used by Technical Supp...

Page 81: ...he configuration settings to camera or if you want to make a backup of the settings Note Only the administrator can import export configuration files To import export configuration file 1 In Camera Co...

Page 82: ...y for the camera 4 Click Upgrade You will receive a prompt asking you to reboot the camera 5 When the upgrade is finished the device will reboot automatically The browser will also be refreshed To upg...

Page 83: ...camera It is easy to reboot the camera remotely To reboot the camera through the web browser 1 In Camera Configuration System click the Maintenance tab 2 Click the Reboot button to reboot the device...

Page 84: ...ect the language of the Browser It supports several languages Figure 23 Login dialog box Live view mode Once logged in click Live View on the menu toolbar to access live view mode See Figure 1 on page...

Page 85: ...is played back play stop slow and fast forward playback 5 Archive functions Click these buttons for the following archive actions Capture a snapshot image of the playback video Start Stop clipping vid...

Page 86: ...k the Search button to search for the required recorded file 4 Click to search the video file 5 In the pop up window select the box of the video file and click Download to download the video files To...

Page 87: ...ction Intrusion Detection Region Entrance Detection Region Exiting Detection Unattended Baggage Detection or Object Removal Detection 3 Select the start time and end time 4 Click Search to search the...

Page 88: ...end recording time Table 2 Types of logs Log type Description of events included Alarm Start Motion Detection Stop Motion Detection Start Tamper proof Stop Tamper proof Exception Invalid Login HDD Fu...

Page 89: ...page click to show the PTZ control panel and click to hide it Figure 26 PTZ control panel Icon Description Directional buttons Controls the movements and directions of the PTZ Center button is used to...

Page 90: ...show the PTZ control panel 2 Click the directional zoom buttons on the PTZ control panel to adjust the PTZ view as desired 3 Select a preset number from the preset list 4 Click the icon to save the cu...

Page 91: ...a preset 4 Set the preset number speed and dwell time for each preset You can adjust the order of presets by using and 5 Click OK to save preset tour path Note Up to 32 patrol paths can be set and ea...

Page 92: ...ject removal 53 region entrance 49 region exiting 51 unattended baggage 52 display control 9 display information set up 32 dual VCA 27 E email parameters set up 22 events search logs 85 exception alar...

Page 93: ...camera 16 81 record playback 82 recording parameters 25 recoding schedule 55 region of interest 27 restore default settings 16 RS 485 set up 16 RTSP authentification 77 S SDHC card formatting 59 free...

Reviews: