background image


8


Installation Manual 


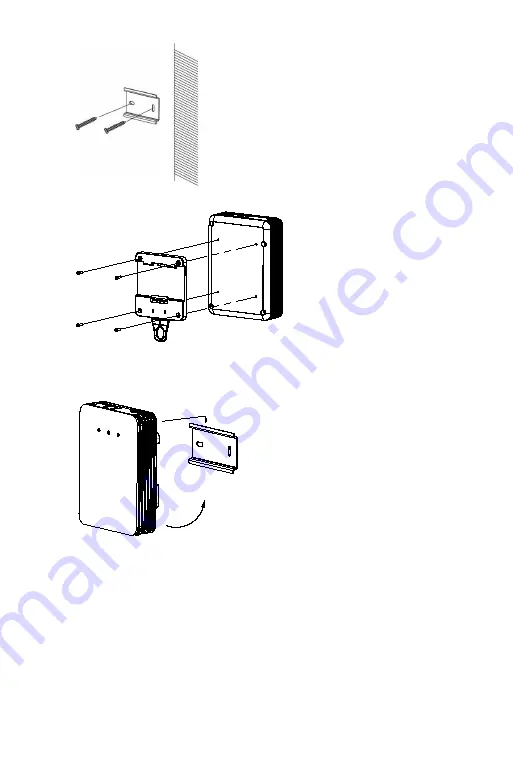
3.  Fix the mounting 

bracket on the rear panel of the main unit with four screws.


4.  

Hook

 the top catch of the main unit on the 

rack. Gently press

 the lower part 

of the camera against the 

rack

 so that 

it snaps into position on the rack. 


Note

:


If 

there is already a standard rail installed, you can directly

 snap the main 

unit onto the installed rail. 
 

Summary of Contents for TruVision TVA-1101

Page 1: ...TruVision Covert IP Camera Installation Manual P N 1072912 EN REV B ISS 22MAY15 ...

Page 2: ...he user may be required to take adequate measures Canada This Class A digital apparatus complies with Canadian ICES 003 Cet appareil numérique de la classe A est conforme à la norme NMB 0330 du Canada European Union directives 12004 108 EC EMC directive Hereby UTC Fire Security declares that this device is in compliance with the essential requirements and other relevant provisions of Directive 200...

Page 3: ...nts 5 Camera description 6 Which adhesive tape to use 7 Set up the camera 7 Complete the installation 13 Configuration 13 Access the SD card 13 Use the camera with an Interlogix NVR or Hybrid DVR or another system 14 Use the camera with TruVision Navigator 14 Specifications 14 TruVision Covert IP cameras 14 Pin definitions 15 ...

Page 4: ...Installation environment When installing your product consider these factors Electrical Install electrical wiring carefully It should be done by qualified service personnel Always use a proper PoE switch or a 12 VDC UL listed Class 2 or CE certified power supply to power the camera Do not overload the power cord or adapter Ventilation Ensure that the location planned for the installation of the ca...

Page 5: ...ging Package contents Camera or lens Mounting accessories Installation manual CD with Configuration Manual and TruVision Device Manager Note The ATM covert camera has no lens in the product package The lens needs to be purchased separately according to the application needs Please notice there are different cable length and form factors options CAUTION Use direct plug in UL listed power supplies m...

Page 6: ...port 17 PoE and network port 18 RS 232 and alarm port Lens purchased separately 3 L shape lens 4 L shape lens cover 5 L shape lens mounting bracket 6 Pinhole lens 7 Lens cable with RJ 12 connector 8 Pinhole lens mounting bracket 19 Cylinder lens 20 Cylinder lens mounting bracket Table 1 LED Indicators LED Color and Status Indication POWER Solid red Normal operation Unlit Power Off STATUS Solid gre...

Page 7: ...urface is around 4 mm thick use the 1mm adhesive tape The drilling hole should be around 10 5 mm wide When the surface is around 1 mm thick use the 4mm adhesive tape The drilling hole should be around 4 5 mm wide Set up the camera Note If the light source where the camera is installed experiences rapid wide variations in lighting the camera may not operate as intended To install the main unit 1 Pr...

Page 8: ...it with four screws 4 Hook the top catch of the main unit on the rack Gently press the lower part of the camera against the rack so that it snaps into position on the rack Note If there is already a standard rail installed you can directly snap the main unit onto the installed rail ...

Page 9: ... surface Note Please ensure that the hole size is appropriate for the camera lens 2 Remove the protective film from the adhesive tape on the pinhole lens mounting bracket Align the bracket with the drilled hole and stick the bracket on the mounting surface 3 Install the pinehole lens into the mounting hole of the mounted bracket 4 Twist the locking sleeve to lock the lens in place ...

Page 10: ... film from the adhesive tape on the L shaped mounting bracket Align the bracket with the drilled hole and stick the bracket on the mounting surface Note Please ensure that the hole size is appropriate for the camera lens 3 Install the L shape lens into the mounting hole in the bracket then fix the lens with screws ...

Page 11: ...x the mounting base of the bracket to the ceiling with the supplied screws 2 Hood the bracket cover to the mounting base 3 Screw the bracket to the mounting base 4 Loop the fixed focal unit with the loop of the bracket and tighten it with the supplied screw ...

Page 12: ...gn the assembled fixed focal unit to the bracket and rotate the unit to tighten the unit with the bracket 6 Loosen the knob to adjust the surveillance angle and then tighten the lock nut to complete the installation Knob Lock nut ...

Page 13: ...t a Probridge or another device via the RS 232 port 4 Connect alarm input output devices Configuration Set up the camera s network and streaming parameters so that the camera can be controlled over the network For further information please refer to the TruVision Covert IP Camera Configuration Manual Access the SD card Insert a SD card up to 64GB for local storage as a backup in case the network f...

Page 14: ... systems Use the camera with TruVision Navigator A camera must be connected to an Interlogix NVR or hybrid DVR in order to be operated by TruVision Navigator Please refer to the TruVision Navigator user manual for instructions on operating the camera with the TruVision Navigator Specifications TruVision Covert IP cameras Electrical Voltage input 12 VDC 10 PoE IEEE 802 3af Power consumption Max 6 5...

Page 15: ...Orange Orange 2 3 White Green White Green 3 4 Blue Blue 4 5 White Blue White Blue 5 6 Green Green 6 7 White Brown White Brown 7 8 Brown Brown 8 Figure 3 Cross over cable 1 White Orange White Orange 1 2 Orange Orange 2 3 White Green White Green 3 4 Blue Blue 4 5 White Blue White Blue 5 6 Green Green 6 7 White Brown White Brown 7 8 Brown Brown 8 Please make sure your connected cables have the same p...

Page 16: ......

Reviews: