


system programming to the Programming Touchpad Header
on the panel.
To do this you must first connect a Programming Touchpad
Cable (60-791) to the touchpad wires (see
Programming
Touchpad Cable Installation Instructions—466-1604
, included
with the cable). Then, use the appropriate procedure for
connecting the touchpad.
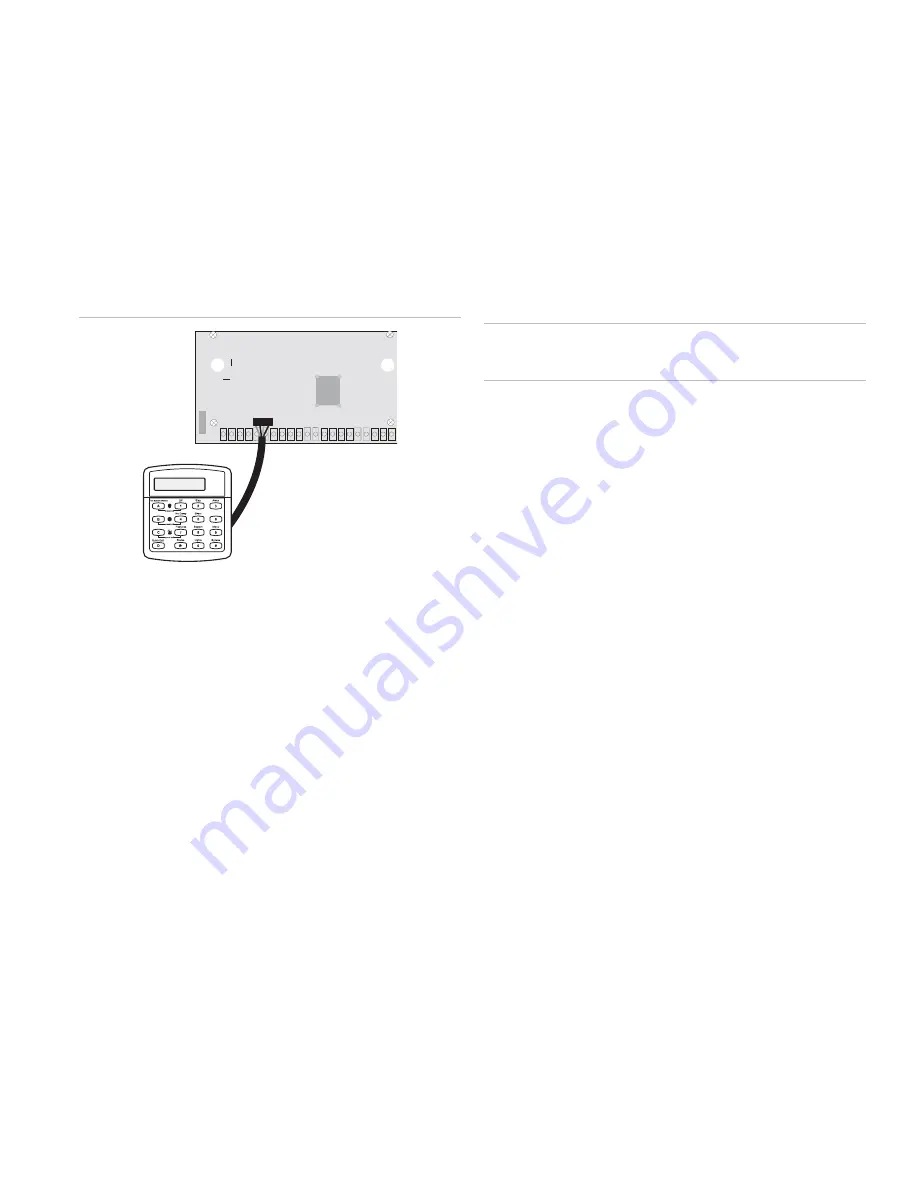
To connect a programming touchpad to a Concord
Express or Concord panel with software version 2.0 or
later:
1. With the panel powered up, connect the cable to the
Programming Touchpad Header (see Figure 5 below).
Figure 5: Connecting a programming touchpad
Programming
Touchpad
Cable (60-791)
2. Activate the service touchpad by pressing 8 + CODE + 0 +
2.
3. Enter program mode by pressing 8 + installer/dealer
CODE + 0 + 0 and program the panel using the panel
documentation
.
4. When programming is completed, simply disconnect the
programming touchpad.
To connect a programming touchpad to a Concord panel
with software versions 1.0–1.6:
1. Disconnect AC and backup battery power.
2. Connect the cable plug to the panel Programming
Touchpad Header pins (see Figure 5 above).
3. Reconnect the AC and backup battery power. The
touchpad briefly displays ***********,
SCANNING BUS DEVICES,
then shows a time and date
display.
Note
: If the touchpad does not respond as described in step 3,
there may be a bus conflict. To correct this, change the
touchpad unit number as described in the section “Changing
the Touchpad Unit Number.”
Removing the programming touchpad from Concord
panels with software versions 1.0–1.6:
To prevent a trouble condition, you must delete the
programming touchpad unit number from Concord panel
memory
before
disconnecting it.
1. After programming is completed, return to the
ACCESSORY MODULES
menu, then press É. The
display should read
BUS DEVICES.
2. Press É. The display shows the lowest unit number and its
device name.
3. Press A or B until the display shows the programming
touchpad unit number.
4. Press D to delete the device and its unit number from
panel memory. The display shows:
UNIT - TYPE
14-NONE
5. Exit program mode and disconnect the programming cable
from the panel header.
Testing
Caution:
Contact the Central Monitoring Station before
activating any alarms, to avoid dispatching local police and fire
departments.
Test the touchpad by arming/disarming the system, activating
the touchpad panics, bypassing sensors, and by turning chime
and lights on/off to verify correct operation. Refer to the panel
documentation
for system operating instructions.
Adjusting Display
The touchpad display can be adjusted for easier viewing to
help compensate for lighting conditions in the touchpad
location. The brightness adjustment lightens or darkens the
background. The contrast adjustment lightens or darkens the
text.
To adjust display brightness:
1. Enter user programming mode by pressing 9 + user,
partition, or system master CODE. The display shows
SYSTEM MENU,
then
TIME AND DATE
(Concord panels with software versions 1.0–1.6 display
USER CODES.
)
2. Press B until the display shows
OPTIONS
, then press É.
The display shows
DOWNLOADING ON/OFF (current
setting)
.
3. Press B until the display shows
TOUCHPAD
BRIGHTNESS 2
(default setting).
4. Enter a setting from 0 (darkest background) to 3 (brightest
background), then press É.
5. The display flashes the entered selection, then stops after
pressing É and displays the new setting and brightness
level.
6. Exit user programming mode by entering:
Ç + 0 + 0 + É for Concord panels with software
versions 2.0 or later
or
Ç + 7 + É for Concord panels with software versions 1.0–
1.6.
To adjust display contrast:
1. Enter configuration mode by pressing the D and 6 buttons
together for at least two seconds. The display shows
DA
nnn
.
SuperBus 2000 2X16 LCD Alphanumeric Touchpad Installation Instructions
3


