background image

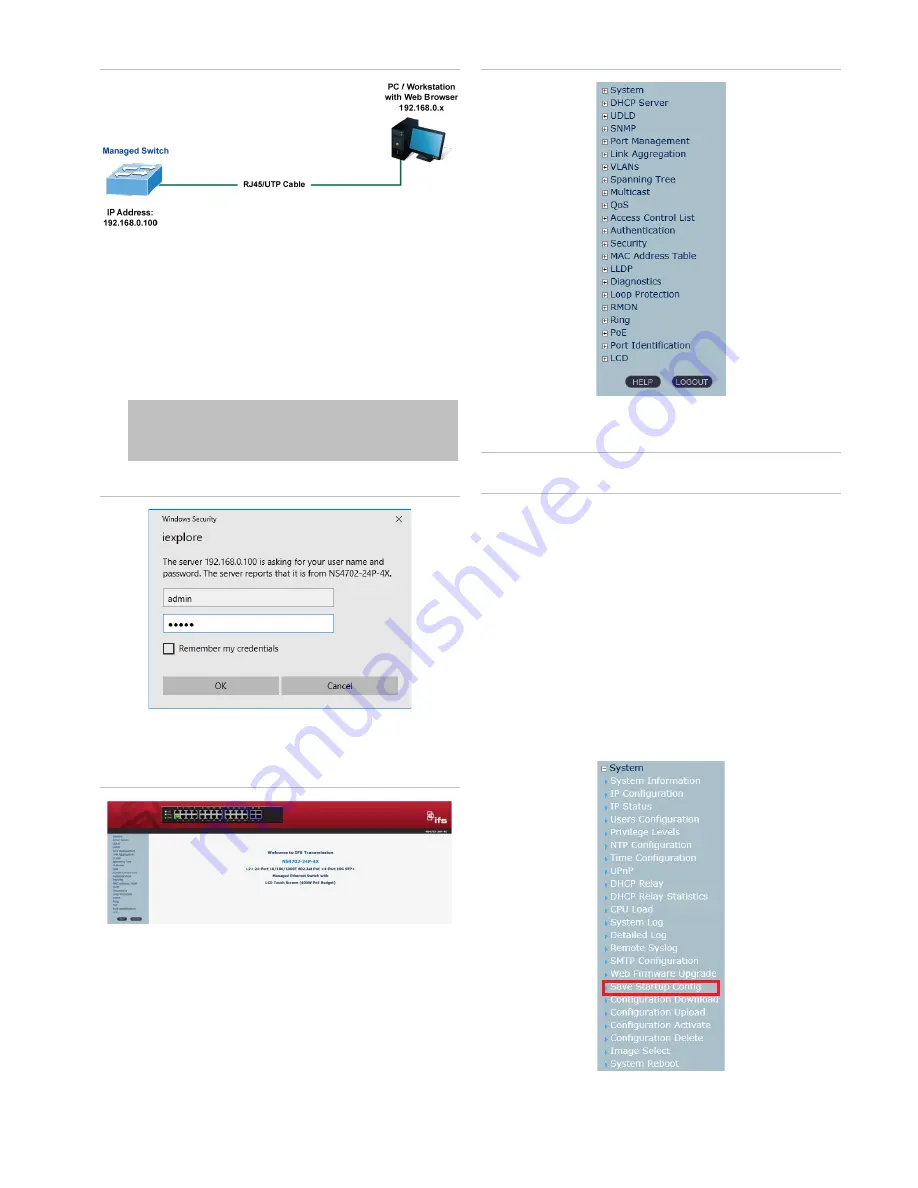
Figure 7: IP management diagram 


Logging in to the managed switch  

1.  Use the 

Internet Explorer 

8.0 or later 

Web browser

 and 

type the


IP address http://192.168.

0.100


(the factory

-

default IP addres

s

) to access the Web interface. 


2. 

When the following dialog box


appears, enter the default 

user name 

“admin” and 

password “

admin” 

(or the


password you have changed before)


as shown in


Figure

 8 

below


Default IP Address: 

192.168.0.100 

Default User 

Name: 

admin 

Default Password

admin 

Figure 8: Login screen 


3. 

After typing


the password, the main screen appears as


shown in


Figure


9


below

.  

Figure 9: Main web interface screen 


4

.  The 

switch menu on the left 

side 

of the web page 

permits 

access to all the 

functions

 and 

status


provided by 

the 

managed 

switch

.  

Figure 10: Main menu 


Refer to the 

User 

Manual or click the 

Help


button for further 

information about using the web management interface.


Note

For security purposes, change and memorize the new 

password after this first setup.


Saving the configuration  

The running configuration file is stored in the RAM of the 

managed 

switch. In the current version, the running 

configuration sequence of running

-

config can be saved from 

the RAM to FLASH by executing the Save Startup Config


command. After doing this, the running configuration sequence 

becomes the startup configuration file


(i.e., 

the saved 

configuration)

To save all applied changes and set the current configuration 

as a startup configuration, the startup

-

configuration file is 

loaded automatically across a system reboot.


1. 

Click 

System

 > 

Save Startup Config

.  


2. 

Click the 

Save Configuration


button.


P/N 1073387-EN 

• REV 

• ISS 

06FEB18 


3 / 

4


Summary of Contents for NS4702-24P-4X

Page 1: ...ork Interface Card Serial port connection Terminal The above workstations come with a COM Port DB9 or USB to RS232 converter The above workstations have been installed with a terminal emulator such as Hyper Terminal included in Windows XP 2003 Serial cable One end is attached to the RS232 serial port and the other end is attached to the console port of the managed switch Ethernet port connection N...

Page 2: ...nfig if vlan ip address 192 168 1 100 255 255 255 0 The previous command would apply the following settings for the managed switch IP Address 192 168 1 100 Subnet Mask 255 255 255 0 Figure 5 Configuring the IP address screen 4 Repeat step 1 to check if the IP address has changed Store the current switch configuration 5 At the prompt type the following command and press Enter copy running config st...

Page 3: ...ided by the managed switch Figure 10 Main menu Refer to the User Manual or click the Help button for further information about using the web management interface Note For security purposes change and memorize the new password after this first setup Saving the configuration The running configuration file is stored in the RAM of the managed switch In the current version the running configuration seq...

Page 4: ...D Enable Default Touch Screen Enable Default Backlight Timeout Enable Default Backlight Timeout Time 300 Default Read Only Mode Disable Default Screen Main Menu Default Time Interval 10 Default Color Scheme Dark Default PIN Number 1234 Click LCD in the main menu of the the web interface see Figure 10 on page 3 to bring up the LCD Management page LCD functionality can be configured on this page Ref...

Reviews: