


P/N 466-
5412 (EN) • REV A • ISS 15JAN18
5 / 6
17. Reconnect the spaded ends of the power supply wire to
the terminal to the terminals on the power supply. Note:
The dashed line/writing side of the wire indicates positive.
Ensure consistency by wiring the + to + and
– to – as
polarity must be observed or touchscreen will not function.
Operation
Refer to
Simon
5” TouchScreen Quick Operation Guide
for
basic touch screen operation information. Refer to the panel
documentation for complete Simon XT, XTi, and XTi-5
programming and operation information.
Setting the clock
You can set the touch screen clock by setting the clock on the
Simon XT, XTi, or XTi-5 panel.
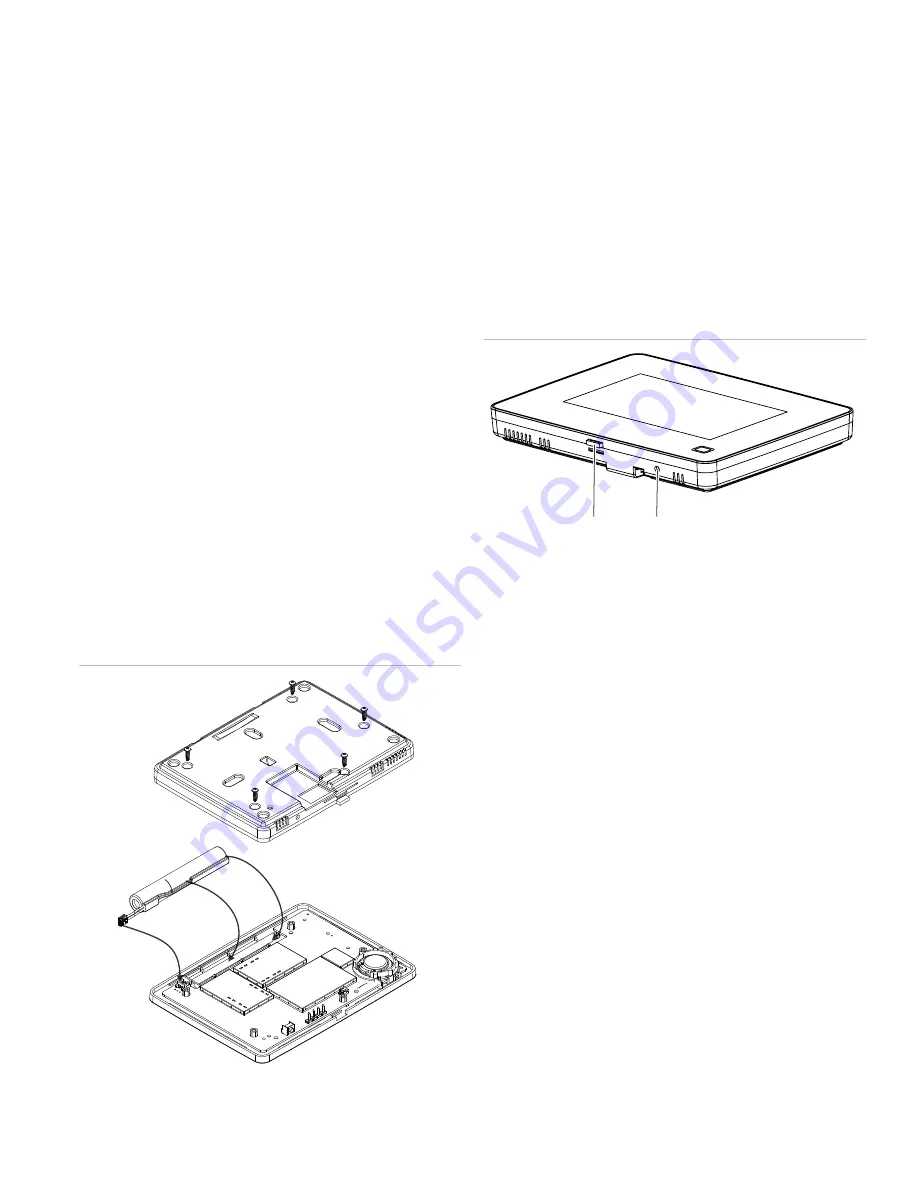
Battery Pack replacement
We recommend that you replace the backup battery pack
every 3-5 years. Only the part 60-924-BAT4SIMONTS5 can be
used as a battery pack replacement.
1. Remove the touch screen from the mounting plate by
depressing the button on the bottom of the touch screen.
2. Remove the five screws from the back cover of the touch
screen and separate the back cover off the front cover.
3. Disconnect the battery from the battery connector and
remove the battery as showing in Figure 6. Replace the
battery pack.
Avoid touching the touch screen face while you are replacing
the batteries.
Figure 6: Battery
Note:
If AC power is lost and battery pack is not present or
depleted, the touch screen will not power up until AC power is
restored (even if a new battery pack is installed).
Reset button
The Reset button is located on the bottom right side of the
touch screen mounting plate (see Figure 7). To power cycle
the touch screen, use a toothpick to depress the recessed
Reset button. Note the reset has no impact on the Simon panel
or the overall state of the alarm system. The button simply
resets the only the touch screen to the same state
Note:
Do not press the Reset button while in programming
mode.
Figure 7: Reset
Clear operation
If the Simon XT, XTi, or XTi-5 panel is connected to an online
service, some information (such as a dealer logo) can be
stored in the touch screen memory. To erase touch screen
memory and restore to factory default, simply relearn the touch
screen into the panel again. The learn in process begins by
clearing the touch screen memory. To keep memory clear,
learn the touch screen into a Simon XT, XTi, or XTi-5 panel
that has no online service supported.
Troubleshooting
•
If your touch screen fails to power up, check the wiring to
ensure the connections are connect. Ensure the wires are
not crossed from Positive to Negative or vice versa.
•
If your touch screen flickers, restarts or has intermittent
issues or does not seem to operate consistently, ensure
the power polarity from the transformer to the Positive and
Negative leads on the touch screen is correct. Also do not
use wire for power other than the cable supplied. Longer
cable may cause power delivery issues to the touch
screen.
•
If your touch screen fails to enroll, go to the Simon panel,
delete that touch screen from the panel, and then repeat
the enroll procedure.
•
If the touch screen chime does not announce the zone
name completely, it is likely due to the zone information
not being sent to the touch screen during installation. To
Opening
button
Reset
button