


4 / 6
P/N 466-
5412 (EN) • REV A • ISS 15JAN18
2. Access the System Tests screen through the Status &
Settings screen by pressing ENTER next to
PROGRAMMING.
3. Enter the access code and press OK.
4. Press SYSTEM TESTS.
5. Press SENSOR TEST.
6. All learned in sensors will be displayed on this screen.
Press
to scroll through the pages).
7. To trip the touch screen, press the RF test button from the
settings screen.
You should hear the panel beep the number of packets
received. The panel will also display the number of
packets received. If you do not hear 6 to 8 panel beeps,
see “Relocate the touch screen to permanent location” on
page 3.
8. Press Close repeatedly to exit.
You should also perform the following to validate the touch
screen installation:
1. Arm the panel and verify that the panel and touch screen
indicate that the panel is armed.
2.
Wait 10 minutes and verify that you do not get a “loss of
connection” message and that the RF icon is not red.
We recommend that you test the touch screen after all
programming is completed and whenever a touch screen
related problem occurs.
To verify communication between the panel and the touch
screen, exit programming mode and then press the System
Status icon on the touch screen. The touch screen should
announce the correct system status.
Note:
If you cannot get the touch screen to trip, test a known
good touch screen at the same location. If the replacement
touch screen functions, contact UTC Fire & Security for repair
or replacement of the faulty touch screen.
Mounting
1. With touch screen operation verified and tested at the
permanent location; mount the touchscreen either on the
wall or on a surface with the supplied desktop stand.
Surface, desktop mounting
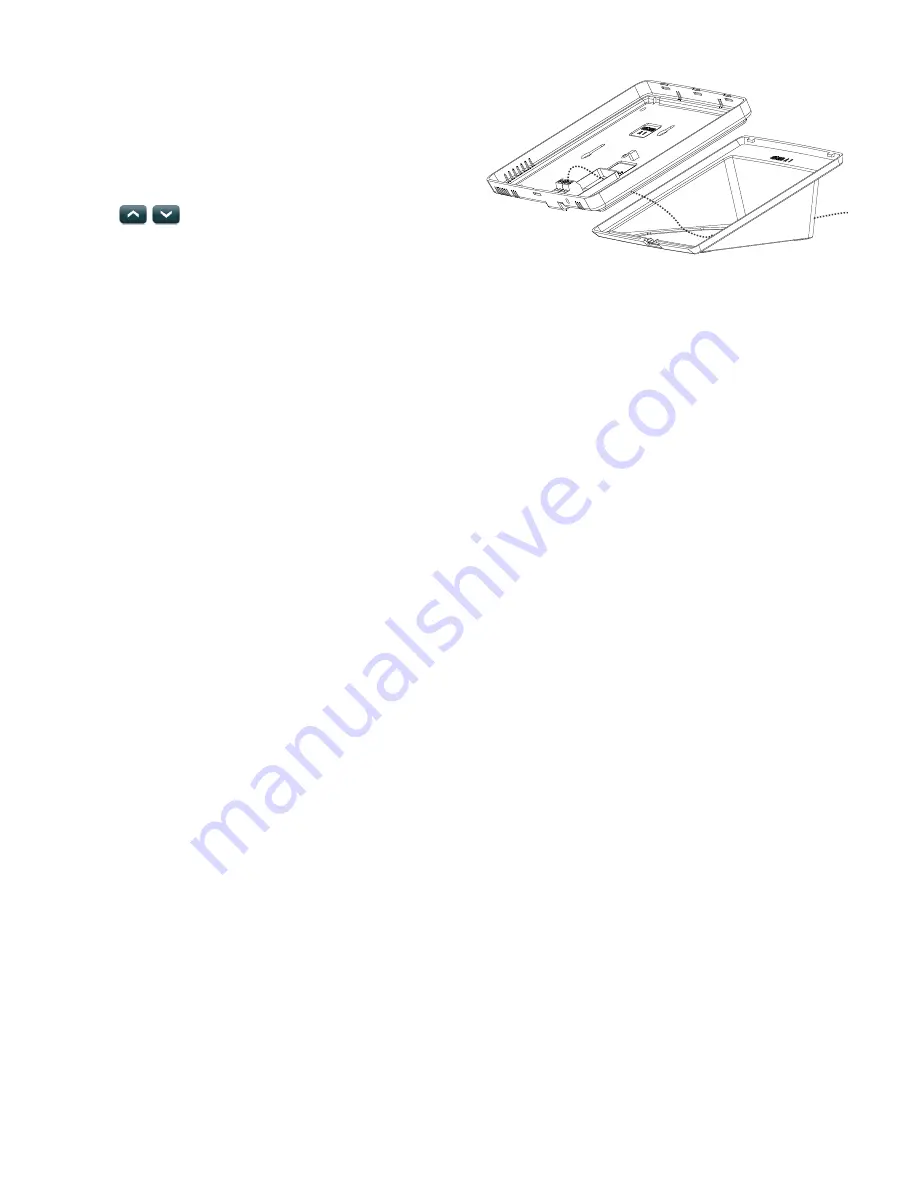
If the unit is to be wall mounted, skip to step 5.
2. Unplug power supply and feed it though the desk top
stand from front to back so that the power wire and supply
extends from the touch screen and mounting base,
through the desktop stand (Figure 5).
Figure 5: Power cable routing with desktop stand
3. Reattach the desktop stand to the mounting base and
touch screen.
4. Plug the power supply back into the wall. Ensure the outlet
is not controlled by a switch.
Wall mounting
If the unit is to be or has been installed on surface utilizing the
desktop stand, skip to the next section.
Note:
Wall mounting uses only the mounting base; the desktop
stand is not used.
5. Separate the mounting base from the touch screen.
6. From the initial power up configuration, disconnect the
power cable Positive and Negative leads from the
mounting base. Disconnect the wire from the power
supply.
7. Hold the base on the wall at the desired mounting location
and mark the mounting holes and wire drop.
8. At the mounting hole locations, drill 3/16-inch holes into
the wall for plastic anchors.
9. At the wire drop opening, drill a 1/2-inch hole into the wall
for the power cable.
10. Push the two plastic anchors into the drilled holes and
tighten screws within a quarter-inch of the anchors.
11. Feed the power wiring through the backside of the wire
drop in the mounting base (see Figure 3 on page 2).
12. Hang the base using the screws, level the base, and
tighten the screws.
13. Run the power cabling behind or down the front of the wall
to the nearest power receptacle.
14. Reconnect the ends of the wire to the power terminals as
identified in Figure 4, taking particular care to ensure the
marked/dashed wire attaches to the Positive lead and the
unmarked wire attaches to the Negative lead.
15. Feed any extra wire back into wall. Wires should not
protrude outside of the wire drop opening.
16. Reattach the touch screen to the mounting base. Angle
the top of the touch screen into the tab hooks on the top of
the mounting base and swing the bottom of the touch
screen into the lower part of the mounting base until you
hear an audible click.
Wires