background image


D-0128588-C – 2021/03 
VRA Screen - Instructions for Use - EN 


Page 

7


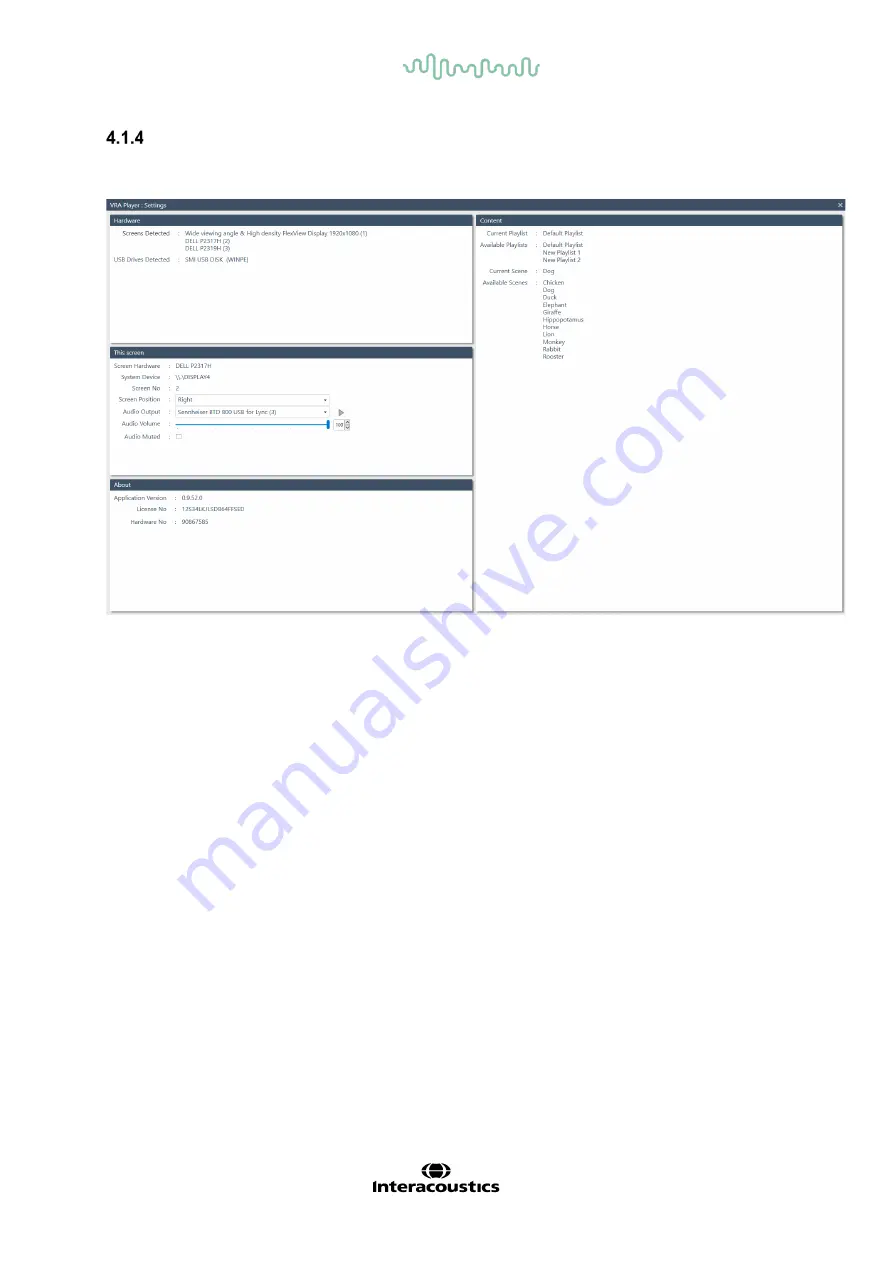
  Setup window 

It is possible to enter the setup window of the VRA system by connecting a USB keyboard. This is 

done by connecting a keyboard and pressing

 F1

 for 

information. 


Hardware 

In this field, information will be available about the screens connected and the USB dongles available 

in the PC 


This screen 

In this area it is possible to adjust the screen setup.  

Use 

Screen position

 to choose what position the screen has in the room. The options are right, left or 

center.  


Audio output

 is where the speakers are selected. It is possible to send sound through the PC, or the 

connected loudspeaker. The play button to the right is to test that the sound is played through the cor-

rect media.  

Audio volume 

gives the option to control how loud the sounds on the videos should be played. It will 

be set to 50 % as default. 

Audio muted 

makes it possible to mute the sound on the videos and it is possible to mute one screen 

and have the sound on another if this is wanted.   

About 

The 

About

 box shows the version number and license key. 


Content 

From here it is possible to see all the playlists loaded to the PC. In 

Current scene

 the next image or 

video to be shown will be present. In 

Available scenes 

all the videos or images of the chosen playlist 

will be shown. It is then possible to choose what to be shown next. If the child being tested is really 

found of ducks, then it is possible to choose the duck to be shown as the first image or video.  

At start up, the VRA PC will have one playlist available on it as default and the system will be ready to 

use out of the box. If the user wants to create their own playlists, please follow the steps below.


To exit the 

information

 screen, press 

F1 

again.


Summary of Contents for VRA Screen

Page 1: ...Science made smarter Instructions for Use EN VRA Screen D 0128588 C 2021 03 ...

Page 2: ...ns 2 Cautions general 2 3 Visual Reinforcement Audiometry VRA 4 4 Getting started 5 4 1 The VRA system 5 PC and connections 5 Setup 6 Start up 6 Setup window 7 4 2 The Playlist Creator 8 PC requirements using the Playlist Creator 8 Software Installation 8 Getting started using the Playlist Creator 10 4 3 Drag and drop 11 5 Care and maintenance 13 5 1 General maintenance procedures 13 5 2 Repair 13...

Page 3: ...description The Interacoustics VRA Screen provides the ability to support up to three visual reinforcement screens where motions and still pictures can be used as rewards The Playlist Creator software delivered with the VRA system makes it possible to adjust the default playlists provided and create playlists of you own Included parts VRA PC Mouse USB with VRA playlist creator Instructions for Use...

Page 4: ...ill find a Return Report where you can describe the problem Please use the Return Report Use of the return report provides the service engineer with the relevant information to investigate the re ported issue Without this information there may be difficulty in determining the fault and repairing the de vice Please always return the device with a completed Return Report in order to guarantee a sati...

Page 5: ...bration instructions or other information that will assist authorized service personnel to repair those parts of this instrument that are designated by Interacoustics as repairable by service personnel No parts of the equipment can be serviced or maintained while in use with the patient The instrument is not intended for use in environments exposed to fluid spills ...

Page 6: ...dlers and it is therefore not possible to determine which side the sound was heard at at a specific sound level If the child accepts it headphones or foam tips with inserts can be used to make an ear specific audiometry In the VRA setup there are usually two screens one on each side of the child When the clinician is present ing a sound the child is prompted to turn its head towards the sound This...

Page 7: ... the VRA system itself and a VRA Playlist Creator 4 1 The VRA system PC and connections VRA system uses a dedidated PC with Windows IoT operating system The VRA system is setup the following way with the PC 1 Power 2 DP port 3 USB 4 HDMI 5 USB 6 USB 7 USB 8 Ethernet 9 HDMI 10 Power 11 Microphone 12 Headset 13 USB 3 0 14 USB ...

Page 8: ...on is the light in the power button on the PC Wait for 30 seconds The system is now ready for use 2 The mouse is now used to control the VRA system Right click Shows image or video on the right screen Left click Shows image or video on the left screen Wheel click Show image or video on the center screen When having more playlists on the VRA PC it is possible to switch between them by using the mou...

Page 9: ... option to control how loud the sounds on the videos should be played It will be set to 50 as default Audio muted makes it possible to mute the sound on the videos and it is possible to mute one screen and have the sound on another if this is wanted About The About box shows the version number and license key Content From here it is possible to see all the playlists loaded to the PC In Current sce...

Page 10: ...ted States and other countries Important make sure you have the latest service packs and critical updates installed for the version of Windows that you are running NOTICE Using operating systems where Microsoft have discontinued software and security support will increase the risk for viruses and malware which may result in breakdowns data loss and data theft and misuse Interacoustics A S cannot b...

Page 11: ...ad and install a new Windows Feature e g NET Framework 3 5 Download and install new features to ensure that the software works as intended Warn you that Windows cannot verify the publisher of this driver software Install the driver software anyway to ensure the VRA playlist creator works as intended Open the program from desktop shortcut or from Start Make sure you have the VRA USB connected to th...

Page 12: ...e image or video should be visible on screen From 0 to 99 seconds 5 Shuffle arrow Replace the image or video on the playlist 6 Remove Scene Remove an image or video from the playlist 7 Remove playlist Remove entire playlist from USB Default playlist can always be removed and added again when needed A new playlist is created by using Add new playlist Open the folders of the content in the upper lef...

Page 13: ...transfer this means that the image or video is not supported by the system When a playlist is created there are multiple options to customize the content For example the time shown on screen which image should appear on what playlist should a single video or image be shown multiple times in a row etc 4 3 Drag and drop It is possible to create as many playlists as needed When having more playlist t...

Page 14: ...It is recommended by doing this as a safely removal of the USB in Windows When the USB is placed in the VRA PC the playlists will be copied to the VRA PC A process bar ap pears while the transfer is taking place Once the transfer is complete the system is ready for use Note If a new playlist is created on the USB the once on the PC will be removed and replaced by the new once ...

Page 15: ... marking effects on safety reliability and performance of the equipment if 1 assembly operations extensions readjustments modifications or repairs are carried out by authorized persons 2 the electrical installation of the relevant room complies with the appropriate requirements and 3 the equipment is used by authorized personnel in accordance with the documentation sup plied by Interacoustics The ...

Page 16: ... product Furthermore this warranty shall not apply to and Interacoustics shall not be responsible for any loss arising in connection with the purchase or use of any Interacoustics product that has been repaired by anyone other than an authorized Interacoustics service representative altered in any way so as in Interacoustics opinion to affect its stability or reliability subject to misuse or negli...

Page 17: ... humidity 0 C 50 C 20 50 C 10 95 Dimensions H x W x L D18 3 x W17 9 x H3 45 cm 7 2 x 7 x 1 4 inches VRA201 weight 1 32 kg 2 6 lbs Copyright Interacoustics A S All rights reserved Information in this document is proprietary to In teracoustics A S The information in this document is subject to change without notice No part of this document may be reproduced or transmitted in any form or by any means...

Reviews: