background image

Service Manual  

AT235


II


NB noise – Ipsi, Reflex: 

1000, 2000, 3000, 4000 Hz 

Stimulus duration: 

750 ms 

Reflex acceptance: 

Adjustable between 2% and 6%, or 0.05 – 0.15 ml change 

of ear canal volume 

Intervals: 

Down to 1 dB step size. 

Intensity max: 

90, 100, 120 dBHL. 

Outputs: 

Contra Earphone: 

TDH39 earphone, DD45 earphone, CIR insert and/or 

EARtone 3A insert for Reflex measurements. 

Ipsi Earphone: 

Probe earphone incorporated in the probe system for 

Reflex measurements 

 Probe connection: 

Connection of the electrical and air system to the probe 

Test types: 

Manual reflex: 

Manual control of all functions. 

Automated Reflex 

Single intensities 

Reflex growth 

Reflex decay: 

Automatic, 10 dB above threshold and manually controlled 

with stimulus durations of 10 

Reflex latency: 

Automated, first 300 ms from stimulus start 


Audiometer functions 

Signals: 

Frequencies Hz:   Intensities dB HL:  

125  

-10 to 70  

250  

-10 to 90  

500  

-10 to 100  

1000  

-10 to 100  

2000  

-10 to 100  

3000  

-10 to 100  

4000  

-10 to 100  

6000  

-10 to 100  

8000  

-10 to 90  


Test types 

Auto threshold determination (Modified Hughson Westlake) 

Auto testing: duration 1-2 s adjusted in 0.1 s intervals 


Summary of Contents for AT235

Page 1: ...Service Manual AT235 Impedance Audiometer Science made smarter Item No 8533743 D 0132907 A 2022 05 ...

Page 2: ... 16 3 6 Saving the calibration data 17 4 Calibration of Transducers 19 4 1 Calibration standard for Impedance 19 4 1 1 Transducer setup 19 4 1 2 Probe tone speaker calibration 20 4 1 3 Transducer calibration 21 4 1 4 Volume calibration 22 4 1 5 Pressure calibration 23 4 1 6 Calibration standard for Audiometer 24 4 2 Selecting a transducer how to guide 25 4 2 1 Transducer types and equipment requir...

Page 3: ...r to the patient and or user The CAUTION label identifies conditions or practices that could result in damage to the equipment NOTICE NOTICE is used to address practices not related to personal injury 1 3 General information We continuously strive to improve our products and their performance hence the specifications in this service manual are subject to change without further notice The performan...

Page 4: ...in any fluid Do not use hard or pointed objects to clean any part of the instrument or accessory Do not let parts that have been in contact with fluids dry before cleaning Rubber ear tips or foam ear tips are single use components Recommended cleaning and disinfection solutions Warm water with mild nonabrasive cleaning solution soap Procedure Clean the instrument by wiping outer case with a lint f...

Page 5: ... includes other common actions except from calibration which is thoroughly described in Chapter 3 and Chapter 4 TOOLS A Torx T8 T10 A flatsided screwdriver An unbrako Hex Key 1 5 Nut screwdriver 5 Cross point screwdriver The pump module should be checked and if applicable maintained on a regular basis We have ensured direct access to the module with the purpose of avoiding total disassembly of the...

Page 6: ...the instrument allows easier access This is done by carefully releasing the tube on the right hand side By sliding the black lock to the right allowing release of the cable the module is no longer attached to the instrument The silicone tube is easily removed from the pump outlet by pulling it apart gently Pushing the pump arm slightly the spring is ready to be unhooked It is now possible to open ...

Page 7: ...crewdriver to carefully open the lock mechanism holding the wheel in place Fig 9 Fig 10 Fig 11 Once unlocked the wheel with the pump tube can be lifted up and off of the module It is now ready for replacement NOTICE The wheel may have a tight fit and thus require some effort to remove ...

Page 8: ...ls are now loose for dismantling the parts Be careful whilst separating as the parts are still attached with cables on the inside Please note that the screen is not fully attached anymore By tilting the top the cabinet is open for service Carefully free the ribbon cable from the cabinet After releasing the ribbon cable and the display cable the bottom and top cabinets are separated Fig 16 Fig 12 F...

Page 9: ... their respective lock mechanisms to the right NOTICE There are 4 screws holding the probe connection board in place Two on the inside and two on the outer rear panel It is possible to change the probe connection board without removing the main board from the bottom cabinet Make sure that no tubes and cables are attached to the mainboard Use the lock mechanism for releasing the main board from the...

Page 10: ... remove the cover by flipping it off With a screwdriver remove the 3 screws holding the cover in place Now the 3 black screws holding the dial in place can also be removed with a screwdriver The rotary dial can now be removed from the top cabinet Fig 20 Fig 21 Fig 22 Fig 23 ...

Page 11: ...play is attached to the bottom cabinet hence removal of the screws on the bottom cabinet is required before disassembly of the display is possible Please refer to Disassembling the Cabinet 2 3 4 Nice to know Access to the SD card is possible when removing the panel and the screw holding it in place We highly recommend use of SD card types authorized by Interacoustics as we otherwise cannot guarant...

Page 12: ...ements given in this standard It is considered good practice to perform annual checks of the audiometric test room s noise level as part of the annual calibration using the applicable table per ANSI ASA S3 1 American National Standard Maximum Permissible Ambient Noise Levels for Audiometric Test Rooms to ensure that audiometer performance will not be affected by any changes in the audiometric test...

Page 13: ...irements for audiometer calibrations 1 A Type 1 sound level meter Octave band filter set 1 3 octave with range from 125 Hz to 16000 Hz must meet Type 1 sound level meter requirements ANSI S1 4 Sound level meters should be checked before use by means of a calibrator 2 A system to measure Frequency Rise time Fall time Duration Overshoot THD Total Harmonic Distortion 3 A Piston phone or sound level m...

Page 14: ...rds and Technology NIST or equivalent Test equipment calibration documents are to be kept on file 3 3 1 Calibration mode entering Connection between the instrument and a computer should be conducted as described in Installing the Diagnostic Suite The calibration program is activated by starting the program and following the on screen instructions The program is found via the below path C Program F...

Page 15: ... is exempted Patient response connect and check unit functionality from Patient response Keyboard Probe switch button verify that instrument and the probe interact properly using the button LED test function Probe indicator using the Diode test3 verify proper diode function Linearity of attenuator test according to Attenuator test Puretone by means of an oscilloscope make sure that the sinus tone ...

Page 16: ...ls contain the software required for the annual calibration of the following instruments AC40 AD629 AT235 AA222 Prior to the first time the instrument is connected to the computer a USB driver for the purpose of storing data has to be installed on the computer In the below section a guide to proper installation of the software can be found Insert the Diagnostic Suite USB into the designated drive ...

Page 17: ...continued software and security support will increase the risk of viruses and malware which may result in breakdowns data loss and data theft and misuse Interacoustics A S cannot be held liable for your data Some Interacoustics A S products support or may work with operating systems unsupported by Microsoft Interacoustics A S recommends you to always use Microsoft supported operating systems that ...

Page 18: ...should look as below with the Connect button highlighted to indicate correct connection If the Connect button is fully highlighted the instrument is not properly connected In this case shut down the application open it and Connect again Make sure that the instrument is connected correctly to a power source and to the computer via a USB cable Fig 28 ...

Page 19: ...pment shut down in an untimely manner for instance caused by a power outage Method 1 Following each action simply save by selecting the Save button as exemplified below Save can be used at any point to save the present values All values in all screens are saved Save Close saves and exits the application In this case a dialog box with the message Calibration data successfully written to hardware po...

Page 20: ...d 2 After a given action go to the Main menu and select Write to hardware as illustrated below A dialog box with the message Calibration data successfully written to hardware pops up when the action is successfully completed Fig 29 ...

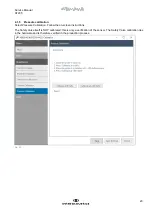
Page 21: ...contra phone connected to the device NOTICE Switching between different transducers requires a new calibration of the transducer in question The probe contains calibration data for the Probe tone IPSI and volume NOTICE Present calibration data will be over written if saved In this case a total recalibration will be necessary for correct functionality of the selected item Fig 30 ...

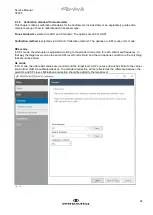
Page 22: ...ation Select Probe Tone Speaker for calibration Connect the probe to a 2 cc coupler with corresponding preamplifier and RMS meter Follow the on screen instructions NOTICE It is essential to click Calculate Gain after each frequency level calibration Fig 31 ...

Page 23: ...ration to calibrate the transducers Select the relevant transducer and follow the on screen instructions Upload defaults can be used when calibrating a new transducer in order to have a slide starting point closer to target Output damping is equal to attenuator settings Fig 32 ...

Page 24: ...ld be used Background noise should be kept to a minimum Follow the on screen instructions NOTICE Height above sea level must be set before the volume calibration is conducted Verify that the result is successful when the calibration is completed in order to avoid problems later in the process Fig 33 ...

Page 25: ...elect Pressure Calibration Follow the on screen instructions The Safety Valve itself is NOT calibrated this is only a verification of the sensor The Safety Valve calibration lies in the hardware and is therefore verified in the production process Fig 39 ...

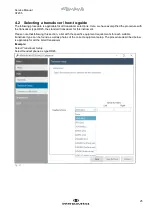
Page 26: ...de or HL mode SPL mode In SPL mode the attenuator is adjusted according to the standard correction for each stimuli and frequency In that way the target level can be the same SPL level for all stimuli and the microphone correction is the only thing that should be added HL mode In HL mode the attenuator values are rounded and the target level in SPL varies and will be similar to the values known fr...

Page 27: ...cer type DD45 the standard transducer for this instrument Please note that following this section a list with the specific equipment requirements for each suitable transducer type can be found as well as photos of the correct equipment setup The procedure described below is applicable for all the listed transducers Example Select Transducer Setup Select Headset phone as type DD45 Fig 41 ...

Page 28: ...he 6cc IEC 60318 3 IEC 303 coupler Adjust the slider until the calibration level is obtained on the measurement amplifier i e 90 dB SPL Fig 43 Check the frequency accuracy with a frequency counter The accuracy has to be better than 1 When the intended calibration level is obtained use Enter to get the next frequency Repeat until all stimuli are calibrated for both the left and right transducer NOT...

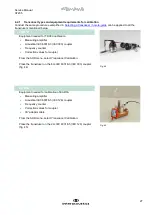
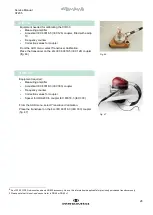
Page 29: ...Acoustical IEC 60318 3 IEC 303 coupler Frequency counter Correction values for coupler From the AUD menu select Transducer Calibration Place the transducer on the 6cc IEC 60318 3 IEC 303 coupler fig 44 EAR3A Fig 45 Equipment needed for calibration of EAR3A Measuring amplifier Acoustical IEC 60318 5 IEC 126 coupler Frequency counter Correction values for coupler 30 adaptor cable From the AUD menu s...

Page 30: ...EC 60318 5 IEC 126 coupler fitted with eartip 10 Frequency counter Correction values for coupler From the AUD menu select Transducer Calibration Place the transducer on the 2cc IEC 60318 5 IEC 126 coupler fig 46 DD65 V25 Fig 47 Equipment required Measuring amplifier Acoustical IEC 60318 3 IEC 303 coupler Frequency counter Correction values for coupler Spacer for HDA200 to coupler IEC 60318 3 IEC 3...

Page 31: ...ssure value in the bottom of the pressure test view Make sure that the pressure does not drop more than 5 daPa 0 5 daPa sec during the next 10 seconds Release pressure by manually removing the probe from its cavity Test minimum pressure limit green dotted line Place the probe in a 2ml hard wall cavity and select the slowest pump speed Set target pressure to 1000 daPa and verify that the actual pre...

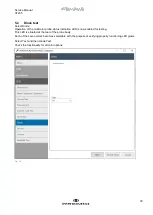
Page 32: ...tatus indication LED is now enabled for testing This LED is situated at the rear of the probe body Each of the seven colors becomes selectable with the purpose of verifying properly functioning LED glows Select Test and then Diode Test Check the functionality for all color options Fig 49 ...

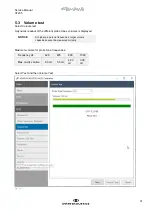
Page 33: ...rent probe tones volumes is displayed NOTICE At higher probe tone frequencies larger volume capacities cannot be measured correctly Maximum volume for probe tone frequencies Frequency Hz 226 678 800 1000 Max cavity volume 8 0 ml 5 0 ml 4 23 ml 3 39 ml Select Test and then Volume Test Fig 50 ...

Page 34: ... AT235 32 Control whether the tone 226 Hz is audible in the probe tip Place probe tip in a 2 cc cavity and check that the colored bar is changing color from blue to green The volume shows 2 ml 1 90 to 2 10 ml Fig 51 ...

Page 35: ...ormation Test points 5 6 and 7 enable testing of each part of the attenuator Max output damping 0 Min output damping 120 Fixed attenuator level 0 no damping Level 25 add 25 dB attenuation damping 20 dB attenuation ON OFF ON add 20dB on top of 4 5 When damping is 20 dB or less the 20 box should be ticked When damping is exactly 20 dB ticking the 20 box is optional Above 20 dB damping the box should...

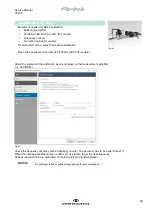
Page 36: ...Service Manual AT235 34 As illustrated below make sure that the values are as follows 0 dB 3 V 0 3 V This particular example is measured on the left output Fig 53 ...

Page 37: ...35 35 Now check at 60 dB 3mV 0 3 mV This particular example is measured on the left output Fig 54 Repeat for the second attenuator using the Headset1Right output making sure that the output corresponds with the selected ...

Page 38: ...on command via USB Power supply UES65 Use only specified power supply unit UE60 type Input 100 240 VAC 50 60 Hz 2 5 A Output 24 0 VDC Dimensions H x W x L 29 x 38 x 7 5 cm AT235 weight 2 5 kg Impedance measuring system Probe tone Frequency Level 226 Hz 678 Hz 800 Hz 1000 Hz pure tones 1 85 dB SPL 69 dB HL 1 5 dB Air pressure Control Indicator Range Pressure limitation Pump speed Automatic Measured...

Page 39: ...be connection Connection of the electrical and air system to the probe Test types Manual reflex Manual control of all functions Automated Reflex Single intensities Reflex growth Reflex decay Automatic 10 dB above threshold and manually controlled with stimulus durations of 10 Reflex latency Automated first 300 ms from stimulus start Audiometer functions Signals Frequencies Hz Intensities dB HL 125...

Page 40: ...ll volumes in the measurement range Distortion Max 1 THD Compliance Range 0 1 to 8 0 ml Temperature dependence 0 003 ml C Pressure dependence 0 00020 ml daPa Reflex sensitivity Reflex artifact level 0 001 ml is the lowest detectable volume change 95 dB SPL measured in the 711 coupler 0 2 ml 0 5 ml 2 0 ml 5 0 ml hard walled cavities Temporal reflex characteristics IEC60645 5 clause 5 1 6 Initial la...

Page 41: ...racoustics Standard As Broad band noise specified in IEC 60645 5 but with 500 Hz as lower cut off frequency Low Pass noise LP Spectral properties Interacoustics Standard Uniform from 500 Hz to 1600 Hz 5 dB re 1000 Hz level High Pass noise HP Spectral properties Interacoustics Standard Uniform from 1600 Hz to 10KHz 5 dB re 1000 Hz level Ipsilateral Earphone Pure tone Interacoustics Standard Wide Ba...

Page 42: ...d Interacoustics Standard Interacoustics Standard Interacoustics Standard ISO 389 4 ISO 8798 0 5 ml 1 ml Hz TDH39 EARtone 3A IP30 DD65 v2 DD45 Probe NB Stimulus Correction Values RETSPL 125 45 26 30 5 47 5 41 4 3 250 25 5 14 17 27 24 5 4 5 500 11 5 5 5 8 13 9 5 4 9 7 5 3 7 1000 7 0 4 5 6 6 5 6 9 7 5 3 15 1500 6 5 2 2 5 8 5 6 21 1600 Hz 2000 9 3 2 5 8 12 6 11 7 3 9 26 3000 10 3 5 2 8 11 6 0 8 0 5 3...

Page 43: ...HL 125 80 65 85 70 100 85 70 60 75 60 250 100 85 100 85 110 100 85 75 100 85 500 120 100 110 95 115 105 100 85 120 100 750 120 105 115 100 120 110 100 85 120 105 1000 120 105 115 100 120 110 105 90 120 105 1500 120 105 115 100 120 110 110 90 120 100 2000 120 105 115 95 120 110 105 90 120 100 3000 120 105 115 100 120 110 95 90 120 105 4000 120 105 110 95 120 105 100 85 120 105 6000 120 100 100 85 1...

Page 44: ... 5 105 2000 9 0 120 15 0 105 3000 10 0 120 16 0 105 4000 9 5 120 14 5 105 6000 15 5 120 20 5 100 8000 13 0 105 18 0 95 White Noise 0 0 120 Table 4 IEC TDH39 Coupler IEC 60318 3 1998 6ccm Tone Audiometer Tone Narrow Band Noise ISO 389 1 1998 ISO 389 4 1994 Frequency RETSPL Max HL RETSPL Max HL 125 45 0 85 49 0 70 250 25 5 105 29 5 90 500 11 5 120 15 5 105 750 7 5 120 12 5 105 1000 7 0 120 13 0 105 ...

Page 45: ...110 3000 3 5 120 9 5 110 4000 5 5 115 10 5 105 6000 2 0 100 7 0 95 8000 0 0 90 5 0 90 White Noise 0 0 110 Table 8 IEC CIR 33 Coupler IEC 60318 5 2006 2ccm Tone Audiometer Tone Narrow Band Noise ISO 389 2 1994 ISO 389 4 1994 Frequency RETSPL Max HL RETSPL Max HL 125 26 0 90 30 0 85 250 14 0 105 18 0 100 500 5 5 110 9 5 105 750 2 0 115 7 0 110 1000 0 0 120 6 0 110 1500 2 0 120 8 0 110 2000 3 0 120 9...

Page 46: ...OW IPSI Sp Center Frequency Att Setting Reading Tone NB Hz dB HL dB HL dB HL 125 85 70 60 250 85 85 75 500 85 100 85 750 85 100 85 1000 85 105 90 1500 85 110 90 2000 85 105 90 3000 85 95 90 4000 85 100 85 6000 85 85 80 8000 75 70 80 75 WB 85 95 LP 85 100 HP 85 95 Table 12 IP30 Contra EAR 3A Contra Center Frequency Att setting Reading Tone NB Hz dB HL dB HL dB HL 125 85 100 85 250 85 110 100 500 85...

Page 47: ...Service Manual AT235 x 7 Appendix B Block Diagram ...

Page 48: ...8108148 Diagnostic probe system 1077 8108189 Clinical probe system 1077 8503373 TDH39P contra headset P3045 neutral 8106919 DD45 contra headset P3045 8520328 DD65v2 headset 8103323 IP30 insert phone 10ohm single contra 8106339 DD45 audiometric headset 8106355 TDH39 audiometric headset HBA headband 8101884 IP30 insert phone 10ohm set ...

Page 49: ...umaural Headband cable 8517499 RadioEar Cushions for Circumaural Headbands 8105761 Strap key kit 8104678 Assortment BET55 complete 8106038 Probe floss kit 8105696 Printer kit 1077 8106795 Wall mounting kit 1077 8103838 APS3 patient response switch 8106790 Diagnostic probe holder 1077 ...

Page 50: ...0580 Kit eartip adaptor 6pcs 8500830 Eartip adaptor cleaning tool 8011348 Probe cleaning tool Eartips of various sizes 8511445 Types umbrella mushroom flanged Single Use Eartip Box 8515491 TPR MPT III thermal paper 8500610 Foam pad HBC39 headset 10 pcs 1 bag 8002802 ...

Page 51: ...107762 Probe tip kit 1077 incl gasket 8004140 Cable for pump 24 pins 8000656 Pump module 8102693 Gasket 8527201 Mainboard with FW Replacement Kit AT235 1043 8108143 PCA keyboard 1077 8108144 Bottom 1077 8108145 PCA probe connection board 8106874 Rotary encoder 1077 8102178 Knob plastic 1077 ...

Page 52: ...S PART NUMBER DESCRIPTION 8102071 Display cable 1077 8004158 Cable for keyboard 40 pins 8101484 Rotary dial cover 1077 8108146 Top cabinet 8108147 Display 1077 8524210 Power supply 24V 60W UES65 240250SPA3 8507211 Contra headband P3045 ...

Page 53: ... Logo Update AT235 direct printout allows results to be printed directly after testing via a supported USB printer please contact Interacoustics customer service for a list of supported PC printers if in doubt The printout logo can be configured via the audiometer itself see below or downloaded via the Diagnostic Suite in the General Setup 1 Open the program Paint which can be found in the accesso...

Page 54: ...date_user logo bin file to the formatted thumb drive 12 It is very important that this file is the ONLY FILE on this USB thumb drive 13 With the audiometer switched off insert the thumb drive into any available USB port 14 Then switch the instrument on and push the Temp Setup Button from the Tone test screen 15 Enter Common Settings using the Setup Tests Button 16 To the question Do you want to in...

Reviews: