background image

                                15

English

Step 11—Dual Processor installation instructions.

PC-3849

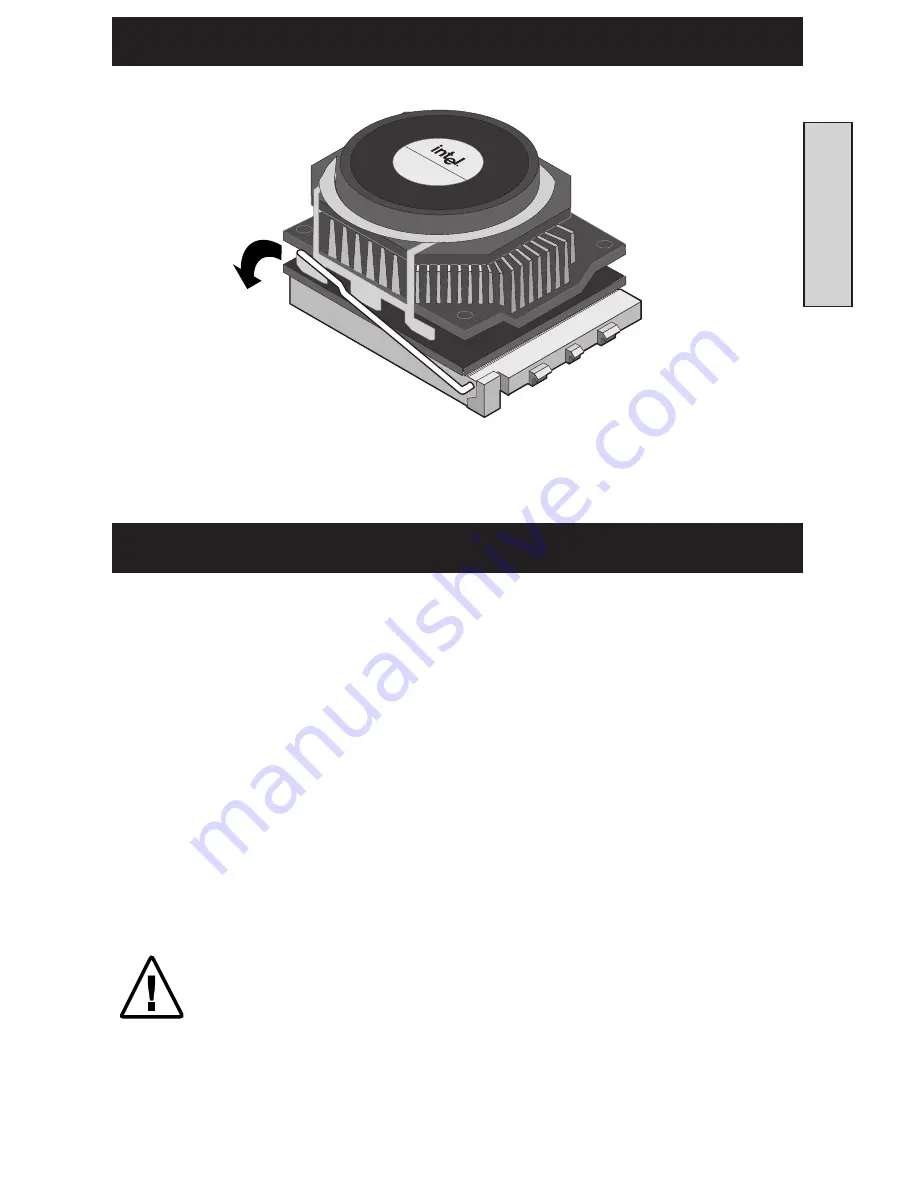
Close the socket handle to lock the Pentium II  OverDrive processor
in place.

Once it is locked in place, the Pentium II OverDrive processor
should fit snugly in the socket

.

Step 11 — Close the socket handle

Step 12 — Connect the fan power cable

This is essentially the reverse of step 6.  You should use the fan
power cable provided with the Pentium II OverDrive processor.
Carefully attach the small connector on the fan cable to the small
connector on the top of the Pentium II OverDrive processor fan.
The connector should snap into place. The cable’s small connector
is notched so it will only connect one way.

Then connect the large fan cable connector into one of the available
connectors from the system’s power supply.  See the illustration on
the following page for details.

Note:  If your system uses a software program, such as
Intel’s "LANDesk Client Manager", to monitor the
processor operation, refer to the "Troubleshooting" section
on page 23 for information on configuring the Pentium II
OverDrive processor to support the fan monitoring feature.
This feature can only be supported if fan power is supplied
by the motherboard.

Summary of Contents for Pentium II OverDrive

Page 1: ...II...

Page 2: ...pt as provided in Intel s Three Year Limited Product Warranty for this product Intel assumes no liability whatsoever and Intel disclaims any express or implied warranty relating to sale and or use of...

Page 3: ...ssor If it does follow the owner s manual procedure using this manual for addtional information Check your computer s owner s manual This symbol indicates a CAUTION or WARNING It identifies operations...

Page 4: ...n for Intel s MMX technology To run the diagnostic program requires Windows 95 or Windows NT 3 51 or greater 1 Insert the Pentium II OverDrive processor Diagnostic diskette into drive A 2 Choose File...

Page 5: ...our computer s system unit Step 3 Unplug computer and remove cover Turn off the computer and any attached equipment such as a monitor or printer unplug the power cord and remove the cover Warning Don...

Page 6: ...ht by the system power supply add in cards or floppy hard drive mounting brackets It may be necessary to remove add in cards or drives to gain access to the processor socket Refer to your system docum...

Page 7: ...e Pentium Pro processor Back of system Baby AT Motherboard On top of your Pentium Pro processor there should be a passive heatsink which may be attached with a clip or a fan heat sink with an attached...

Page 8: ...on the installation process for these computers see the dual processor section on page 19 The Owner s Manual for your computer may show the location of the processor If you can t locate your computer...

Page 9: ...n t touch computer components Then carefully unplug the heatsink s power cable from the computer s power supply or slide the power cable off the motherboard connector Your new OverDrive processor does...

Page 10: ...k Client Manager to monitor the processor fan operation the Pentium II OverDrive processor may be compatible with that feature Refer to the Getting Help section on page 28 for more information PC 3843...

Page 11: ...sure to hold your hand over the clip while unfastening it to prevent it from flying loose Warning You must be very careful on removing the clip from the processor It may be under considerable tension...

Page 12: ...sink and the socket just above the socket tab Gently pry outward to allow the heat sink to slip over the tab You should then be able to completely release the heat sink from all the other socket tabs...

Page 13: ...the box in which the Pentium II OverDrive processor shipped 90 deg Caution The fan heat sink and processor may come out as two separate pieces Before opening the ZIF socket lever make sure to first re...

Page 14: ...and pin holes are properly aligned gently insert the processor into the socket Don t use force to insert the processor in the socket Align the overhang area of the processor with the side of the sock...

Page 15: ...small connector on the top of the Pentium II OverDrive processor fan The connector should snap into place The cable s small connector is notched so it will only connect one way Then connect the large...

Page 16: ...16 Step 10 Connect the fan power cable Step 13 Connect the fan power cable continued PC 3843N System power supply cable Fan power cable provided with the OverDrive processor System Power Supply...

Page 17: ...roblems with your computer after installing the Pentium II OverDrive processor or don t see improved performance turn to the Troubleshooting section on page 23 If your computer requires setting jumper...

Page 18: ...EEE standard MMX Technology Tests the various MMX Instruction Test technology instructions to see whether they are working properly MMX Technology Video Test Demonstrates the MMX technology features o...

Page 19: ...pports dual processing You must have two Pentium II OverDrive processors to configure a system for dual processing The Pentium II OverDrive processor is not designed to support more than two processor...

Page 20: ...ual processor motherboards may require a Voltage Regulator Module VRM for the second processor Contact your system manufacturer for information on obtaining a second VRM if one was not included with y...

Page 21: ...Pentium Pro processor based system with two Pentium II OverDrive processors Follow steps 1 through 13 on pages 4 to 17 to remove both Pentium Pro processors and install both Pentium II OverDrive proce...

Page 22: ...th the Pentium Pro processor Follow Steps 1 through 8 in the Single Processor Installation section to remove both Pentium Pro processors from the system Follow steps 9 through 13 to install the Pentiu...

Page 23: ...outlet The cables and cords are attached correctly Any cards you removed are reinstalled properly The Pentium II OverDrive processor is fully inserted and the processor socket handle is fully locked...

Page 24: ...eliminated jumper settings and setup requirements as the problem but you don t see a speed improvement see the Getting Help section on page 28 Your computer powers on andruns normally fora fewminutes...

Page 25: ...e connectors both at the fan and power source are fully seated and tight Warning When your computer is plugged in the power is on and the cover is off don t touch your computer or the fan Exercise ext...

Page 26: ...when the computer is powered on contact Intel Customer Support using the phone numbers located in the back of this manual for additional information The BIOS in many older computers may not properly...

Page 27: ...he motherboard as shown below The pins are connected ON when a tiny plastic connector covers two pins The connector has a metal piece embedded in the plastic that allows current to pass between the pi...

Page 28: ...l Brand products is available on the Internet for downloading by anonymous FTP and for viewing or downloading on the World Wide Web Try Intel s newsgroup forum for answers to common questions or post...

Page 29: ...dia 63 2 638 0860 Hours 0900 1500 Vietnam 63 2 638 0860 Indonesia 800 65 7249 Thailand 63 2 638 0860 Hours 0900 1600 Hong Kong 852 2 844 4456 Phillipines 1 800 651 0117 Singapore 65 831 1311 Malaysia...

Page 30: ...rive processors are available upon request If the OverDrive processor which is the subject of this Limited Warranty fails during the warranty period for reasons covered by this Limited Warranty Intel...

Page 31: ...at the OverDrive processor is or may be defective you will be issued a Return Material Authorization RMA When you return the OverDrive processor to Intel you must include the RMA number on the outside...

Page 32: ...MITATIONS OR EXCLUSIONS MAY NOT APPLY TO YOU THIS LIMITED WARRANTY GIVES YOU SPECIFIC LEGAL RIGHTS AND YOU MAY ALSO HAVE OTHER RIGHTS THAT VARY FROM JURISDICTION TO JURISDICTION ALL EXPRESS AND IMPLIE...

Reviews: