6
General Installation Process
12
Reinstall the RAID Controller on the
Motherboard (Valid for Intel® Server
Chassis)
A
Make sure that the power to the chassis is still turned off, the power
cords are unplugged, and the chassis is grounded and has no AC
power.
B
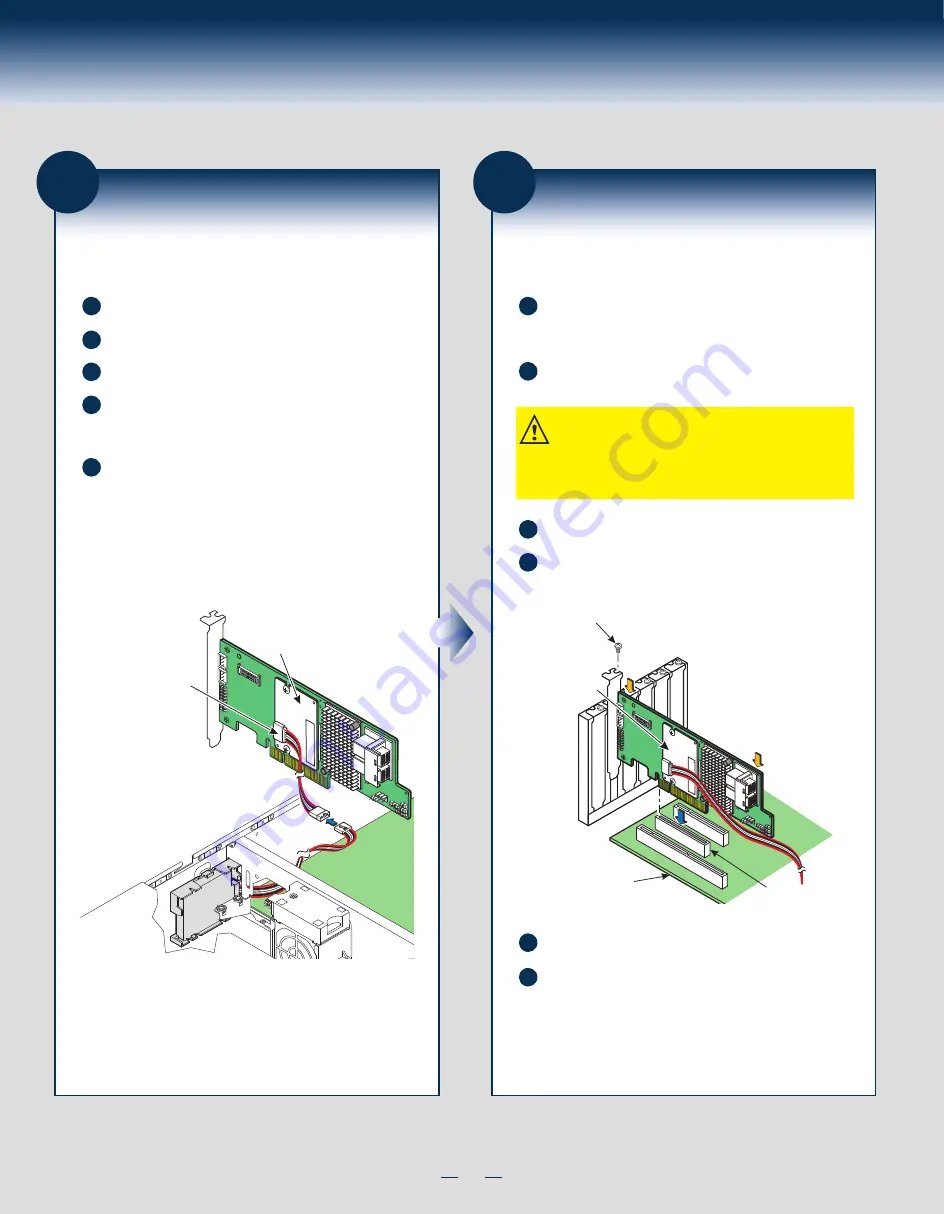
Install the RAID controller in a PCIe slot on the motherboard, as
shown in the following figure.
C
Press down gently, but firmly, to seat the card correctly in the slot.
D
Secure the RAID controller to the computer chassis with the bracket
screw.
NOTE: This RAID controller is a PCIe x8 card, and it can
operate in x8 or x16 slots. Some PCIe slots, however, support
only PCIe graphics cards; if a RAID controller is installed in
one of these slots, the RAID controller will not function. Refer
to the guide for your motherboard for information about the
PCIe slot.
E
Reinstall the computer cover, and reattach the power cords.
F
Turn on the power to the computer.
Refer to the
Intel
®
RAID Software User Guide
for information about
running the RAID configuration utility and installing the software
drivers.
Intel
®
RAID Controller
RS3DC080 as shown
Press
Here
Edge of
Motherboard
PCIe Slot
Bracket
Screw
Press
Here
RMFBU module
11
Connect the RMFBU4 Module to the
Remote Super Capacitor Pack Module
(Valid for Intel® Server Chassis)
A
Ground yourself, and make sure that the system is grounded.
B
Place the RAID controller on a flat, clean, static-free surface.
C
Remove the cable that is included in the RAID controller box.
D
Insert one 9-pin cable connector on the cable into the 9-pin J1
connector on the RMFBU4 module, as shown in the following
figure (the cable is blue).
E
Insert the other 9-pin cable connector into the 9-pin connector on
the remote Super Capacitor Pack module.
Align the cable connectors to make sure that they are connected
correctly.
Intel
®
RAID Controller
RS3DC080 as shown
J1
RMFBU4 module
Summary of Contents for AXXRMFBU4
Page 2: ...This page is intentionally left blank...
Page 12: ...H24048 001...


