background image

9

R

V

L

R

L

R

L

R

L

VIDEO-1

OUT

IN

VIDEO-2

VIDEO-3

OUT

IN

IN

TAPE

VIDEO

S VIDEO
OSD SELECTOR

(REC)

OUT

IN

(PLAY)

DIGITAL OUTPUT

DIGITAL INPUT

COAXIAL

1

COAXIAL

2

OPTICAL

1

OPTICAL

2

OPTICAL

FRONT

FRONT

CENTER

SUB

WOOFER

SURROUND

FRONT

CENTER

CD

PHONO

SUB

WOOFER

SURROUND

AMP IN

PRE  OUT

GND

MONITOR

OUT

S

REMOTE 
CONTROL

REMOTE

LOCAL

IN

DVD

L

R

L

R

L

R

SURROUND  SPEAKERS

FRONT SPEAKERS A

CENTER

SPEAKER

FRONT SPEAKERS B

MULTI CHANNEL
INPUT

MULTI SOURCE

OUT

R

L

AV RECEIVER

CAUTION: SPEAKER IMPEDANCE

6 OHMS MIN. / SPEAKER

ANTENNA

AM

FM

75

AC INLET

AC OUTLETS

AC 120V 60Hz

SWITCHED

TOTAL 120W 1A MAX.

MODEL NO. 

DTR-7

IN

DVD

R

V

L

S

R

L

FRONT

CENTER

SUB

WOOFER

SURROUND

MULTI CHANNEL
INPUT

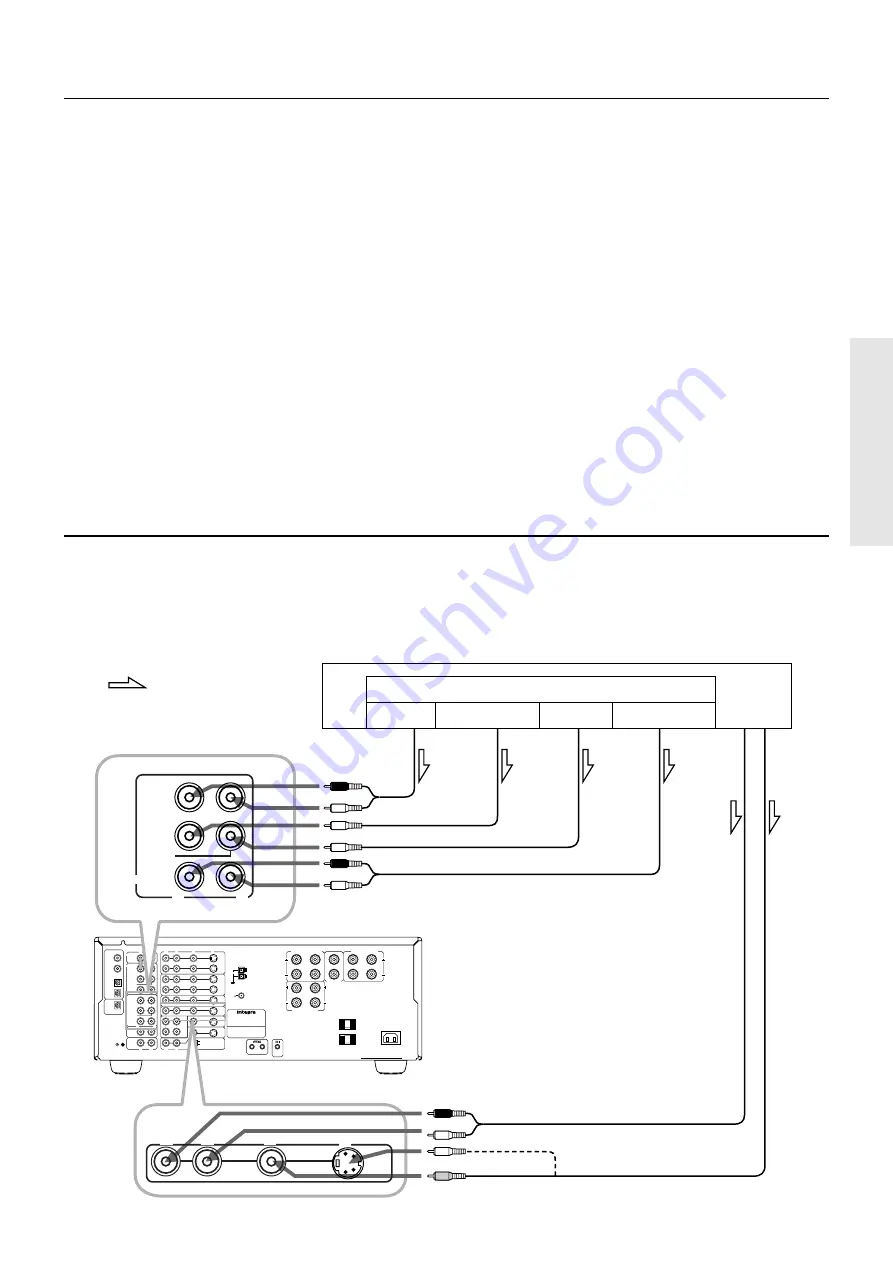
Decoder with 5.1-channel output

You may connect the 5.1-channel outputs of an external decoder (such as MPEG decoder and DVD player) to the MULTI CHANNEL
INPUTs of this unit.

:Signal flow

DVD player or a decoder with Multi (5.1) channel outputs

FRONT OUT

SUBWOOFER OUT

CENTER OUT

SURROUND OUT

AUDIO OUT

VIDEO OUT

Multi (5.1) channel outputs

Front

Subwoofer

Center

Surround

Connecting equipment with 5.1-channel output

Video equipment connections

1. Digital audio connections

This receiver has a powerful digital signal processor for use with DVD players, DAT decks, and CD players. The digital inputs, CO-
AXIAL 1, 2 and OPTICAL 1, 2 can be assigned to individual input selector buttons, so when an input selector button is pressed, the
assigned digital input is used instead of the corresponding analog input. (See page 23,29.)

2. Connect your second video cassette deck.
3. Connect your DVD player to COAXIAL or OPTICAL, whichever appropriate.
4. OSD SELECTOR:

Selects whether to output the OSD (On-Screen Display) information with the Video signals or the S-Video signals. Select "S VIDEO"
when the monitor is connected via the S-Video terminal.

5. Connecting video equipment through S-video connectors

• The signals input from the S IN jack will be output only to the S OUT jack; the signals input from the V IN jack will be output only to the

V OUT jack.

• For information on whether you need to connect either S or V jack or both of them, please refer to the instruction manual that came with

your video equipment.

6. Connect your video camera or TV game machine to the VIDEO-4 / VIDEO CAM INPUT jacks.

If a monaural video camera is used, connect its audio connection cable to “ R(MONO)” audio jack.

Notes:

• When using a playback-only VCR, connect it to VIDEO 3 or VIDEO 4. If you connect it to VIDEO 1 or VIDEO 2, you need to make only the input

connections.

• This receiver can be used only with a monitor TV equipped with a video input or S video jack.
• Interference may be caused between the TV and this receiver. If this interference occurs, place the receiver and the TV as far apart as possible. We do not

recommend the use of a common TV/FM antenna (see antenna section).

• Remove the protective cap attached to the DIGITAL INPUT/OUTPUT (OPTICAL) jack before making the connection. When this jack is not used,

replace the protective cap.

DTR-7/DTR-6

Summary of Contents for DTR-6

Page 1: ...necting speakers 10 Connecting power amplifiers 12 Connecting an equalizer 13 Connecting the power 13 Making antenna connections 14 Appendix Using the remote controller 49 Programming the remote controller codes of other devices into the RC 392M 52 Using a Macro function 54 Troubleshooting guide 58 Specifications 60 Control positions and names 62 Thank you for purchasing the Integra Audio Video Co...

Page 2: ...y as recom mended by the manufacturer 14 Power Lines An outdoor antenna should be located away from power lines 15 Nonuse Periods The power cord of the appliance should be unplugged from the outlet when left unused for a long period of time 16 Object and Liquid Entry Care should be taken so that objects do not fall and liquids are not spilled into the enclosure through openings 17 Damage Requiring...

Page 3: ...not expressly approved by the party responsible for compliance could void the user s authority to operate the equipment NOTE This equipment has been tested and found to comply with the limits for a Class B digital device pursuant to Part 15 of the FCC Rules These limits are designed to provide reasonable protection against harmful interference in a residential installation This equipment generates...

Page 4: ...oration 6 Niles is a registered trademark of Niles Audio Corporation Key Features THX 1 select DTR 7 only DTS 2 decorder built in Dolby 3 digital decoder built in Linear PCM 96 kHz 24 bit D A converter 5 1 multichannel inputs 4 assignable digital inputs 2 coaxial 2 optical Optical digital output DTR 7 only Onscreen display Main in jacks for front left right channels DTR 7 only Pre outs for all cha...

Page 5: ...he same time The life of the batteries supplied is about six months but this will vary depending on usage Using the remote controller Point the remote controller toward the remote control sensor The STANDBY indicator lights up when the unit receives a signal from the remote controller Notes Place the unit away from strong light such as direct sunlight or inverted fluorescent light which can preven...

Page 6: ...OPTICAL 1 OPTICAL 2 OPTICAL FRONT FRONT CENTER SUB WOOFER SURROUND FRONT CENTER CD PHONO SUB WOOFER SURROUND AMP IN PRE OUT GND MONITOR OUT S REMOTE CONTROL REMOTE LOCAL IN DVD L R L R L R SURROUND SPEAKERS FRONT SPEAKERS A CENTER SPEAKER FRONT SPEAKERS B MULTI CHANNEL INPUT MULTI SOURCE OUT R L AV RECEIVER DIGITAL OUTPUT DIGITAL INPUT COAXIAL 1 COAXIAL 2 OPTICAL 1 OPTICAL 2 OPTICAL R L CD PHONO G...

Page 7: ... INPUT MULTI SOURCE OUT R L AV RECEIVER CAUTION SPEAKER IMPEDANCE 6 OHMS MIN SPEAKER ANTENNA AM FM 75 AC INLET MODEL NO DTR 7 AC OUTLETS AC 120V 60Hz SWITCHED TOTAL 120W 1A MAX Capacity is total 120 watts R V L R L R L R L VIDEO 1 OUT IN VIDEO 2 VIDEO 3 OUT IN IN TAPE VIDEO S VIDEO OSD SELECTOR REC OUT IN PLAY DIGITAL OUTPUT DIGITAL INPUT COAXIAL 1 COAXIAL 2 OPTICAL 1 OPTICAL 2 OPTICAL FRONT FRONT...

Page 8: ... connector marked L to the left channel The yellow connector marked V is used for video connection Please refer to the instruction manual of each component when making any connections Video Disc Player Digital video equipment or Video cassette recorder AUDIO OUT VIDEO PUT AUDIO IN VIDEO IN AUDIO OUT VIDEO OUT VIDEO IN Monitor TV DVD player DIGITAL COAXIAL OUTPUT DIGITAL OPTICAL OUTPUT Signal flow ...

Page 9: ...is pressed the assigned digital input is used instead of the corresponding analog input See page 23 29 2 Connect your second video cassette deck 3 Connect your DVD player to COAXIAL or OPTICAL whichever appropriate 4 OSD SELECTOR Selects whether to output the OSD On Screen Display information with the Video signals or the S Video signals Select S VIDEO when the monitor is connected via the S Video...

Page 10: ...er systems Before connecting the speakers place them correctly by consulting the instruction manuals that came with your speakers For surround playback see Using the listening modes on page 34 the configuration and placement of your speakers are very important For Home THX cinema surround playback we recommend that you use a THX speaker system that is certified by Lucasfilm Ltd such as Onkyo HTS S...

Page 11: ...ceiver is designed to produce optimum sound quality when speakers with impedances within the specified ranges are connected Please check the following information and choose speakers with appropriate impedances for the connections FRONT SPEAKERS A or B 6 ohms min speaker SURROUND SPEAKERS 6 ohms min speaker CENTER SPEAKER 6 ohms min DTR 7 DTR 6 Center Speaker Surround Speaker R ch Front Speaker A ...

Page 12: ...2 OPTICAL FRONT FRONT CENTER SUB WOOFER SURROUND FRONT CENTER CD PHONO SUB WOOFER SURROUND AMP IN PRE OUT GND MONITOR OUT S DVD MULTI CHANNEL INPUT MULTI SOURCE OUT R L DTR 7 DTR 7 DTR 6 R V L R L R L R L VIDEO 1 OUT IN VIDEO 2 VIDEO 3 OUT IN IN TAPE VIDEO S VIDEO OSD SELECTOR REC OUT IN PLAY DIGITAL OUTPUT DIGITAL INPUT COAXIAL 1 COAXIAL 2 OPTICAL 1 OPTICAL 2 OPTICAL FRONT FRONT CENTER SUB WOOFER...

Page 13: ...FRONT SPEAKERS B MULTI CHANNEL INPUT MULTI SOURCE OUT R L AV RECEIVER CAUTION SPEAKER IMPEDANCE 6 OHMS MIN SPEAKER ANTENNA AM FM 75 AC INLET AC OUTLETS AC 120V 60Hz SWITCHED TOTAL 120W 1A MAX MODEL NO DTR 7 R L FRONT FRONT AMP IN PRE OUT Output jack Input jack 2 POWER ON button 2 POWER STNBY button 1 MODE AUDIO button MASTER VOLUME STANDBY ON PHONES VIDEO S VIDEO POWER OFF ON A SPEAKERS B FM AM PH...

Page 14: ... 1 Insert the end of the cable 2 Clamp it in place with pliers 4 Re install the cover Directional Iinkage Do not use the same antenna for both FM and TV or VCR recep tion since the FM and TV or VCR signals can interfere with each other If you must use a common FM TV or VCR antenna use a directional linkage type splitter Assembling the AM loop antenna Assemble the loop antenna as shown in the illus...

Page 15: ...nd electrical shock grounding is necessary Follow item 19 of the Important Safeguards on page 2 when you install the outdoor antenna Connecting the AM loop antenna The AM loop antenna is for indoor use only Set it in the direction and position where you receive the clearest sound Put it as far away as possible from the unit TVs speaker cables and power cords When reception is not satisfactory with...

Page 16: ...y Screen Setup Background Color Green 1 Superimpose Mode Normal Immediate Display ON Character Position Screen Setup Use the on screen display to set the background color the superim pose mode etc 1 Press the OSD MENU button 2 Select Screen Setup and press the right edge of the EN TER Cursor button 3 Press the upper or lower edge of the ENTER Cursor button to select each item and then press the ri...

Page 17: ...pose Mode Normal Immediate Display ON Character Position Input Selector screen page 27 32 Rec Selector screen page 45 Listening Mode Setup screen page 38 Speaker Setup screen page 19 Screen Setup screen See the previous page OSD screens or Select the input source page 27 Perform digital input setting page 29 Assign a video input source page 40 Perform IntelliVolume setting page 43 Set the listenin...

Page 18: ... Your system is a non THX speaker system Press the SMART SCAN CONTROLLER 3 Set whether or not a subwoofer is connected Yes A subwoofer is connected No A subwoofer is NOT connected Press the SMART SCAN CONTROLLER 4 Select the size of your front speakers Large Large front speakers are used Small Small front speakers are used Press the SMART SCAN CONTROLLER 5 Select the size of your center speaker La...

Page 19: ... right or left edge of the button to set a parameter Subwoofer Set whether or not a subwoofer is connected Yes A subwoofer is connected No A subwoofer is NOT connected Front Select the size of your front speakers Large Large front speakers are used Small Small front speakers are used Center Select the size of your center speaker Large A large center speaker is used Small A small center speaker is ...

Page 20: ...er Press the SMART SCAN CONTROLLER 7 SW appears Set the distance from the subwoofer 8 Press the SMART SCAN CONTROLLER The speaker distance setup has been completed Loudspeaker Position Time Synchronization is a registered trademark of Lucasfilm LTD 1 2 7 Using the on screen display 1 Press the OSD MENU button 2 Select Speaker Setup and then press the right edge of the ENTER Cursor button 3 Select ...

Page 21: ...plained on the page 18 19 If the speaker level is set to 1dB or higher the maximum level indicated on the display will change if you raise the volume level Setting the speaker Level Using the on screen display 1 Press the OSD MENU button 2 Select Speaker Setup and then press the right edge of the ENTER Cursor button 3 Select Level Setup and then press the right edge of the ENTER Cursor button The ...

Page 22: ...Test Tone ON 3 Press the SMART SCAN CONTROLLER The test tone is output and Turn SSC Up appears 4 Gently rotate the SMART SCAN CONTROLLER clockwise and just before sound is distorted press the SMART SCAN CONTROLLER If you do not press the SMART SCAN CONTROLLER Dis torts Push SSC appears Note Allowing the speakers to produce distorted sound for a long time may cause damage to the speakers To disable...

Page 23: ...aker level Playing a digital source Digital Input Setup SPEAKERS A PCM DIGITAL DIRECT STEREO 3 4 Bass Peak Setup Bass Peak Level Limiter Yes Peak Level 18dB Starting The Test Tone Bass Peak Setup 1 Turn Volume Up 2 When Sound Distorts 3 Press ENTER Level 31dB Digital input setup Each of the DVD CD VIDEO 1 3 and TAPE input channels can be set so that it accepts analog or digital audio input The def...

Page 24: ...in as follows Press the FM MUTE MODE button The AUTO indicator turns off At this time the station will be in mono and interstation noise will be heard Select the station to which you want to listen FM MUTE MODE DISPLAY FM AM SPEAKERS A DSP AUTO TUNED FM DISPLAY button Pressing the DISPLAY button each time will change the indication as follows Frequency preset No Listening mode MASTER VOLUME STANDB...

Page 25: ...can be stored in the memory SPEAKERS A DSP AUTO TUNED CHARACTER MEMORY 3 PRESET MODE ADJ PUSH TO ENTER PRESET MODE ADJ PUSH TO ENTER 4 5 PRESET MODE ADJ PUSH TO ENTER 2 CHARACTER MEMORY 3 PRESET MODE ADJ PUSH TO ENTER Cancelling preset stations 1 Select the preset station you wish to remove as explained in the previous section 2 Press the CHARACTER MEMORY button repeatedly Preset Erase appears on ...

Page 26: ...tton 1 Press the desired input selector button or the MULTI CH INPUT button The selected source name appears on the display If you have selected DVD CD VIDEO 1 VIDEO 2 VIDEO 3 or TAPE perform Digital Input Setup see page 23 See page 33 for information on MULTI CH INPUT See page 32 if you have selected FM or AM 3 Start playing the selected input source 4 Adjust the sound volume to an appropriate le...

Page 27: ...EXIT button to exit the setup mode 3 Selecting an input source If no sound is heard from the speakers check the following items When you have selected DVD CD VIDEO 1 3 or TAPE check the digital input setup is correct See page 23 Make sure that the input signal format setting is correct See page 28 29 The Muting function may be activated Cancel the Muting func tion See Muting the sound on page 31 M...

Page 28: ...al input source is detected automatically to execute the necessary decoding process Analog Analog audio signal processing The audio signals input from the equipment connected to the analog input jacks are played PCM PCM signal processing A decoding process is executed only when PCM signals are in put DTS DTS signal processing A decoding process is executed only when DTS signals are in put Notes In...

Page 29: ...digi tal input jacks OPTICAL1 2 COAXIAL1 2 to connect the DTS source 2 If you play a CD or LD that supports DTS when the Auto matic or Digital setting is selected you may hear a noise for a short while until the DTS decoder recognizes the DTS en coded signal and starts operating This is not a malfunction 3 If you press the PAUSE or SKIP button on the player while playing a DTS source a short noise...

Page 30: ...EREO A SPEAKERS B Changing the display The display changes each time you press the DISPLAY button dur ing playback DISPLAY SPEAKERS A DSP AUTO TUNED ch SPEAKERS A DSP AUTO TUNED SPEAKERS A DSP AUTO TUNED ch SPEAKERS A DSP AUTO TUNED SPEAKERS A DSP AUTO TUNED Frequency Preset channel Listening mode Preset station name Does not appear if no name is given Listening mode Preset input source name Does ...

Page 31: ...ble levels with the on screen display 1 Press the OSD MENU button 2 Select Listening mode Setup and then press the right edge of the ENTER Cursor button 3 Select Listening Mode and then press the right edge of the ENTER Cursor button 4 Select Tone Control and then press the right edge of the ENTER Cursor button The Tone Control Setup screen appears Press the upper or lower edge of the ENTER Cursor...

Page 32: ...e MODE AUDIO button and then the TUNER button Using the on screen display 1 Press the OSD MENU button 2 Select Input Selector and then press the right edge of the ENTER Cursor button 3 Select Input and then press the right or left edge of the ENTER Cursor button to select TUNER 4 Select Preset No and then press the right edge of the EN TER Cursor button 5 Press the right or left edge of the ENTER ...

Page 33: ...h Input Level Setup Left 0dB Center 5dB Right 0dB Left Sur 0dB Left Sur 0dB Subwoofer 10dB 3 3 Remote controller Setting the MULTI CHANNEL INPUT To play back an input source you connected with the MULTI CHANNEL INPUT connectors you must set the output level of each speaker Also note that this output level setting must be per formed independent of the speaker levels you set using the test tone see ...

Page 34: ...play back monaural recordings such as old movie soundtracks The center channel delivers unprocessed original sound whereas the other channels delivers processed center channel sound with ap propriate reverberation Thus you can enjoy monaural sound with the atmosphere of a movie theater ORCHESTRA This mode is suitable for classics and opera music The center channel is cut and the surround channels ...

Page 35: ... LEVEL DIMMER TI CH MUL INPUT ANDBY ST TI SOURCE MUL DTR 7 by VIDEO4 MONO AUDIO L R REC OUT MULTI SOURCE 3 MASTER VOLUME control knob 2 Use the LISTENING MODE buttons to select the desired listening mode and then start play ing the selected source Use these buttons to set the listening mode param eters See page 38 1 Input selector buttons Select the desired input source To change the input source ...

Page 36: ... is a feature of Dolby Digital When playing back software which has been encoded in Dolby Digital sometimes you may see a brief message in the front panel display which will read Dial Norm XdB X being a numeric value Dialogue Normalization serves to let you know if the source mate rial has been recorded at a higher or lower level than usual For example if you see the following message Dial Norm 4d...

Page 37: ...des available when the speakers are installed in a full configuration right left front center and right left surround speakers Without surround speakers set the listening mode to STEREO 3 Stereo or Direct Input source analog PCM Dolby Digital DTS MPEG Listening mode 3 2ch 2 0ch 3 2ch 2 0ch Stereo 3 Stereo O O O O O O Dolby Pro Logic O THX Cinema O Action O Musical O Mono Movie O Orchestra O Unplug...

Page 38: ...eter setting 4 Press the SMART SCAN CONTROLLER 2 3 AUDIO ADJUSTMENT Listening Mode Setup Listening Mode Mono Movie Front Effect ON Reflect Level 0dB Reverb Level 0dB Room Size Mid Default Using the on screen display If you use the on screen display to set a listening mode you can set the relevant parameters on the same screen 1 Press the OSD MENU button 2 Select the Listening Mode and press the ri...

Page 39: ...ources more reverberation will be applied by the DSP creating too much reverb effects and the sound loses its frame or presence In this case set FRONT EFFECT to OFF No reverbera tion from the DSP will be applied to the sound output from three front channels and the sound source will be played as it is without any further reverberation Note The Front Effect function is effective only on the Action ...

Page 40: ... the ENTER Cursor button 3 Select Video Assign Setup and then press the right edge of the ENTER Cursor button Video Assign Setup screen is displayed When the cursor is on TAPE you can press the lower edge of the ENTER Cursor button to display additional items When the cursor is on DVD you can press the upper edge of the ENTER Cursor button to display the previous items 4 Press the upper or lower e...

Page 41: ...name 4 Press the TUNING DOWN UP button to select the character you wish to change 5 Rotate the SMART SCAN CONTROLLER to select the character you wish to enter and then press the SMART SCAN CONTROLLER The name entry mode will be canceled automatically when you finish entering 8 characters To erase a name 1 Select the source whose name you wish to erase by pressing the corresponding input selector b...

Page 42: ...of each speaker in the range of 12 to 12 dB The adjustment range of the subwoofer is 30 to 10 dB To use the above setting from now on The above setting will be overwritten by the speaker output levels you set through the test tone once you press the TEST button on the remote control ler 1 2 3 Adjusting the output level of each speaker using the remote controller 1 Press the MODE AUDIO button 2 Pre...

Page 43: ... you wish to set IntelliVolume by pressing the corresponding input selector button 2 Press the SP SYS SETUP button repeatedly until IntelliVolume appears Press the SMART SCAN CON TROLLER Now you can perform IntelliVolume setup 3 While listening to playback sound rotate the SMART SCAN CONTROLLER to select a desired value The setting is possible in the range between 12 12 dB in units of 1 dB Press t...

Page 44: ...er connected to the TAPE VIDEO 1 VIDEO 2 jacks Then start playing the source component you selected in step 1 Notes If you change the input source during recording you will record the signals from the newly selected input source You cannot record the surround effects VIDEO 1 VIDEO 2 VIDEO 3 VIDEO 4 DVD FM AM PHONO CD TAPE 3 1 2 PRESET MODE ADJ PUSH TO ENTER 1 2 PRESET MODE ADJ PUSH TO ENTER REC OU...

Page 45: ...EO 4 jack Notes If you change the input source during recording you will record the audio signals from the newly selected input source and the video signals assigned to that input source You cannot record the surround effects Recording a source 3 SP SYS SETUP 4 1 2 Using the on screen display You can use the on screen display to set the recording equipment to which the signals are output By doing ...

Page 46: ...TER CD PHONO SUB WOOFER SURROUND AMP IN PRE OUT GND MONITOR OUT S REMOTE CONTROL REMOTE LOCAL IN DVD L R L R L R SURROUND SPEAKERS FRONT SPEAKERS A CENTER SPEAKER FRONT SPEAKERS B MULTI CHANNEL INPUT MULTI SOURCE OUT R L AV RECEIVER CAUTION SPEAKER IMPEDANCE 6 OHMS MIN SPEAKER ANTENNA AM FM 75 AC INLET AC OUTLETS AC 120V 60Hz SWITCHED TOTAL 120W 1A MAX MODEL NO DTR 7 REMOTE LOCAL MULTI SOURCE OUT ...

Page 47: ...UME STANDBY ON PHONES VIDEO S VIDEO POWER OFF ON A SPEAKERS B FM AM PHONO CD TAPE VIDEO 1 DVD VIDEO 4 VIDEO 3 VIDEO 2 D O W N U P FM MUTE MODE CHARACTER MEMORY SP SYS SETUP MODE AUDIO ADJUSTMENT BASS TREBLE DISPLAY DSP PRESET MODE ADJ PUSH TO ENTER DOWN TUNING UP THX DTS SURROUND MODE LISTENING MODE STEREO DIRECT DIGITAL ANALOG CH LEVEL DIMMER REC OUT MULTI SOURCE TI CH MUL INPUT ANDBY ST TI SOURC...

Page 48: ...el 0dB Room size Mid Multi ch input Left 0dB Center 0dB Right 0dB R Sur 0dB L Sur 0dB Subwoofer 0dB Digital input DVD OPT2 VIDEO1 COAX1 VIDEO2 None VIDEO3 COAX2 VIDEO4 None TAPE None CD OPT1 Intellivolume CD 0dB PHONO 0dB FM 0dB AM 0dB TAPE 0dB DVD 0dB VIDEO1 0dB VIDEO2 0dB VIDEO3 0dB VIDEO4 0dB Video assign Setup CD None PHONO None FM None AM None TAPE None DVD DVD VIDEO1 VIDEO1 VIDEO2 VIDEO2 VID...

Page 49: ...WER STNBY button will activate the power standby mode SEND LEARN indicator This indicator acts as a guide when commands are programmed into or sent by the remote controller It also warns the user when an error is made or battery power is low Controlling the receiver 1 Press the MODE AUDIO button 2 Press the desired operation button Shaded buttons in the figure are the operation buttons used to con...

Page 50: ...con troller toward the sensor area on the DVD player 1 Press the MODE DVD button 2 Press the desired DVD operation button POWER ON STNBY Turning the power on and off to the DVD player DVD SET DVD setup DVD player on screen button MENU Displaying the menu Moving the cursor ENTER Confirming the selection RETURN Return DVD player buttons Down Up Playback Stop Rewind Fast forward Pause EJECT r Eject 0...

Page 51: ...an Onkyo Integra tape deck Note First connect an Onkyo Integra tape deck using the zconnection See page 7 1 Press the MODE AUDIO TAPE button 2 Press the desired tape deck operation button Playback Stop Rewind Fast forward REC o Recording pause Reverse playback You may also use the following buttons VOL Adjusting the volume level of the receiver MUTING Muting the sound from the receiver MODE MD MD ...

Page 52: ...order have already been programmed into the buttons on the RC 392M You may pro gram other remote controller codes into these buttons If you wish to restore the Onkyo Integra preset codes after you pro gram new codes erase the new codes See page 53 Notes The remote controller can have max 408 memory slots 51 buttons by 8 modes although this number varies significantly depending on the manufacturers...

Page 53: ...shes three times quickly then the RC 392M exits Learning mode Resume from Step 1 Erasing a learned code from a MODE button 1 Press and hold down the MODE button from which you wish to erase the learned code and press the ENT button twice Then release the buttons When you press the MODE button the SEND LEARN indica tor lights up When you press the ENT button the indicator turns off When you release...

Page 54: ...s the MACRO MODE button to complete program ming The SEND LEARN indicator flashes twice slowly Repeat Steps 1 3 to program other series of button operations into another MODE button 4 Check to see if the series of button operation has been cor rectly learned Point the remote controller toward the receiver press the MODE CD button and press the MACRO MODE button to see if the unit responds as progr...

Page 55: ...le During transmission point the remote controller toward the device to be controlled Notes You may program up to 16 button operations into the MACRO DI RECT button If you try to program the 17th step it will be ignored If you do not press any button for more than 30 seconds during the pro cedure the SEND LEARN indicator flashes three times quickly then the RC 392M exits Learning mode Resume from ...

Page 56: ...oller button operation from the MACRO DIRECT button 1 Press and hold down any one of the MODE buttons and press the MACRO DIRECT button Then release the but tons When you press the MODE button the SEND LEARN indica tor lights up When you press the MACRO DIRECT button the indicator turns off When you release the buttons the indicator flashes once 2 Press the MACRO DIRECT button again The SEND LEARN...

Page 57: ...ies in the correct direction After inserting the batteries release the buttons The SEND LEARN indicator flashes slowly 3 Press the ENT button The SEND LEARN indicator lights up for about ten seconds then turns off All programmed codes are erased and the button memories re turn to the factory presets Notes Proceed to Step 3 immediately once you have completed Step 2 Other wise the batteries will be...

Page 58: ...s incorrect Turntable and speakers are too close together Stylus of turntable pick up is worn Turntable stylus tip is dirty Treble control too high AM loop antenna is not attached Noise from electrical apparatus such as fluores cent lamp Noise from TV set Noise caused by turning fluorescent lamp on and off Noise from automobile ignition Remedy Remove the AC plug from the outlet immediately Then co...

Page 59: ...ion Improper OSD selector setting Improper connection Improper video is assigned The digital input selector is not set properly The TV or monitor is not set to receive the out put signals from the receiver The video cable is not connected securely Only S Video connection is made Playback source is not Dolby Digital encoded Playback source is not Dolby Digital DTS encoded The listening mode is set ...

Page 60: ...1 2 3 4 VIDEO Composite 1 Vp p 75 ohms Output Level Impedance VIDEO 1 2 MONITOR VIDEO Composite 1 Vp p 75 ohms DTR 6 AMPLIFIER SECTION Continuous Average Power output FTC All channels 85 watts per channel min RMS at 8 ohms 2 channels driven from 20 Hz to 20 kHz with no more than 0 08 total harmonic distortion 110 watts min RMS at 6 ohms 2 channels driven from 1 kHz with no more than 0 1 total harm...

Page 61: ... 16 ft Power supply Two AA batteries 1 5 V 2 Specifications and features are subject to change without notice DTR 6 TUNER SECTION FM Tuning Range 87 5 108 0 MHz 50 kHz steps Usable Sensitivity Mono 11 2 dBf 1 0 µV 75 ohms IHF Stereo 17 2 dBf 2 0 µV 75 ohms IHF 50 dB Quieting Sensitivity Mono 17 2 dBf 2 0 µV 75 ohms Stereo 37 2 dBf 20 µV 75 ohms Capture Ratio 2 0 dB Image Rejection Ratio 40 dB IF R...

Page 62: ...rs A B indicators b Rec out indicator c Sleep indicator d PCM digital indicator e Listening mode or Digital input format indicators f Memory indicator g FM Stereo indicator h Tuned indicators i Auto indicator j Multi function display Frequency and Preset station Input selector Sleep time Volume level Listening mode k MULTI SOURCE indicator MASTER VOLUME STANDBY ON PHONES VIDEO AUDIO L R S VIDEO PO...

Page 63: ... 5 MODE buttons 13 27 49 56 6 DISPLAY DVD SET button 49 50 7 CH buttons 32 49 8 EXIT RETURN button 16 17 50 9 PREV CH button This button is not used for this receiver 10 TRACK button 50 11 CD TAPE DVD MD operation buttons 50 51 12 Input Selector buttons 27 32 35 49 13 Numeric key STEREO DSPa s SURROUND SPA B CH SEL LEVEL DIMMER buttons 21 27 33 35 42 49 51 The THX button are not used for the DTR 6...

Page 64: ...E SN 29342732 Printed in Japan D9907 1 ONKYO U S A CORPORATION 200 Williams Drive Ramesy N J 07446 U S A Tel 201 825 7950 Fax 201 825 8150 E mail integra onkyousa com ...

Reviews: