background image

iMeter Solo Owner’s Manual 


Viewing Power Consumption in SmartLinc 

From SmartLinc, you will be able to view the Instantaneous Power used for individual iMeter Solos.  

NOTE: Once you upload the .bin file with iMeter Solo support, SmartLinc will only support population of 
up to 14 rooms (the 15

th

 room will be designated to iMeter Solo and the 16

th

 to Thermostat). If you are 

currently using room 15, please be sure to move those devices/scenes to another room before you 
update your .bin file.  

1)  Update your SmartLinc .bin file: 

a.  Download the .bin file at: 

www.smarthome.com/files/iMeter20110426mg2.bin


b.  Connect to SmartLinc through your browser 

c. Click 

the 

 icon 

d.  Click “Change Application Version” 

e.  Click “Browse” and select the .bin file 

f. Click 

“Upload” 

A confirmation screen will say “MPFS Update Successful”  

g.  Click “Main Page”  

2) Click 

the 

 icon 

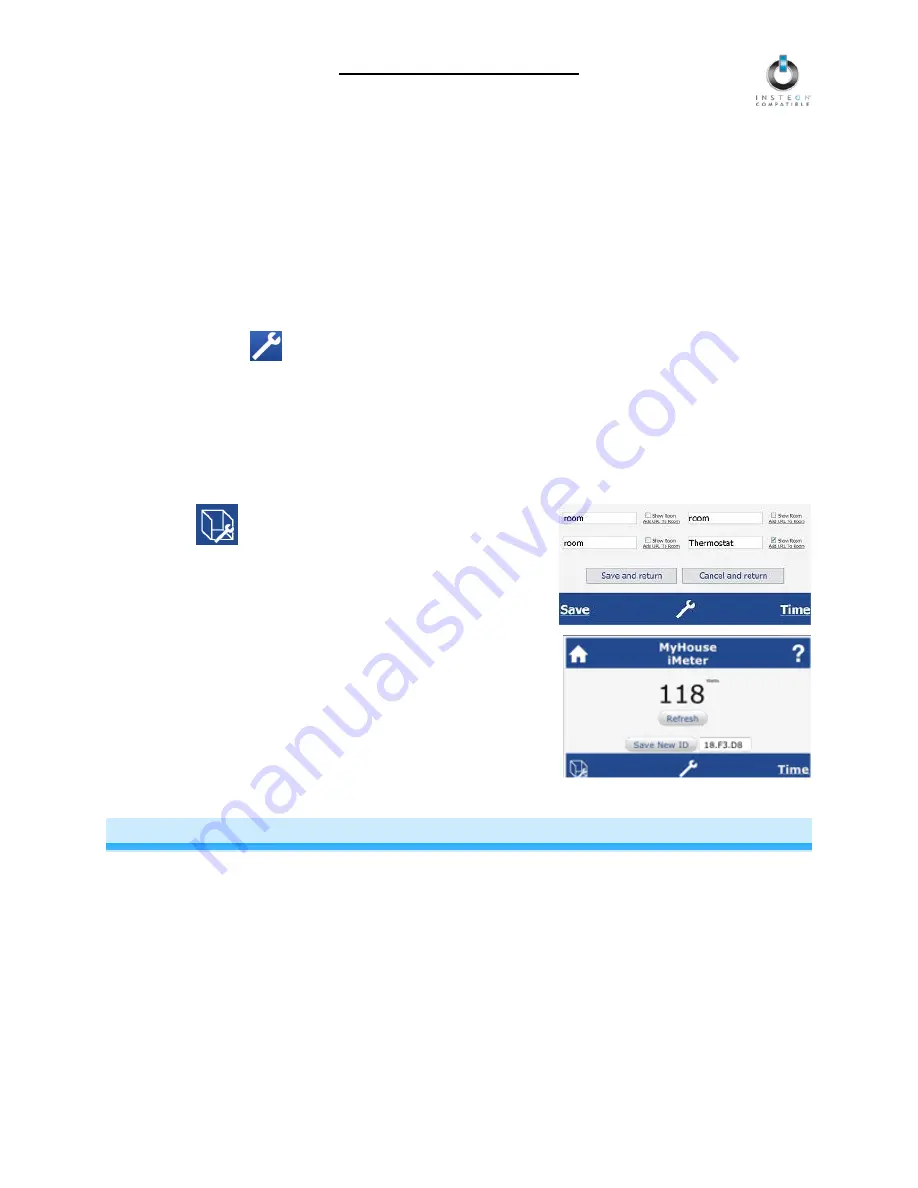
3)  Scroll down to the bottom of the Room list. The 15

th

 room 

(located at the bottom of the list, next to the room named 
“Thermostat”) will be used exclusively for iMeter Solo. 
Rename the room and then click “Save and return”. 

4) Choose the room you just renamed and type in the 

INSTEON ID of the desired iMeter Solo 

5) Click 

“Refresh” 

NOTE: Only one iMeter Solo can be monitored within SmartLinc 
at a time. To monitor another iMeter, enter the INSTEON ID and 
click Refresh. 

ADVANCED FEATURES  

Restoring Power to iMeter Solo 

iMeter Solo stores all of its settings, such as Links to other INSTEON devices, etc., with non-volatile 
memory. Because settings are saved in this non-volatile memory, they will not be lost in the event of a 
power failure.  

Page 7 of 10 


Summary of Contents for Smarthome iMeter Solo INSTEON 2423A1

Page 1: ...iMeter Solo INSTEON Power Meter Plug In Model 2423A1 ...

Page 2: ...wing Power Consumption in HouseLinc 6 Storing Tracking Power Consumption Information in HouseLinc 6 Viewing Power Consumption in SmartLinc 7 ADVANCED FEATURES 7 Restoring Power to iMeter Solo 7 Resetting iMeter Solo to its Factory Default Settings 8 ABOUT INSTEON 8 Using Dual Band INSTEON Devices to Upgrade Your Network 8 Important Note about INSTEON Networks Split Single Phase vs 3 Phase Installa...

Page 3: ... Outlet Key iMeter Solo Features Installs and Links to other INSTEON devices in minutes Measures your appliance power consumption Indicates INSTEON setup mode activity and operational states with a Status LED and beeper Stores setup state in memory so settings aren t lost during power outages or when unplugged Two year warranty What is Included with iMeter Solo iMeter Solo Power Meter Plug In Quic...

Page 4: ...NSTEON terms refer to the components of an INSTEON scene and are used on a scene by scene basis Controller sends INSTEON commands to other devices Responder reacts to commands sent out by another INSTEON device An INSTEON device may act as a Controller Responder or sometimes both INSTEON networks are also extremely secure Each INSTEON device is assigned a unique INSTEON ID so unless neighbors or w...

Page 5: ... II Pollution Degree 2 Installing iMeter Solo 1 Plug the desired appliance into the outlet on iMeter Solo 2 Plug iMeter Solo into an unswitched outlet iMeter Solo will beep and its Status LED will turn on solid green After about 20 seconds iMeter Solo will beep again USING iMETER SOLO TO MEASURE POWER CONSUMPTION OF YOUR HOUSEHOLD APPLIANCES Adding iMeter Solo to HouseLinc 1 In HouseLinc click the...

Page 6: ...Tracking Power Consumption Information in HouseLinc iMeter allows you to save the appliance s power consumption information to a CSV file so you can track and monitor the appliance s energy usage over time To save power consumption information set up an event in HouseLinc 1 In HouseLinc click the Events tab and click Add Event 2 Drag the desired icons into the Trigger s pane and edit as necessary ...

Page 7: ...sion e Click Browse and select the bin file f Click Upload A confirmation screen will say MPFS Update Successful g Click Main Page 2 Click the icon 3 Scroll down to the bottom of the Room list The 15th room located at the bottom of the list next to the room named Thermostat will be used exclusively for iMeter Solo Rename the room and then click Save and return 4 Choose the room you just renamed an...

Page 8: ...ces embody the full potential of a true INSTEON mesh network Taking the power line band signal and working in conjunction with the RF band signal its dual band function plays out in two ways Phase bridger a receiver of commands reacting to and translating signals sent from one power phase to the opposite via RF Signal repeater a participant in an INSTEON network repeating commands intended for oth...

Page 9: ...lo is not plugged into a switched outlet that is turned off Unplug iMeter Solo for at least 10 seconds and then reinstall iMeter Solo is locked up A surge or excessive noise on the power line may have glitched it If the above doesn t work perform a factory reset See Resetting iMeter Solo to its Factory Default Settings If you have tried these solutions reviewed this Owner s Manual and still cannot...

Page 10: ...ther oral or written express or implied including any warranty or merchantability or fitness for a particular purpose Any implied warranty including any warranty of merchantability or fitness for a particular purpose which may not be disclaimed or supplanted as provided above shall be limited to the two year of the express warranty above No other representation or claim of any nature by any person...

Reviews: