background image

Focus  Control 

Turning  either  of  the  coarse  focus  control  knobs 

will  raise  or


lower  the  stage.  The  smallest  graduation  on  the  fine 

adjust  knob  index  scale  is  2

μ

m


of


vertical.

Focus  Tension  Adjustment

  The  tension  of  the  coarse  focus  is 

adjustable and preset at the factory for ease of use. If you wish to 
adjust the coarse focus tension, first locate the tension adjustment 
ring,  It  is  located  between  the  frame  and  coarse  adjustment  knob. 
Turning  the  ring  toward  the  rear  of  the  microscope  increases  the 
tension, and toward the front of the microscope loosens it. Tension 
is too high if you experience physical discomfort.

Pre-focusing  or  Focus  Stop  Control 

Use  of  this  feature  will 

insure  that  the  shorter  working  distance  objectives  don't  contact 
the  stage  or  specimen  when  using  the  microscope.  Its  use  also 
simplifies focusing. After focusing on the specimen with the coarse 
adjustment  by  low  magnification  eyepiece,  rotation  of  the  lever 
toward  the  handler  will  set  and  upper  limit  on  the  coarse 
adjustment  movement.  After  changing  specimens  or  objectives, 
focusing is


easily accomplished by rotating the coarse adjustment 

knob  to  reach  the  pre-focused  position,  then  making  fine 
adjustments  with  the  fine  adjustment  knob.  Focusing  movement 
with  the  fine  adjustment  isn't  affected  by  using  the  pre-focusing
lever.

D i o p t e r  A d j u s t m e n t

  P r o p e r 

correction  for  individual  vision  is 
accomplished  via  the  diopter 
adjustment  located  at  the  left 
eyepiece,  see  figure  4.  Using  the
40X magnification objective, bring
An image into focus with your right 
eye  only.  Once  the  image  is  well 
focused,  observe  with  left  eye,
make  fine  adjustments  with  the 
diopter Adjustment ring to correct 
for your Vision.

Proper  interpupillary  distance

,  Or  the  distance  between 

eyepieces,  is  crucial  to  the  comfort  of  the  user.  Adjusting  the 
interpupillary distance is accomplished through a “folding” action of 
the optical head, at figure 4, allowing for quick and easy adjustment.


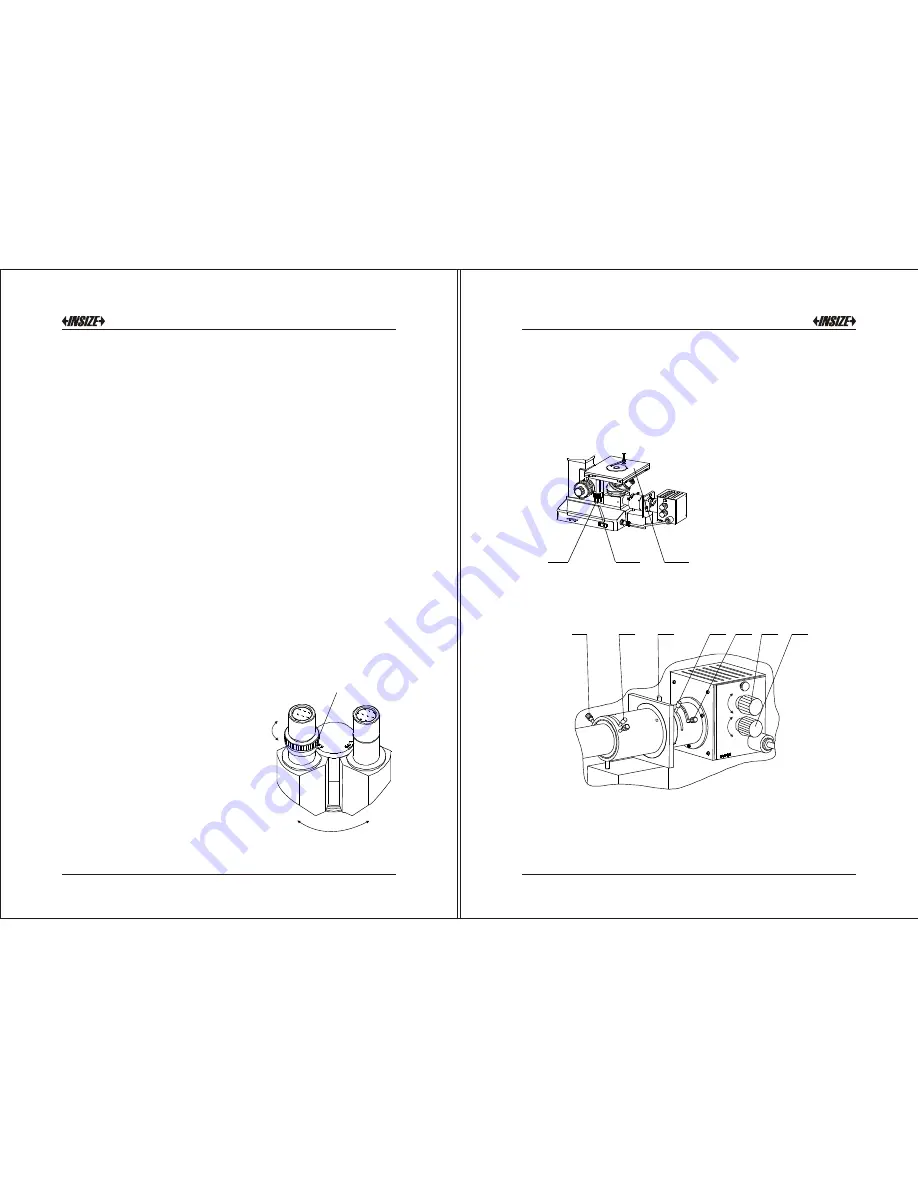
1.  Field  Diaphragm  Centering  Screw    2.  Field  Diaphragm  Adjustment  Lever   
3. Aperture  Diaphragm Adjustment  Lever    4.  Filter  wheel(Polarizer(optional))   
5. Focusing Lens Adjustment Lever 6. Light Bulb Transverse Adjustment


Knob  

7 Light Bulb Vertical  Adjustment Knob  

Figure


6


Figure


4

Diopter Adjustments Ring

2)


4)


3)


3. Diopter and Interpupillary Adjustments

4. Mechanical  Stage  Controls, see  figure  5,  the  coaxial  transverse/ 


longitudinal  knob  allow  for  easy  adjustment.

5.  Illumination Alignment,  See  Figure  6.

2)


7

8

Figure


5

1. Longitudinal Adjustment


Konb  

2. Transverse Adjustment 


Knob  

3. Stage


1

2

3

1

2

3

4

5

6

7

1)


Summary of Contents for ISM-M1000

Page 1: ...OPERATION MANUAL ISM M1000 Metallurgical Microscope www insize com ...

Page 2: ... WITH A PROPERLY GROUNDED WALL OUTLET DO NOT EXPOSE THE INSTRUMENT TO HIGH TEMPERATURES OR HUMIDITY AVOID USING THE INSTRUMENT IN EXTREMELY DUSTY LOCATIONS OPERATING TEMPERATURE 5 C TO 35 C OPERATING HUMIDITY 20 TO 80 25 C WARNING WARNING 1 2 Contents This precision instrument has been designed to require a minimum of optical and mechanical maintenance Its excellent design assures years of high qu...

Page 3: ...h all adjustments and functions before using your new microscope Components 3 4 Getting Started 1 Eyepiece 2 Switch Handspike For Observe Photograph 3 Thumbscrew 4 Trinocular 5 Up Stop 6 Table board Longitudinal Adjustment Knob 7 Brightness Control Knob 8 Table board Transverse Adjustment Knob 9 Power Switch 10 Field Diaphragm Centering Screw 11 Focusing Lens Adjustment Lever 12 Light Bulb Vertica...

Page 4: ... Figure 3 The power switch to the illuminator and the brightness control is located on the base The electrical system is fuse protected and the fuse holder located on the socket Turn on the light with the power switch see figure 2 If the light does not appear to be ON check the brightness control to see if it s on a sufficiently low setting Then adjust the brightness control until image can be obs...

Page 5: ... making fine adjustments with the fine adjustment knob Focusing movement with the fine adjustment isn t affected by using the pre focusing lever Diopter Adjustment Proper correction for individual vision is accomplished via the diopter adjustment located at the left eyepiece see figure 4 Using the 40X magnification objective bring An image into focus with your right eye only Once the image is well...

Page 6: ... Figure 9 1 Set Screw 2 Cover Board 3 Lamp 4 Lamp House 5 Lamp Socket 1 2 3 4 5 a c b This paper will allow for focusing of the lamp filament on it If the filament image is not centered in the overpass hole reduce the aperture diaphragm adjust the light bulb transverse and vertical adjustment to obtain a uniform image Adjust the focusing lens lever until a sharp image of the lamp filament is attai...

Page 7: ... instrument is dry before using Microscope eyepieces and objectives are coated They should not be wiped while dry as dirt or dust may scratch the coating It is best to remove parts from the frame prior to cleaning Always blow loose dust away first Use cotton swabs or lens tissue moistened with a lens cleaner or a small amount of alcohol then wipe the surface clean with a good quality lens tissue S...

Reviews: