Insignia NS-PDP42 User Manual Download Page 18

19

Insignia NS-PDP42/50-09 42" and 50" Plasma TV

www.insignia-products.com

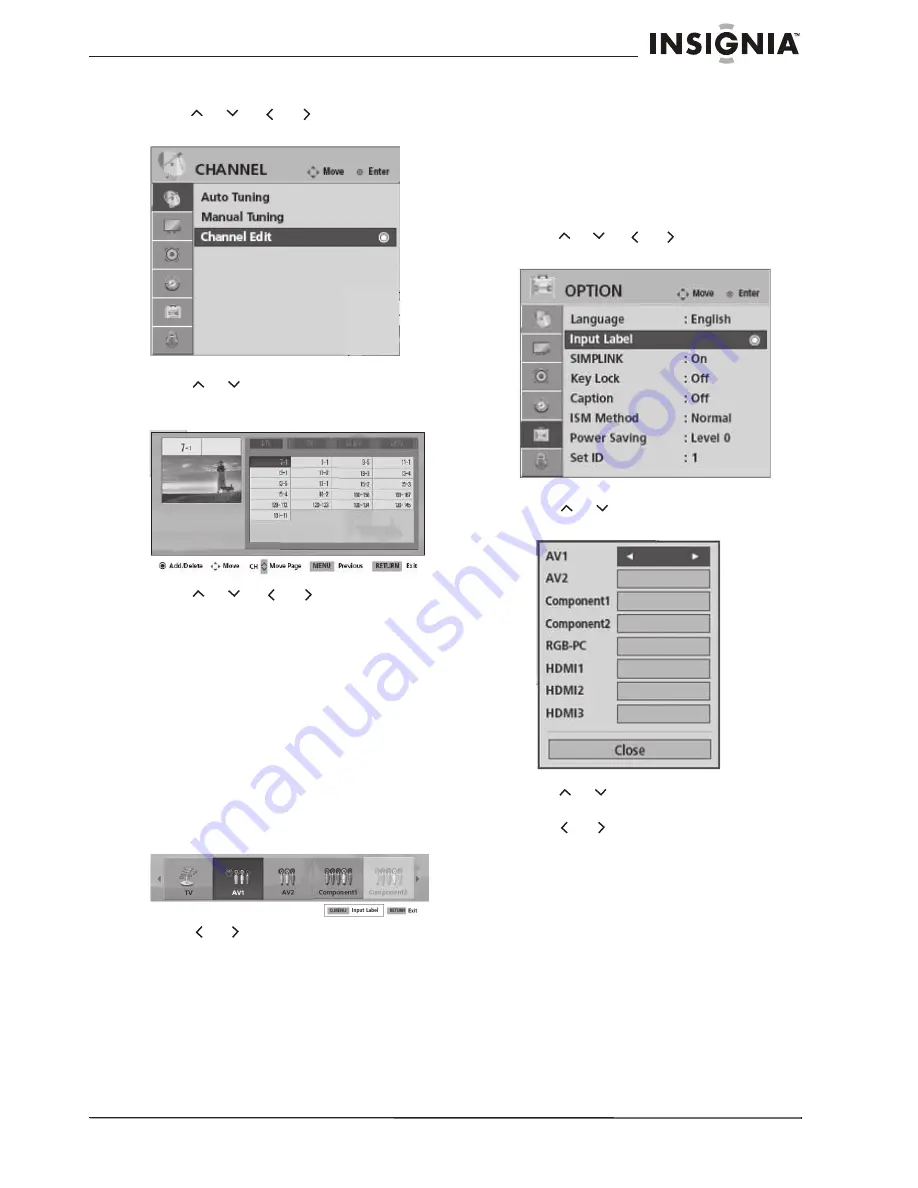
To edit the channel lists:

1

Press 

M

ENU

 on the remote control, then 

press 

or 

 or 

 or 

 to select 

CHANNEL

. The 

CHANNEL menu opens.

2

Press 

ENTER

 to enter the 

CHANNEL menu.

3

Press or  

to 

select 

Channel Edit

, then 

press 

ENTER

. The 

Channel Edit sub-menu 

opens.

4

Press 

or 

 or 

 or 

 to select a 

channel to add or delete it from the list. 

5

Press 

ENTER

 to toggle the channel 

On

 or 

Off

.

6

Press 

RETURN

 to return to the previous 

menu, or press 

M

ENU

 to return to normal 

viewing.

Selecting the input source for your TV

To select the input source:

1

Press 

INPUT

 or 

Q.

M

ENU

 on the remote 

control. The 

INPUT menu opens.

Note to reviewers: Page 39 indicates that the 
user can use the Q.MENU to select the input 
source, but Input is not on the Q.MENU. 
Which is correct?

2

Press

 or 

 to cycle through the available 

inputs. Input sources which are not available 
(connected) are grayed out. Choices include 

TV

,

AV1

,

AV2

,

Component1

,

Component2

,

RGB(PC)

,

HD

M

I1

,

HD

M

I2

, and 

HD

M

I3

.

To change the input label, see “Changing the 
input label” on page 19.

3

Press 

ENTER

 to confirm your choice.

Note to reviewers: Page 38 of the source 
document indicates that the user needs to 
press ENTER to select the input source, but 
page 39 does not. Which is correct?

4

Highlight 

EXIT

 and press 

ENTER

 to close the 

menu.

Changing the input label

To change the input label:

1

Press 

M

ENU

 on the remote control, then 

press 

or 

 or 

 or 

 to select 

OPTION

.

The 

OPTION menu opens.

2

Press 

ENTER

 to enter the 

OPTION menu.

3

Press 

or 

 to select 

Input Label

. The 

Input Label sub-menu opens.

4

Press 

ENTER

 to enter the sub-menu, then 

press 

or 

 to select the source for which 

you want to change the label. 

5

Press

 or 

 to select the label you want.

6

Press 

RETURN

 to return to the previous 

menu, or press 

M

ENU

 to return to normal 

viewing.

Setting the AV mode

You can choose from three preset picture/sound 
modes to enhance your TV viewing.

To set the AV mode:

1

Press 

AV 

M

ODE 

on the remote control to 

cycle through the available preset 
picture/sound modes. Choices include 

Cinema

,

Sport

, and 

Game

.

These choices are presets for both the 
Picture mode and the Audio mode.

Summary of Contents for NS-PDP42

Page 1: ...42 and 50 Plasma TV Spanish NS PDP42 50 09 User Guide Gu a del Usuario...

Page 2: ...ing and use instructions Water and moisture Do not use your TV near water For example do not use it near a bath tub wash bowl kitchen sink laundry tub in a wet basement or near a swimming pool Warning...

Page 3: ...storm or when it is left unattended and unused for long periods of time unplug it from the power outlet and disconnect the antenna or cable system This helps prevent damage to your TV from lightning...

Page 4: ...pecialized companies can dismantle the discarded TV to concentrate the reusable materials and to minimize the amount of materials to be disposed of Dispose of your old TV according to local regulation...

Page 5: ...jack 9 AV IN 1 S Video composite video and L R audio Connect a video cable analog composite video 480i or an S Video cable better quality 480i to the appropriate jack Connect L R audio cables to the...

Page 6: ...ns off 18 PICTURE Press to change the preset picture mode 19 INPUT Press to cycle through the available source inputs 20 AV MODE Press to cycle through the available preset AV modes 21 FAV Press to di...

Page 7: ...or the 50 TV hold the cable management clip with both hands and pull it backward Note to reviewers Please explain The source document was not clear on this process Mounting the TV on a wall This TV ac...

Page 8: ...ye bolts or brackets are tightened securely 4 Use a sturdy rope or cable not provided to secure the TV We recommend that you tie the rope or cable so that it becomes horizontal between the wall and th...

Page 9: ...ack of your TV or the AV IN 2 AUDIO L white and AUDIO R red jacks on the side of your TV 3 Turn on your TV 4 Press INPUT press or to select AV1 or AV2 then press ENTER to confirm Connecting external e...

Page 10: ...UT press or to select Component 1 or Component 2 then press ENTER to confirm Supported resolutions Connecting external equipment using HDMI or DVI digital This connection can be used to connect a digi...

Page 11: ...tion on how to make these connections see Connecting external equipment using composite video good an alog on page 10 Notes To get the best picture quality adjust your PC graphics card to 1360 768 Dep...

Page 12: ...GB DVI jack on the back of your TV 4 Turn on your TV and the PC 5 Press INPUT press or to select RGB PC then press ENTER to confirm Connecting to an external digital audio device You can connect your...

Page 13: ...ns 3 Press or to select SCREEN RGB PC then press ENTER The SCREEN menu opens 4 Press or to select Auto config then press ENTER 5 Press or to select YES then press ENTER Auto configuration begins If th...

Page 14: ...CH or CH on the remote control To enter a channel number directly Press the number buttons on the remote control In digital TV mode a main major channel can have one or more sub minor channels Press t...

Page 15: ...rogram you are watching Caption Turns Closed Captioning On or Off Multi Audio Changes the audio language digital signal SAP Selects MTS sound analog signal Sleep Timer Selects the amount of time befor...

Page 16: ...ER The sub menu for that item opens 4 Press or to select the setting you want 5 Press RETURN to return to the previous menu or press MENU to return to normal viewing Memorizing and setting up channels...

Page 17: ...can create two types of channel lists in memory based on the default channel list created from the Auto Tuning channel search These channel lists are the Custom List and Favorite Channel List A Custom...

Page 18: ...ent2 RGB PC HDMI1 HDMI2 and HDMI3 To change the input label see Changing the input label on page 19 3 Press ENTER to confirm your choice Note to reviewers Page 38 of the source document indicates that...

Page 19: ...device TV automatically turns on To turn Simplink on or off 1 Press MENU on the remote control then press or or or to select OPTION The OPTION menu opens 2 Press ENTER to enter the OPTION menu 3 Pres...

Page 20: ...he Q MENU opens 2 Press or to select Aspect Ratio then press or to cycle through the various aspect ratios 3 Press or to select Close then press ENTER to return to normal viewing Selecting preset pict...

Reviews: