background image

10

NS-DPF10WW-17

www.insigniaproducts.com

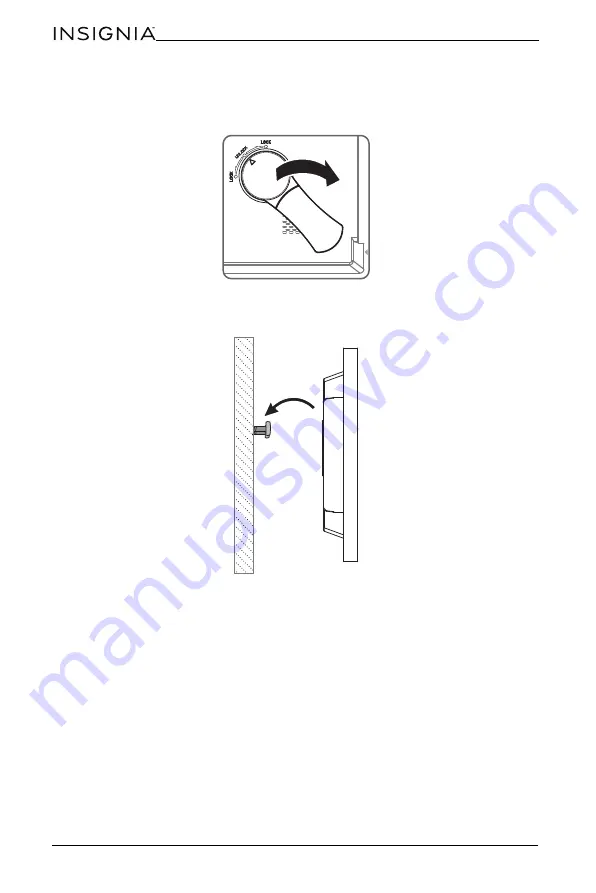
Hanging the photo frame

1

If the stand is attached, turn the stand to the 

UNLOCK

 dot and remove the 

stand.

2

Insert two nails (not included) into your wall, then align the photo frame’s 
mounting holes with the nails to hang your photo frame.

Summary of Contents for NS-DPF10WW-17

Page 1: ...Before using your new product please read these instructions to prevent any damage USER GUIDE 10 Digital Photo Frame with Premium IPS Panel NS DPF10WW 17 ...

Page 2: ...laying a slideshow 18 Playing an instant slideshow from a memory card or USB device 18 Manually playing a slideshow 18 Using the Clock Calendar view screen 19 Maintaining your digital photo frame 20 Cleaning your digital photo frame 20 Replacing the remote control battery 20 Troubleshooting 21 Specifications 22 Legal notices 22 ONE YEAR LIMITED WARRANTY 23 Introduction Congratulations on your purc...

Page 3: ...g does not fit into your outlet consult an electrician for replacement of the obsolete outlet 8 Protect the power cord from being walked on or pinched particularly at plugs convenience receptacles and the point where they exit from the appliance 9 Do not attempt to modify or extend the power cord of this device 10 Unplug this device during lightning storms or when it will not be used for long peri...

Page 4: ...k do not expose this device to rain moisture dripping or splashing and no objects filled with liquids should be placed on top of it Features 10 1 LED backlit TFT LCD display Premium IPS panel for accurate natural colors and a wide viewing angle 16 9 wide screen aspect ratio 1024 x 600 resolution Supports JPEG image format Slideshow mode Scheduled on off Built in media reader with support for SD MM...

Page 5: ...t included 3 navigation buttons Press to navigate the on screen menus When viewing a picture press right or left to view the next or previous picture 4 OK Press to select the highlighted option or to pause and resume the slideshow 5 M menu Press to go to the main menu 6 ON OFF switch Slide to turn your digital photo frame on or off 7 Stand lock Turn the stand to LOCK to display in a landscape or p...

Page 6: ...ort Plug a USB flash drive into this slot 2 SD memory card slot Plug a memory card into this slot Your digital photo frame accepts SD SDHC MultiMediaCard MMC Memory Stick MS Memory Stick PRO MS PRO 3 DC in jack Plug the power adapter into this connector USB DC IN 5V SD MMC MS ...

Page 7: ...us When viewing a picture press right or left to view the next or previous picture In Slideshow mode press to open a pop up menu to rotate zoom or delete an image Caution If you select the delete option the image is permanently deleted from the memory card or USB flash drive 5 BACK Press to go back a screen in the on screen menus 6 ZOOM Press to zoom in on the image Options include 125 150 175 200...

Page 8: ...ote control This tab protects the battery The remote control will not work until it is removed Setting up the photo frame 1 Lay the picture frame face down 2 Line up the arrow on the stand with the UNLOCK dot on the back of the photo frame and insert the stand into the grooves 3 Rotate the stand to LOCK the stand in a landscape or portrait view Portrait view Landscape view ...

Page 9: ... back your own pictures insert a memory card or USB flash drive containing pictures into the corresponding slot on the photo frame Make sure that the label on the memory card or USB flash drive faces the back of the photo frame Caution DO NOT remove a USB device or memory card while they are being used by your photo frame The USB device or memory card should only be removed when the Main Menu scre...

Page 10: ...com Hanging the photo frame 1 If the stand is attached turn the stand to the UNLOCK dot and remove the stand 2 Insert two nails not included into your wall then align the photo frame s mounting holes with the nails to hang your photo frame ...

Page 11: ...your selection You can choose from the following options Photo Starts the slideshow or displays thumbnails of the images on the media device To change photo settings see Using the Photo Setup menu on page12 Calendar Displays a calendar and clock To change the calendar settings see Using the Calendar Setup menu on page14 Setting Opens the Start Up Setting menu STORAGE View pre loaded images stored ...

Page 12: ...view pictures from another device select it from this menu Using the Photo Setup menu 1 Slide the ON OFF switch to turn the digital photo frame on The menu opens 2 Press or to select Setting then press ENTER The Start Up Setting menu opens Note If a card or flash drive containing images is inserted into the frame the slideshow automatically starts after about eight seconds ...

Page 13: ...o Screen Crop to Fill or Full Screen Slideshow Duration Select the duration of the slideshow Choose from 5 sec 15 sec 30 sec 60 sec 5 min or 15 min Slideshow Repeat Select the way the photos are repeated Choose Once or Repeat Slideshow Effect Adjust the transition effect between each image in a slideshow Choose from Random S curve Partition Erase Blinds Random lines Grid Gross Zoom Spiral or Close...

Page 14: ...W 17 www insigniaproducts com Using the Calendar Setup menu 1 Slide the ON OFF switch to turn the digital photo frame on The menu opens 2 Press or to select Setting then press ENTER The Start Up Setting menu opens ...

Page 15: ...nthly Calendar and Clock Date Press to change the month then press to move to the day field Press to change the day then press to move to the year field Press to change the year then press ENTER when done Press or to select another menu option Clock Mode Change the Clock Mode Choose 24 hour or 12 hour Clock Time Press to change the hour then press to move to the minute field Press to change the mi...

Page 16: ...WW 17 www insigniaproducts com Using the System Setup menu 1 Slide the ON OFF switch to turn the digital photo frame on The menu opens 2 Press or to select Setting then press ENTER The Start Up Setting menu opens ...

Page 17: ...hange the hour then press to move to the minute field Press to change the minute then press ENTER when done Press or to select another menu option Auto Power Off Select if you want the photo frame to turn off at a specific time Choose On or Off Auto Shut Time Set the time you want the photo frame to turn off Press to change the hour then press to move to the minute field Press to change the minute...

Page 18: ...he slideshow to play from demo photos stored on the digital photo frame itself The menu opens 2 Press to select from the available options memory card USB flash drive or onboard storage 3 Press SLIDE SHOW A slideshow begins that displays the pictures contained in the memory device you selected Caution Memory cards fit into the card slots in only one direction Do not force a memory card into a slot...

Page 19: ...age 5 To change slideshow settings see Using the Photo Setup menu on page12 Using the Clock Calendar view screen 1 Slide the ON OFF switch to turn the digital photo frame on OR If viewing a slideshow press MENU then BACK The main menu opens Caution If you select the delete option the image is permanently deleted from the memory card or USB flash drive ...

Page 20: ...y CR2025 into the battery tray Match the polarity of the new battery with the plus sign in the battery tray 3 Slide the battery tray into the battery compartment until it clicks into place Note To change the date and time settings see Using the Calendar Setup menu on page14 Cautions The battery should not be exposed to excessive heat such as sunshine heat registers or fire Battery chemicals can ca...

Page 21: ...are JPEG image files Turn the digital photo frame off and make sure that the memory device is inserted all the way into the slot or port and is inserted correctly then turn it back on After a few seconds you should see your first picture Try formatting the device in FAT32 format Caution Formatting the device erases all files on the device Back up the files on the device to your computer before att...

Page 22: ...dio communications However there is no guarantee that interference will not occur in a particular installation If this equipment does cause harmful interference to radio or television reception which can be determined by turning the equipment off and on the user is encouraged to try to correct the interference by one or more of the following measures Reorient or relocate the receiving antenna Incr...

Page 23: ...riod expires you must pay all labor and parts charges This warranty lasts as long as you own your Insignia Product during the Warranty Period Warranty coverage terminates if you sell or otherwise transfer the Product How to obtain warranty service If you purchased the Product at a Best Buy retail store location or from a Best Buy online website www bestbuy com or www bestbuy ca please take your or...

Page 24: ...SIGNIA SHALL NOT BE LIABLE FOR ANY INCIDENTAL OR CONSEQUENTIAL DAMAGES FOR THE BREACH OF ANY EXPRESS OR IMPLIED WARRANTY ON THIS PRODUCT INCLUDING BUT NOT LIMITED TO LOST DATA LOSS OF USE OF YOUR PRODUCT LOST BUSINESS OR LOST PROFITS INSIGNIA PRODUCTS MAKES NO OTHER EXPRESS WARRANTIES WITH RESPECT TO THE PRODUCT ALL EXPRESS AND IMPLIED WARRANTIES FOR THE PRODUCT INCLUDING BUT NOT LIMITED TO ANY IM...

Page 25: ... Canada or 01 800 926 3000 Mexico INSIGNIA is a trademark of Best Buy and its affiliated companies Distributed by Best Buy Purchasing LLC 7601 Penn Ave South Richfield MN 55423 U S A 2019 Best Buy All rights reserved Made in China V2 ENGLISH 19 0052 ...

Reviews: