background image

39

 NS-19E310NA15 Insignia 19" 720p 60Hz LED TV

www.insigniaproducts.com

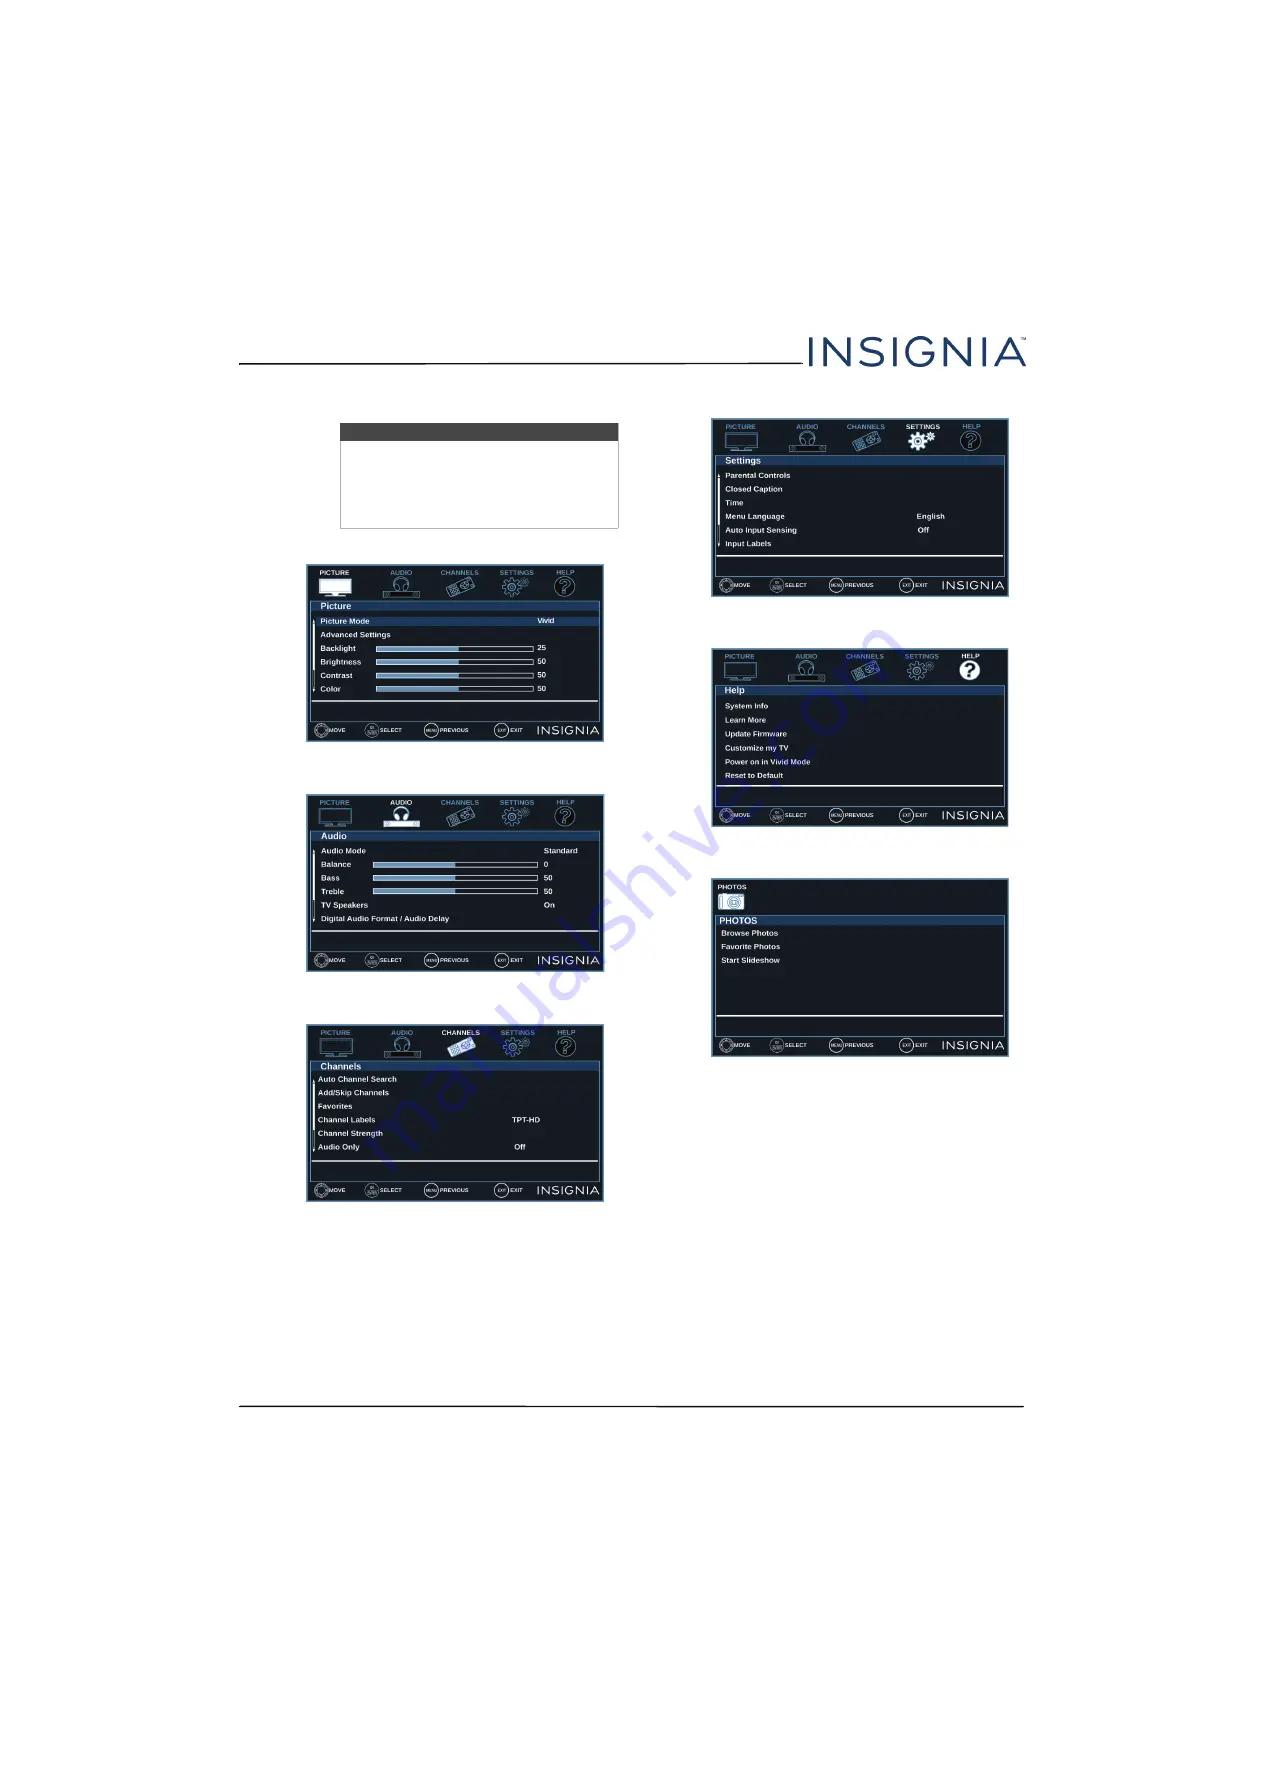
On-screen menu overview

Picture

 menu (TV mode)

Audio

 menu (TV mode)

Channels

 menu (TV mode)

Settings

 menu (TV mode)

Help

 menu

PHOTOS

 menu (USB mode)

Notes

• Depending on the signal source 

selected, you may see different 
options on your screen.

• Menu items that are not selectable are 

grayed out.

Summary of Contents for NS-19E310NA15

Page 1: ...USERGUIDE Before using your new product please read these instructions to prevent any damage 19 720p 60Hz LED TV NS 19E310NA15...

Page 2: ...8 Side jacks 9 Back jacks 10 Remote control 11 What connection should I use 12 Connecting a cable or satellite box 13 HDMI best 13 DVI same as HDMI but requires an audio connection 14 Component video...

Page 3: ...rst time 36 Understanding the basics 38 Turning your TV on or off 38 Selecting the video input source 38 On screen menu overview 39 Navigating the menus 40 Selecting a channel 40 Adjusting the volume...

Page 4: ...g parental control levels 57 Downloading rating information 58 Locking control buttons 59 Using closed captioning 60 Turning closed captioning on or off 60 Selecting the analog closed captioning mode...

Page 5: ...v Contents www insigniaproducts com Remote control 70 General 71 INlink CEC compatible device 72 Specifications 75 Legal notices 76 One year limited warranty Insignia Televisions 77...

Page 6: ...grabbed WALL OR CEILING MOUNT YOUR TELEVISION ALWAYS contact your retailer about professional installation if you have any doubts about your ability to safely mount your television ALWAYS use a mount...

Page 7: ...h as vases should be placed on the apparatus 18 Your TV has four VESA mounting holes on the back If you attach a wall mount bracket or TV stand to the back of your TV the bracket or stand must be secu...

Page 8: ...National Electrical Code ANSI NFPA No 70 provides information with respect to correct grounding of the mast and supporting structure grounding of the lead in wire to an antenna discharge unit size of...

Page 9: ...formance INlink Enjoy the benefit of having HDMI CEC compatible products plug and play No setup is needed CEC technology lets different devices discover and communicate with each other See page 41 for...

Page 10: ...a cushioned clean surface to protect the screen from damages and scratches 2 Find the front of the TV stand The front of the stand is the side with the widest width from the stand column to the edge...

Page 11: ...the screen from damages and scratches 2 If the TV stand is installed pinch and hold the two tabs on the TV stand while you pull the stand off the stand column 3 Remove the two screws that secure the...

Page 12: ...VESA mounting holes on the back If you attach a wall mount bracket to the back of your TV the bracket must be securely attached using all four holes If you do not use all four mounting holes your TV...

Page 13: ...to open the on screen menu For more information see Navigating the menus on page 40 2 INPUT Press to open the INPUT SOURCE list press CHTor CHS to select the video input source your want then press t...

Page 14: ...to this jack 3 HDMI 2 DVI Connect an HDMI device to this jack For more information see HDMI best on page 13 19 22 or 25 OR Connect the video for a DVI device to this jack For more information see DVI...

Page 15: ...o for a component video device to the VIDEO Y PB PR jacks For more information see Component video better on page 15 20 or 23 OR Connect the video for an AV device to the VIDEO Y jack For more informa...

Page 16: ...B Control a photo slideshow See Viewing photos in a slideshow on page46 12 INPUT Open the INPUT SOURCElist Press S orT to select the videoinput source then press ENTER See Selecting the videoinput sou...

Page 17: ...HDMI video audio Better than composite or coaxial Component video requires an audio connection Better than coaxial AV composite video requires an audio connection Good Coaxial video audio Connection...

Page 18: ...and all connected equipment is turned off 2 Connect the incoming cable from the cable wall jack to the cable in jack on the cable or satellite box 3 Connect an HDMI cable not provided to one of the H...

Page 19: ...o cable not provided to the PC DVI AUDIO jack on the back of your TV and to the AUDIO OUT jacks on the cable or satellite box 6 Plug your TV s AC power adapter into a power outlet turn on your TV then...

Page 20: ...tellite TV box 5 Plug your TV s AC power adapter into a power outlet turn on your TV then turn on the cable or satellite box 6 Press INPUT to open the INPUT SOURCE list 7 Press S or T to highlight Com...

Page 21: ...turn on the cable or satellite box 5 Press INPUT to open the INPUT SOURCE list 6 Press S or T to highlight Component AV then press ENTER Notes Cables are often color coded to match color coded jacks T...

Page 22: ...able or satellite box 4 Plug your TV s AC power adapter into a power outlet turn on your TV then turn on the cable or satellite box 5 Press INPUT to open the INPUT SOURCE list 6 Press S or T to highli...

Page 23: ...ves Do not bundle the coaxial cable with the AC power adapter or other cables If the antenna is not installed correctly contact qualified service personnel to correct the problem If the signal level f...

Page 24: ...1 Make sure that your TV s AC power adapter is unplugged and the DVD or Blu ray player is turned off 2 Connect an HDMI cable not provided to one of the HDMI jacks on the side of your TV and to the HD...

Page 25: ...ter into a power outlet then turn on your TV and DVD or Blu ray player 5 Press INPUT to open the INPUT SOURCE list 6 Press S or T to highlight Component AV then press ENTER Note Cables are often color...

Page 26: ...see the documentation that came with the player 5 Press INPUT to open the INPUT SOURCE list 6 Press S or T to highlight Component AV then press ENTER Notes Cables are often color coded to match color...

Page 27: ...he side of your TV and to the HDMI OUT jack on the game console 3 Plug your TV s AC power adapter into a power outlet then turn on your TV 4 Turn on the game console then set it to the correct output...

Page 28: ...sole 5 Press INPUT to open the INPUT SOURCE list 6 Press S or T to highlight Component AV then press ENTER Note Cables are often color coded to match color coded jacks Important Your game console may...

Page 29: ...to open the INPUT SOURCE list 6 Press S or T to highlight Component AV then press ENTER Notes Cables are often color coded to match color coded jacks The yellow video connector on the AV cable connect...

Page 30: ...omputer is turned off 2 Connect an HDMI cable not provided to one of the HDMI jacks on the side of your TV and to the HDMI OUT jack on the computer 3 Plug your TV s AC power adapter into a power outle...

Page 31: ...k of your TV and to the AUDIO OUT headphone jack on the computer 5 Plug your TV s AC power adapter into a power outlet then turn on your TV and the computer 6 Press INPUT to open the INPUT SOURCE list...

Page 32: ...t an audio cable not provided to the PC DVI AUDIO jack on the back of your TV and to the AUDIO OUT headphone jack on the computer 4 Plug your TV s AC power adapter into a power outlet then turn on you...

Page 33: ...er you plug in the USB flash drive and want to switch back to the drive press INPUT to open the INPUT SOURCE list press S or T to select USB Photos then press ENTER The PHOTOS menu opens Caution Do no...

Page 34: ...ss ENTER For more information see Selecting the audio out mode on page 51 Warning Loud noise can damage your hearing When using headphones use the lowest volume setting on your headphones that still l...

Page 35: ...the digital speaker system or sound bar 3 Plug your TV s AC power adapter into a power outlet then turn on your TV 4 Turn on the digital speaker system or sound bar then set it to the correct source...

Page 36: ...IN jacks on the analog speaker system or sound bar 3 Plug your TV s AC power adapter into a power outlet then turn on your TV 4 Turn on the analog speaker system or sound bar then set it to the correc...

Page 37: ...r devices Refer to the documentation that came with your devices for connection information Just remember to use the best connection types available for the best picture and sound For information abou...

Page 38: ...r to the DC IN 12V connector on the back of your TV 2 Connect the other end of the adapter to a power outlet Caution Your TV should only be operated from the power source indicated on the label Always...

Page 39: ...ls in the battery compartment 3 Replace the battery compartment cover Aiming the remote control Point the remote control towards the remote sensor on the front of your TV Cautions Batteries should not...

Page 40: ...ighlight Remote Codes then press ENTER Your TV displays information about the universal remote codes that you can use to make your TV work with a universal remote 5 Press MENU to return to the previou...

Page 41: ...ess S or T to highlight a language then press ENTER 4 Press W or X to highlight Home Use Mode or Store Display Mode then press ENTER If you selected Store Display Mode a message asks if you are sure y...

Page 42: ...reset label or Custom 12 If you select a preset label press X to select Next then ENTER OR If you select Custom press ENTER then press S or T to enter the first character in your custom label Press W...

Page 43: ...ower outlet 2 Press power to turn on your TV The power indicator turns off 3 Press power again to turn off your TV Your TV enters standby mode and the power indicator turns red Selecting the video inp...

Page 44: ...creen menu overview Picture menu TV mode Audio menu TV mode Channels menu TV mode Settings menu TV mode Help menu PHOTOS menu USB mode Notes Depending on the signal source selected you may see differe...

Page 45: ...e Press MUTE to turn off the sound Press MUTE again to turn the sound back on Viewing channel information Press INFO to view an information banner The information banner shows the current program info...

Page 46: ...On or Off then press ENTER 6 Press MENU to return to the previous menu or press EXIT to close the menu Turning Device Auto Power Off on or off When INlink is set to On Device Auto Power Off automatica...

Page 47: ...MENU to return to the previous menu or press EXIT to close the menu Turning Audio Receiver on or off When INlink is turned on and you have connected an HDMI CEC compatible audio receiver to your TV t...

Page 48: ...EC compatible devices you have connected appears 5 Press MENU to return to the previous menu or press EXIT to close the menu Selecting an INlink compatible device When you have more than one INlink co...

Page 49: ...You can connect a USB flash drive to your TV to view compatible JPEG pictures This section covers Switching to USB mode Browsing photos Viewing favorite photos Viewing photos in a slideshow Switching...

Page 50: ...from the favorite photo list A heart appears on a photo that has been added to the favorite photo list When a photo is displayed full screen a control bar appears at the bottom of the photo The file n...

Page 51: ...mode See Switching to USB mode on page 44 2 If the photos you want to view are in a folder on the USB flash drive select the folder For information about selecting a folder see Browsing photos on pag...

Page 52: ...d a standard picture Moderately increases the contrast brightness and sharpness This selection is good for standard TV broadcasts Energy Savings the backlight brightness is decreased Your TV has a bac...

Page 53: ...r white edges Reset Picture Settings Resets all picture settings to factory mode 4 Press W or X to adjust the option or press S or T to select a setting 5 Press MENU to return to the previous menu or...

Page 54: ...Make sure that your TV is in VGA mode For more information see Selecting the video input source on page 38 2 Press MENU 3 Press W or X to highlight SETTINGS then press T or ENTER 4 Press S or T to hi...

Page 55: ...t headphones to your TV audio plays through both the headphones and the TV speakers You can select Auto default setting Automatically turns off the TV speakers when you connect a device to the AUDIO O...

Page 56: ...s where you select which audio out mode you want to use 1 Connect headphones a home theater system sound bar or external speaker system to the AUDIO OUT jack on the side of your TV 2 Press W or X to h...

Page 57: ...ress S or T to highlight Auto Channel Search then press ENTER or X 4 Press S or T to highlight Cable Satellite Box Cable from the wall or Antenna then press ENTER A If you select Cable Satellite Box t...

Page 58: ...ENTER 3 Press S or T to highlight Add Skip Channels then press ENTER or X 4 Press S T W or X to highlight the channel you want to hide then press ENTER Each channel has a circle to the left When you h...

Page 59: ...channel 1 Press FAVORITE The Favorite List opens 2 Press S or T to highlight a channel then press ENTER Adding or changing a channel label If a channel is not already labeled you can label the channe...

Page 60: ...X to highlight CHANNELS then press T or ENTER 3 Press S or T to highlight Channel Strength then press ENTER or X 4 Press MENU to return to the previous menu or press EXIT to close the menu Setting pa...

Page 61: ...programs such as news and sports shows are not rated When Block Unrated TV is turned on TV programs that do not have ratings are blocked When you try to watch a blocked program you are prompted to ent...

Page 62: ...e strongly suggested TV MA Mature audiences only U S TV content ratings All All ratings are blocked FV Fantasy violence L Strong language S Sexual situations V Violence D Suggestive dialog U S movie M...

Page 63: ...blocked rating is filled 9 Press MENU to return to the previous menu or press EXIT to close the menu Downloading rating information If the program you are viewing has downloadable rating information y...

Page 64: ...ress S or T to highlight Yes or No then press ENTER 10 Press ENTER MENU or W to return to the previous menu or press EXIT to close the menu Locking control buttons When the button lock is turned On th...

Page 65: ...Selecting the analog closed captioning mode Analog channels usually have one or more closed captioning modes The CC1 mode usually displays a text version of the TV program audio in a small banner The...

Page 66: ...caption setting You can select CS1 through CS6 CS1 is usually the printed version of the audio CS2 through CS6 display content provided by the broadcaster You can change the way digital closed caption...

Page 67: ...en press T or ENTER 3 Press S or T to highlight Time then press ENTER or X 4 Press S or T to highlight Date Time then press ENTER 5 Press S or T to highlight Mode then press ENTER or X 6 Press S or T...

Page 68: ...ous menu or press EXIT to close the menu Adjusting menu settings You can adjust how the TV menus look by Selecting the menu language Turning Input Sensor on or off Labeling an input source Selecting t...

Page 69: ...X to move to the label field 5 Press S or T to select a preset label or select Custom to create your own label 6 If you select Custom press ENTER then S or T to select characters letters or numbers an...

Page 70: ...e control problems General problems INlink CEC compatible device problems Viewing system information You may need to view system information during troubleshooting 1 Press MENU 2 Press W or X to highl...

Page 71: ...ww insigniaproducts com then click Support Service Enter NS 19E310NA15 in the box under Manual Firmware Drivers Product Information then click X 3 Follow the instructions in the Firmware Installation...

Page 72: ...ns Go through the Easy Setup wizard For more information see Turning on your TV for the first time on page 36 OR If you select Cancel or press MENU your TV returns to the Help menu without making any...

Page 73: ...connected correctly and securely See Connecting a cable or satellite box on page 13 or Connecting an antenna or cable TV no box on page 18 Adjust the brightness See Adjusting the TV picture on page 47...

Page 74: ...Problem Solution Dotted lines or stripes appear on the screen Make sure that the antenna or cable TV is connected correctly and securely See Connecting a cable or satellite box on page 13 or Connecti...

Page 75: ...er is connected while another connected device is turned on the picture may be poor Turn off one or more devices Problem Solution Good sound but poor color Adjust the contrast color and brightness set...

Page 76: ...to your TV Try replacing the cable between the antenna cable or cable satellite box and your TV Problem Solution When I press INPUT I cannot select my device it is grayed out Turn on the device Your T...

Page 77: ...with your TV Problem Solution My TV is not playing the audio from the connected CEC device Make sure that the HDMI cable is connected securely to your TV and the device Make sure that the device is co...

Page 78: ...feature is turned on See Turning INlink on or off on page 41 Make sure that the device is a CEC device See the documentation that came with the device If the device is not an Insignia device it may no...

Page 79: ...nd one for the audio receiver volume Problem Solution I cannot select the Root Menu option on the INlink menu OR The device s root menu does not open when I select Root Menu on the INlink menu The dev...

Page 80: ...suggested resolutions 720p 480p 480i Analog NTSC Digital ATSC 8 VSB Clear QAM HDMI 2 side E EDID compliant HDCP compliant Component video 1 back Composite video 1 back Shared with component Y Shared a...

Page 81: ...ion t l vision ordinaire Canada BETS 7 NTMR 7 IC Statement This device complies with Industry Canada licence exempt RSS standard s Operation is subject to the following two conditions 1 this device ma...

Page 82: ...product in the country where the original purchase was made What does the warranty not cover This warranty does not cover Customer instruction education Installation Set up adjustments Cosmetic damag...

Page 83: ...IA is a trademark of Best Buy and its affiliated companies Registered in some countries Distributed by Best Buy Purchasing LLC 7601 Penn Ave South Richfield MN 55423 U S A 2015 Best Buy All rights res...

Reviews: