background image


www.insigniashowers.com


Last Modified: 10/02/2021


 11 

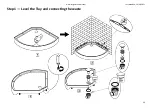
Step 1 —


Level the Tray and connecting the waste


Summary of Contents for MC90CQ

Page 1: ... Support Call 01908 317512 and request technical support for aiding your installation Replacements Parts Inside of your warranty period visit https www insigniashowers com click support and make a warranty claim Spares Replacements Parts Outside of your warranty period visit https www insigniashowers com replacement parts html WARRANTY REG NO _______________________ To claim your full 5 year warra...

Page 2: ...ing the Waste 11 Applying RubberGum 12 Installing the Water Valve and Hand Shower Holder 13 Installing the Glass Shelf and Back Panel Seals 14 Installing the Back Panels 15 Installing the Upright Profiles 16 Installing the Top Bottom Rails 17 Installing the Front Fixed Glass 18 Installing the Door Wheels Seals and Handles 19 Installing the Doors 20 Installing the Roof 21 Installing the Water Conne...

Page 3: ...d this booklet with great care to ensure you get the best out of your build and have a shower that will last for many years to come Like everything in order to obtain a first class product that will serve you well for many years the effort and correctness put into the assembly will reflect in the quality of your finish ...

Page 4: ...e build up may cause damage to your shower and will not be covered under warranty TIP 3 Installation These showers are designed to be free standing and movable from their location should you have the need to replace anything ALWAYS USE Flexible braided water inlet pipes not supplied and not central heating plastic type Get your WRAS Approved Flexible Braided Hoses here www insigniashowers com wras...

Page 5: ...www insigniashowers com Last Modified 10 02 2021 05 ...

Page 6: ...y from the wall The waste hose must be of a flexible type 1m flexible waste supplied The water supply pipes must be that of a flexible braided type not supplied DO NOT OVERTIGHTEN THE BRAIDED HOSES AS IT CAN CAUSE THE CONNECTION TO POP AFTER A FEW WEEKS OF USE Always fit easy to get to isolation taps on both hot and cold water supply not supplied Just like a dishwasher or washing machine this prod...

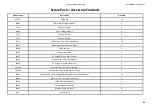
Page 7: ...lumn Upright Profiles Magnetic Door Seals Rear flap Door Seals Fixed Glass Flap Seals 1 2 2 2 2 Glass Room Glass Doors Front Fixed Glass 2 2 VERY IMPORTANT Have you got everything If not please contact the Insignia directly on 01908 317 512 Remember NEVER book your tradesman until everything has arrived been checked and is present No replacement missing parts can be obtained free of charge during ...

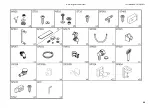
Page 8: ...2 Monochrome Door Handle Black 2 SP268 Shower Hose 1 SP015 Hand Shower Holder 1 SP057 90 Degree Chrome Water Outlet 1 SP101 PVC Hose for water connections 1 SP009 90 Degree Threaded Elbow Joint 3 SP263A Monochrome Door Wheels Spring 4 SP263B Monochrome Door Wheels Non Spring 4 SP314 Monochrome Screw Fixing Block Wing Bolt two separate pieces 12 SP404 Monochrome L Bracket Connection 8 SP402 PRC20 G...

Page 9: ...www insigniashowers com Last Modified 10 02 2021 09 ...

Page 10: ...www insigniashowers com Last Modified 10 02 2021 10 ...

Page 11: ...www insigniashowers com Last Modified 10 02 2021 11 Step 1 Level the Tray and connecting the waste ...

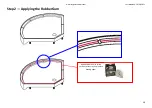
Page 12: ...www insigniashowers com Last Modified 10 02 2021 12 Step 2 Applying the RubberGum Apply RubberGum to raised sections of the tray and remove backing paper ...

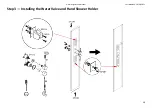
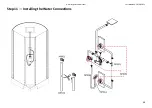
Page 13: ...www insigniashowers com Last Modified 10 02 2021 13 Step 3 Installing the Water Valve and Hand Shower Holder ...

Page 14: ...www insigniashowers com Last Modified 10 02 2021 14 Step 3 Installing the Glass Shelf and Back Panel Seals ...

Page 15: ...www insigniashowers com Last Modified 10 02 2021 15 Step 4 Installing the Back Panels ...

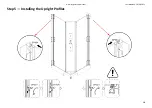
Page 16: ...www insigniashowers com Last Modified 10 02 2021 16 Step 5 Installing the Upright Profiles ...

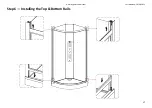
Page 17: ...www insigniashowers com Last Modified 10 02 2021 17 Step 6 Installing the Top Bottom Rails ...

Page 18: ...www insigniashowers com Last Modified 10 02 2021 18 Step 7 Installing the Front Fixed Glass ...

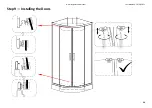
Page 19: ...www insigniashowers com Last Modified 10 02 2021 19 Step 8 Installing the Door Wheels Seals and Handles ...

Page 20: ...www insigniashowers com Last Modified 10 02 2021 20 Step 9 Installing the Doors ...

Page 21: ...www insigniashowers com Last Modified 10 02 2021 21 Step 10 Installing the Roof ...

Page 22: ...www insigniashowers com Last Modified 10 02 2021 22 Step 11 Installing the Water Connections ...

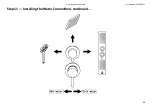
Page 23: ...www insigniashowers com Last Modified 10 02 2021 23 Step 11 Installing the Water Connections continued ...

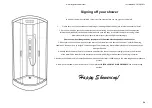
Page 24: ...owards the open doors and the user 3 Do not aim the hand shower directly at the joints of your shower as this does not fall under normal showering conditions However due to Insignia s unique design of the shower tray water will only leak back in to the tray so you won t get flooded 4 Visually check the water flow in to the waste and adjust the feet of the tray accordingly to ensure the direction o...

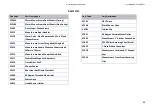
Page 25: ...wer Head 230mm x 230mm SP316 Monochrome Hand Shower Matte Black SP317 Matte Black Magnetic Door Seals SP318 Tinted Glass Shelf SP319 Shower Waste SP313 Rear Door Seal Fixed Glass Seal SP009 90 Degree Threaded Elbow Joint SP300 Waste Hose SP015 Hand Shower Holder Part Code Part Description SP101 UPVC Hose SP268 Black Shower Hose AMI01 Jubilee Clip SP057 90 Degree Chrome Water Outlet SP404 Monochrom...

Page 26: ...ore use 8 If you have any underlying health conditions which you feel could be aggravated by using a steam room consult your GP before use 9 If you begin to have any issues with your health after using a steam room stop immediately and consult your GP regarding your symptoms before continuing to use 10 Consult your GP before using the steam room if you re on medication at all especially with drows...

Page 27: ...common crossed out wheelie bin label We accept returns of all products carrying the Insignia brand All other products are either considered outside the scope of WEEE or Insignia is not technically the producer of these products Insignia also accepts historic like for like WEEE returns All WEEE returned to Insignia will be recycled in appropriate treatment and recycling centres in accordance with t...

Page 28: ...be used in any way shape or form with out written permission from Maclean International Ltd Images are NOT permitted to be saved printed or uploaded Violation of copyright laws are punishable by law All images are registered with ImageTraker Insignia is a registered trademark of Maclean International Ltd ...

Reviews: