background image


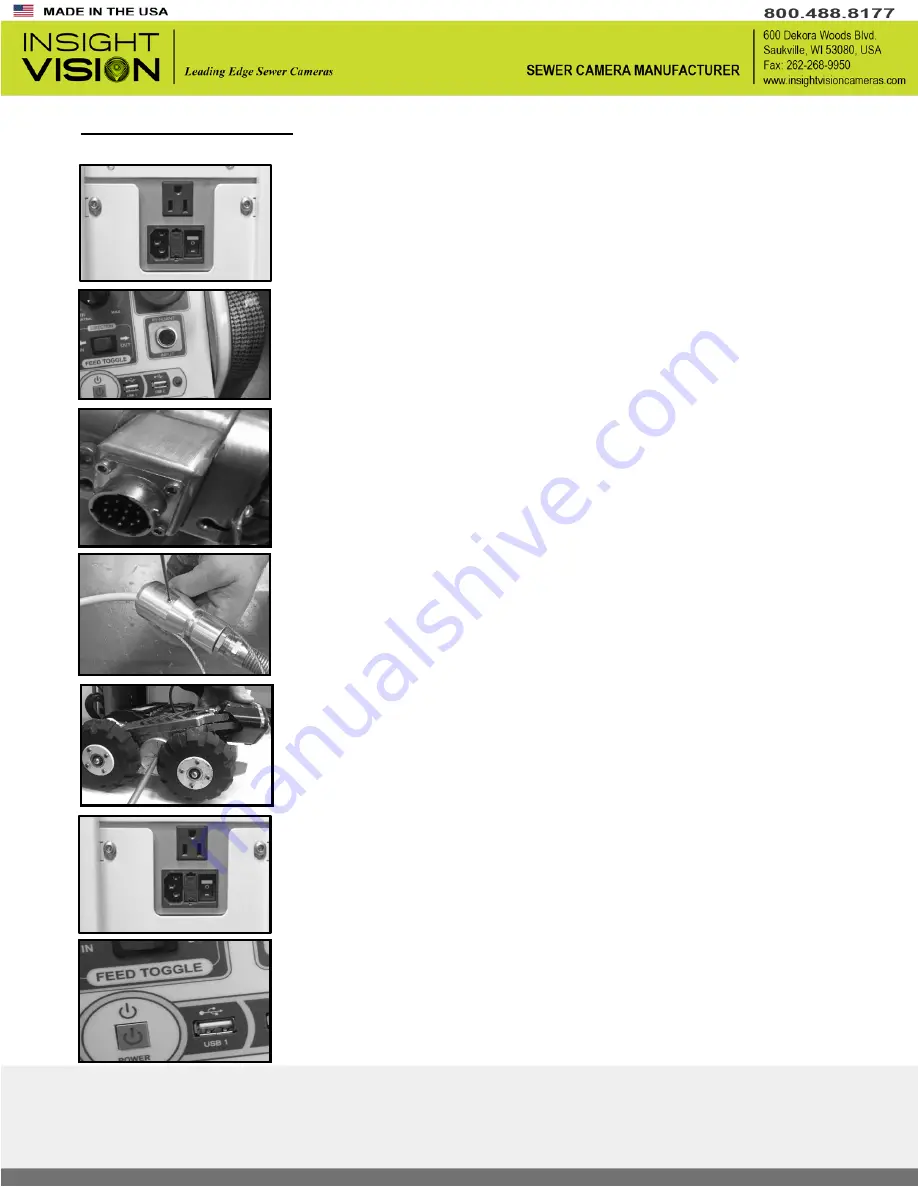
System Power-Up: 

Follow these steps before powering up the system. 


1.  Plug in your power cable in the back of the system with 

external power outlet. 


2.  Plug in the crawler controller into the specified USB port. 


3.  Connect the crawler to the mainline cable receptacle. 


4.  Tighten your strain relief clamp using the provided 3-32 

Allen wrench. 


5.  Set your camera height to desired pipe diameter. 


6.  Switch power toggle on back of the system to the on 

position. 


7.  Press the power button on the face of the system. 

Summary of Contents for IRIS

Page 1: ...IRIS MAINLINE CRAWLER Integrated Remote Inspection System FOLLOW LIKE AND WATCH ...

Page 2: ...sing the equipment Use Equipment with Care Do not force the equipment Do not allow inexperience operator to use the equipment Maintain equipment and use only accessories that are recommended by the manufacturer If you need to contact customer service For immediate assistance contact Insight Vision Phone 800 488 8177 Fax 262 268 9952 Email Technical Service service insightvisioncameras com Email Sa...

Page 3: ...TENTS Warranty 2 System Overview 3 System Package 6 System Power Up 7 Motorized Reel Control 8 Crawler Pendant Control 9 Control System App 10 System Recording 11 On Screen Display App 14 Technical Specifications 16 ...

Page 4: ...ive remedy Insight Vision shall in no event have any other obligation or liability of any nature arising from the breakdown malfunction defect or other failure of the product including without limitation any liability for service maintenance repairs personal injury property damage loss of profits loss of use or other consequential damages 6 Any action for any claimed breach of this warranty shall ...

Page 5: ...iple output device ports for additional accessories System can record to internal solid state drive 500GB or external USB memory stick The crawler is designed to inspect sewer pipes from 6 to 12 Up to 18 with additional wheelset A built in sonde is optional which can transmit a frequency that is locatable with a 512 Hz locator The IRIS portable mainline crawler also comes with a free downloadable ...

Page 6: ...dy to head cable on the crawler for any damages cracks pinched and kinks 5 Do not lift the crawler by the strain relief or cable Notice Do not remove the screws from the clip on top of the crawler body This can void the warranty Motorized Reel Drum It is important to improve the longevity of your motorized reel by doing these basic checkups It is recommended before and after every inspection to do...

Page 7: ... ft of cable Finished OD 35 WHEEL SETS Provided wheel set options to get into 6 up to 12 diameter pipes OPERATING SYSTEM Operates on Windows 7 Operating System 500GB of Solid State Drive SSD Wi Fi Adapter 9 7 TOUCH SCREEN Resistive Touch screen works with gloves Use stylus to improve functionality Using sharp or hard object may scratch the screen ON SCREEN DISTANCE COUNTER Footage counter in meter...

Page 8: ... 600 FT CABLE CRAWLER HARD CASE Optional Accessories PNEUMATIC WHEELS LOWERING HOOKS 8 GB FLASH DRIVE 512HZ SONDE Replacement Parts SUNSHADE RAIN COVER HAND CONTROLLER PNEUMATIC WHEELS CAMERA NOSE CONE SIDE PANEL REMOTE CONTROL FOR LCD MOTORIZED REEL WHEELS 15 FOOT POWER CORD FUSE SPARE 3 32 ALLEN WRENCH STRAIN RELIEF KIT Notice We ship the Portable mainline crawler system in a shipping crate it i...

Page 9: ... Plug in the crawler controller into the specified USB port 3 Connect the crawler to the mainline cable receptacle 4 Tighten your strain relief clamp using the provided 3 32 Allen wrench 5 Set your camera height to desired pipe diameter 6 Switch power toggle on back of the system to the on position 7 Press the power button on the face of the system ...

Page 10: ... Control Knob Notice To bring the crawler back with the reel using the pendant control momentarily press 2 sec the crawler in reverse to dis engage the crawler When using reel speed control auto assist out you will need to be aware of the speed of the reel in conjunction with running the crawler out this is not synchronized action If you stop moving the crawler forward you also need to stop the au...

Page 11: ...ckwise Use as required Notice Pay attention as you assist the crawler you don t want to do too much where the cable can get tangle or kink The idea of the auto assist is to relieve tension on the crawler as it pulls the cable 2 When you are ready to drive the crawler back On the pendant control momentarily press 2 sec the crawler in reverse to dis engage the crawler This will unlock the wheels Pre...

Page 12: ...pections This app will automatically launch with the camera app 4 RECORD MP4 APP Use this app to do your recording in MP4 format This app will automatically launch with the camera app 5 VIDEOS SNAPSHOTS FOLDERS Access all your recordings and photos Factory defaults Videos and Snapshots folders on the desktop Drag and drop to your intended external storage device USB or SD 6 DIGITAL KEYBOARD Access...

Page 13: ...imply click and drag to rearrange accordingly 3 When MP4 Record app is first run opened and or loaded You must open the settings dialog by clicking on Settings 4 The settings are all at the proper defaults Notice Only advanced users will need to change them based on application needs To produce smaller files the size can be reduced to 320x240 pixel by using the pull down selection in the size wind...

Page 14: ...ed you are set for the duration and ready to record your inspection 4 Once you click on Record you will see the red box 5 While recording the meter will show you the amount of disk space is being used 6 When you wish to stop press the Red Box There is no Pause function Files can be spliced later in any number of video editors such as the ones that comes with Windows System Recording Follow these s...

Page 15: ...13 Reference Only Setup Diagram Follow these steps before starting your inspections ...

Page 16: ...starting your recordings scroll through to capture in your video User ID Tab This is where you can key in all of the proper information you want to show on the front of the screen This will be your on screen data to be captured in your inspections videos Job ID This is an additional tab to use and capture data in your inspection videos ...

Page 17: ... captured in your video B Distance Zero a Reset your on screen distance counter C Up Down a Move distance counter up and down on your screen Setup A Display Units a Show the distance in meters or feet B Count Preset a Set Zero Offset C Count direction a Forward or Backward Exit A Closes the OSD text writer B Saved the previous text ...

Page 18: ... Standard 600 of cable per system Footage counter On screen distance display in feet or meters Level wind system Reel weight is 150 lbs Reel dimensions is 29 H x 20 W x 21 D Reel is splash resistant with cover Reel power 110 volts 240V optional Control Panel Screen is 9 7 color High Resolution LCD touchscreen Digital On screen Text Enable with External HDMI Port Wireless N speed connectivity Inter...

Page 19: ...800 488 8177 FAX 262 268 9952 WWW INSIGHTVISIONCAMERAS COM Service and Support Specialist Service Manager Linda Moe Email linda insightvisioncameras com Sales Manager Bob Masse Email bob insightvisioncameras com Director of MFG Wayne Hartlich Email wayne alliancetechnology com ...

Page 20: ...18 www insightvisioncameras com Made in the USA ...

Reviews: