background image


M.A.R.S. (Multitrack Audio Recording System

Advanced Functions  

M.A.R.S. User Guide 


45 / 69  


2.


Then select the 

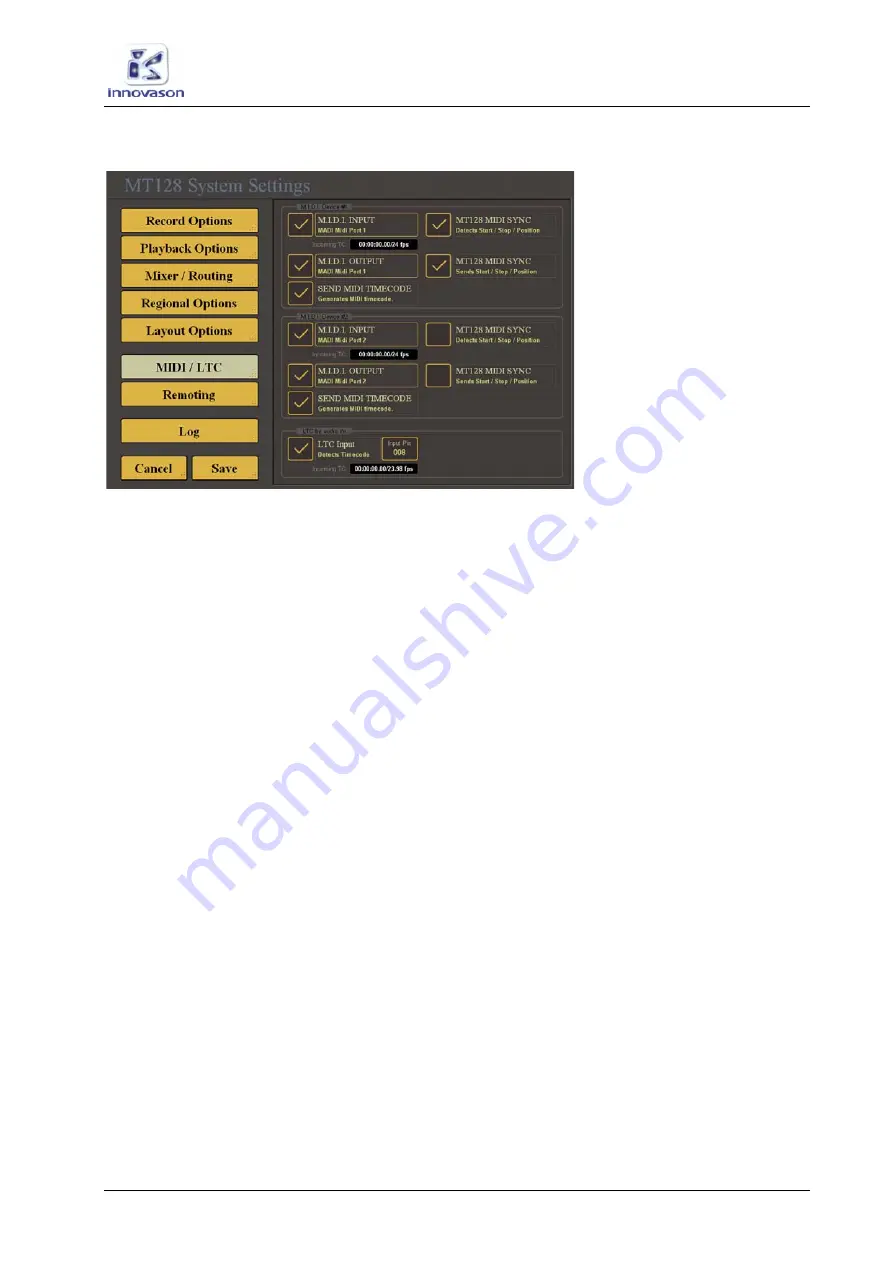
MIDI/LTC

 menu: 


Choosing the LTC Input 

1.


Make sure that the 

LTC Input

 option at the bottom of the 

page is ticked. 

2.


Touch the 

Input Ch

 box and enter a number from the 

numeric keyboard. 

3.


Select 

Save

 to save any changes and close the 

System 

Settings 

window. 


Enabling the MTC Port 

1.


Make sure that the 

MIDI Input

 option at the top of the page 

is ticked and that the name of the MIDI interface is displayed. 

2.


If not, touch the 

MIDI Input

 area to select the MIDI 

interface from the drop-down list. 

3.


Repeat to enable the 

MIDI Output

 port. 

4.


Remember to select 

Save

 to save any changes. 

Summary of Contents for M.A.R.S.

Page 1: ...M A R S User Guide Version Edition 19 Jan 2010 ...

Page 2: ... It cannot be guaranteed that all product names products trademarks requisitions regulations guidelines specifications and norms are free from trade mark rights of third parties All entries in this document have been thoroughly checked however no guarantee for correctness can be given Innovason cannot be held responsible for any misleading or incorrect information provided throughout this manual I...

Page 3: ... About this User Guide 5 Audio Routing 7 Connecting M A R S 9 Checking Communication 11 Playing Back the Demo Project 12 Transport Control 17 Recording 29 Advanced Functions 37 Project Management in M A R S 47 Ethersound Configurations 61 Troubleshooting 63 Replacing the M A R S Hard Disk 67 INSTALLING M A R S System and software 68 ...

Page 4: ......

Page 5: ...o in preparation for a live show or production The most common application is to record the sound check so that it can be replayed later as a virtual sound check About this User Guide M A R S exists in its own right as a stand alone hard disk recorder When integrated into Eclipse the system is known as M A R S Multitrack Audio Recording System When used with other systems the recorder is called MT...

Page 6: ...buttons on the TRANSPORT control panel NOVA accesses the Nova mix management software described within the main Eclipse user guide Nova controls the console and stores recalls mix settings M A R S accesses the hard disk recorder displays All audio recording is managed by the M A R S control computer All audio files are stored on the M A R S hard disk which slots into the rear panel of the frame Wh...

Page 7: ...A R S always records the downstream Ethersound channels it receives shown in blue with Ethersound channel 1 recorded to track 1 Ethersound channel 2 to track 2 and so on With standard patching the result is Tracks 1 to 56 DioCore Mic Inputs 1 to 56 Tracks 57 to 64 are freely available and can be used to record mix busses from the console Audio routing is controlled by the Ethersound channel patchi...

Page 8: ...ponding M A R S tracks This allows the engineer to instantly switch between live mic inputs from the stage and M A R S playback at the touch of a button Alternatively using BDWY mode Broadway individual channels can be switched between the live mic and replay track using the console s CUE buttons This is great if for example the drummer is late for the rehearsal and you have him pre recorded Note ...

Page 9: ...ithout disturbing the passing audio and the other computer For a soft system reboot on the M A R S computer press ALT INS when MARS is displayed on the Eclipse screen For a soft system reboot on the NOVA comuter press ALT DEL when NOVA is displayed on the Eclipse screen The system ships with some connections pre installed Network link between the Nova and M A R S control computers Ethernet Screen ...

Page 10: ...t the Ethersound OUT from the DioCore to the IN of M A R S Using standard CAT5 cables the length may be up to 100m When the connections are correctly made and the receive and transmit devices powered the 2 LEDs beside the Ethersound connector flash synchronously By leaving the console s Ethersound IN connection free the console becomes the Ethersound Primary Master device this enables it to detect...

Page 11: ...Nova Main Mix display 1 Press NOVA on the TRANSPORT panel to switch the touch screen to the Nova displays 2 Look at the colour of the MARS hardware indicator on the Main Mix display The LED will be green if MARS is booted and connected correctly If the status LED is red then there is a problem with the Ethersound connection Please see Page 63 for advice on troubleshooting ...

Page 12: ...o the M A R S system 2 Load the Nova file called Walking this configures the console so that the demo which is 44 tracks will replay across pre configured fader strips with user labels and a mix to match Loading a Project in M A R S 1 Press the M A R S button on the TRANSPORT panel to switch the touch screen to the M A R S control computer If you have just started the system then the MT128 Project...

Page 13: ...User Guide 13 69 This opens the Project Settings page 3 Select the Project Manager Startup Page button The MT128 Project Manager opens 4 Select the project you wish to load from the Last Projects list on the left e g Walking 5 Then select Load The Project Settings for Walking opens ...

Page 14: ...ct The details of the project are checked the audio files are loaded and the current project window opens If the project has loaded correctly In the SYS Info area 1 you should see Device Running This indicates that M A R S is ready In the Project info area 2 you should see the name of the loaded project e g Walking The M A R S touch screen transport controls 4 should be lit to show that they are n...

Page 15: ... of the demo project Notice that some input faders blue IDs are Smart VCAs while others are dedicated inputs Notice that some Groups pink IDs VCAs yellow IDs and mix Masters red IDs have also been configured 4 Check that Eclipse is running in VSC mode Virtual Sound Check at the top of the Main Mix display This mode switches the channels to receive audio from M A R S tracks 1 to 64 instead of the D...

Page 16: ...nd you will see timecode running both on the Eclipse front panel display and M A R S touch screen if it is in view The demo song Walking starts at 00 00 00 00 so you should now be hearing audio 2 Press Stop either on the TRANSPORT panel or M A R S touch screen to stop the play back 3 To locate the 00 00 00 00 song position from NOVA on the CUE memories area of the transport bar press A and the CUE...

Page 17: ...s display can be switched between Internal M A R S and MIDI timecode within the Nova software See Page 66 for details 2 Whilst in Play press the Play button again to pause the playback The green LED on the button flashes when M A R S is paused 3 Press Stop to stop playback 4 Press Rewind or Fast Forward to run the audio backwards or forwards at different speeds On the first press audio runs at 0 5...

Page 18: ...port Control from M A R S Transport control is also available from touch screen buttons within the M A R S displays 4 These buttons work in parallel with those on the TRANSPORT front panel Here is an overview of their operation For more details please refer to the MT128 documentation at www vb audio com ...

Page 19: ...ints using the Nova Cue List and TRANSPORT front panel Or create and recall Markers from the M A R S touch screen displays Note that the two systems are independent you cannot recall Nova cues from M A R S or M A R S markers from the Eclipse front panel Therefore we are going to concentrate on the Nova Cue List as this can be used while viewing any NOVA or M A R S display ...

Page 20: ...n 2 Select a bank e g press A The button lights green Note that a bank must be selected lit before you can choose a number 3 Select a number e g press 1 The current timecode is stored in cue memory A1 This is confirmed by a temporary pop up which appears on the Nova display Note that if the cue memory has already been used you will be asked if you wish to replace it 4 Select OK to overwrite an exi...

Page 21: ...de instantly moves to the stored value a confirmation pop up appears on the Nova display Alternatively you can use the Next and Previous Cue buttons on the TRANSPORT panel 2 Press the Next Cue button to step forward to the next cue point 3 Press the Previous Cue button to step back Note that the next previous order can be set either to step to the next timecode value or to the next cue ID number T...

Page 22: ...on 2 Press the A B C D or E buttons on the TRANSPORT panel to switch the cue list between banks 3 Touch a SET button on the right of the window to instantly store a cue memory 4 Touch a GO button to instantly recall a cue memory 5 Touch or select the CUE TC NAME or COMMENT column titles to order the cue list by ID timecode name or comment Naming or Adding Comments 1 Touch or click on the NAME or C...

Page 23: ... console keyboard For example to enter a time of 1 minute type 00 01 00 00 3 Press Enter to confirm Setting the Next Previous Cue Order 1 At the bottom of the CUE LIST window you can set the Next Prev Mode to either Time or Id This determines how the Next and Previous cue buttons on the TRANSPORT panel operate Time the Next and Previous buttons step through cue memories according to their timecode...

Page 24: ...he button LED flashes red 2 Select the bank and the cue number you wish to clear e g press A and 1 3 Select OK to confirm Clearing All Cues To clear all cue memories 1 Press and hold the ALL button and then press CLR on the TRANSPORT panel A confirmation pop up appears on the Nova display asking if you wish to clear all cues Note that this will clear all 50 cue memories and there is no undo so mak...

Page 25: ...LED flashes yellow 2 Select the cue memory for the start of the loop e g press E and 1 A confirmation pop up appears temporarily on the Nova display showing that the loop start has been set and the ST button cancels 3 Next press the END button on the TRANSPORT panel The button LED flashes yellow 4 And select the cue memory for the end of the loop e g press E and 2 A confirmation pop up appears sho...

Page 26: ... Markers can be created and recalled from the M A R S touch screen displays 5 M A R S markers are independent from the Nova Cue List and therefore can only be recalled from the M A R S touch screen displays Here is an overview of their operation For more details please refer to the MT128 documentation at http www vb audio com ...

Page 27: ...witch to virtual sound check mode You will be asked for confirmation via an on screen pop up Note that if the touch screen is switched to M A R S then you will not see this confirmation pop up Switch back to the NOVA displays to view and confirm the mode change 2 Select OK to confirm Once enabled you will see VSC mode at the top of the Main Mix display Any faders which were patched from DioCore mi...

Page 28: ...isplay Input faders which have CUE buttons active are now fed from M A R S while other faders continue to receive mic inputs from the DioCore 2 Enable the CUE buttons on the faders you wish to switch to M A R S If you are in play and at the correct timecode you should hear M A R S playback on these channels You can configure any combination of live mics and M A R S tracks using this mode for examp...

Page 29: ... approximately 8 hours across all 64 tracks Note that the exact amount of recording time is determined by the file format and the number of tracks in record Should you need to purchase a spare disk for extra recorded material any SATA hard disk can be used the disk must be NTFS formatted Data Structure M A R S calls its audio files Clips and a number of Clips form a Take For example if you start r...

Page 30: ... is never any need to Save When you load back a Project it will always come back exactly as you last left it Creating a New Project 1 Press the M A R S button on the TRANSPORT panel to switch the touch screen to the M A R S control computer Open the MT128 Project Manager window as follows 2 Select the current Project name from the bar running across the top of the display in our example touch or c...

Page 31: ...he bottom of the display A new Project Settings window opens 5 Touch or click on the empty field beside Name to enter a name for the M A R S Project Whenever you need to enter text within M A R S an on screen keyboard appears Touch the on screen buttons to type in a name followed by Save to enter the data ...

Page 32: ... or settings which you may are Description touch to enter a text description for the project File type touch to select a file type from o WAV ideal for Windows based audio applications o BWF Broadcast Wave File default o AIF ideal for MAC based audio applications TC Source touch to select a timecode reference There are several options but the useful ones for M A R S users are o Int internal timeco...

Page 33: ...named after the Project title where all your recorded audio clips will be stored At the top of the window you should see In the SYS Info area Device Running indicates that M A R S is ready In the Project info area you should see the name of the current project e g UserManual example At the bottom of the window The M A R S touch screen transport controls should be lit to show that they are now acti...

Page 34: ... tracks 9 to 16 are record armed and tracks 17 to 64 are empty 2 Touch each of the track buttons you wish to record arm The button turns red when it is armed 3 Select All on below the track buttons to quickly enable record arming for all 64 tracks Note that when a track is record armed it is automatically switched to monitor incoming audio Therefore if audio is present on the corresponding Etherso...

Page 35: ...1 Locate to the desired start timecode by recalling a cue 2 Then on the TRANSPORT control panel press both Play and Record Note that if you only press Record you are in record ready but timecode is paused until you press Play Once the recording begins timecode will roll forwards and the Play and Record button LEDS light green and red 3 Use the Cue buttons to store cue memories as the sound check r...

Page 36: ...that audio clips are present 4 Return to the Nova Main Mix display and select VSC mode Remember to confirm by pressing OK This switches the console s incoming Ethersound channels to receive audio from M A R S 5 Locate back to start timecode and press Play using the TRANSPORT control panel You should now be hearing your recording Note that there is no need to save the M A R S Project when you shut ...

Page 37: ...fitted with 56 microphone channels The diagram below shows the audio streaming for a standard Eclipse configuration In this configuration M A R S records downstream Ethersound channels with Ethersound channel 1 recorded to track 1 Ethersound channel 2 to track 2 and so on With standard patching the result is Tracks 1 to 56 DIO Mic Inputs 1 to 56 Tracks 57 to 64 free The following examples show how...

Page 38: ... 57 to 64 downstream In our example Master Left and Master Right are patched to channels 63 and 64 If you wish you can label the Ethersound channels and use the Tx Labels button to transfer the labels to M A R S See Page 40 for details 2 Now track arm the tracks from the Arm Matrix page within M A R S and record in the usual manner Patch OUT UTILITIES GRID Patch Output F12 ...

Page 39: ...ed to input faders 1 From the PATCH IN grid patch Ethersound channels 01 to 56 upstream to some inputs 2 Make sure that you have disarmed the tracks in M A R S the track buttons on the Arm Matrix page should be green 3 Make sure Eclipse is switched to VSC mode 4 Then play back the audio Patch IN UTILITIES GRID Patch Input F11 ...

Page 40: ...2 Before you arm any tracks return to the Nova displays 3 Open the PATCH INPUT grid 4 And select the DIO1 and PATCH tabs The labels running down the left of the display are the labels entered for each mic input from the DioCore 5 Select the Tx Labels button below M A R S Tracks 6 And exit the PATCH INPUT grid 7 Return to the M A R S touch screen displays press M A R S on the TRANSPORT panel 8 Sele...

Page 41: ...ide 41 69 1 Return to the Nova displays and select M A R S preferences from the main menus The M A R S Preference window appears 2 Tick the top option Tracks are automatically labelled from NOVA When ticked any label changes from Nova are transmitted to M A R S MARS preferences ...

Page 42: ...NOT write data onto the Ethersound channels For example depending on the network configuration you may not want the DioCore to replace signals on the Ethersound network When BROADWAY is activated DioCore channels are disabled as above but this option relates only to Broadway mode Tracks not activated by the VSC in this area you can select any Ethersound channels DioCore mics which you do not want ...

Page 43: ...ndow within M A R S 1 Press the Emergency RECORD touch screen button M A R S automatically creates a new Project with all 64 tracks record armed and BWF selected as the audio file type M A R S starts recording referenced to internal timecode from a start time of 00 00 00 00 2 When you are ready press Stop to finish the recording 3 If you now return to the Project Manager window you will see a new ...

Page 44: ...ecordings are referenced to Int internal timecode default LTCi Linear timecode from an Ethersound channel MTC1 MIDI timecode from the MIDI input on the rear of the console To reference to LTC you must choose the LTC input channel To use MIDI timecode the MIDI interface card must be enabled Both options are set from the System Settings on M A R S 1 Select Sys Set from the top of the M A R S display...

Page 45: ...ox and enter a number from the numeric keyboard 3 Select Save to save any changes and close the System Settings window Enabling the MTC Port 1 Make sure that the MIDI Input option at the top of the page is ticked and that the name of the MIDI interface is displayed 2 If not touch the MIDI Input area to select the MIDI interface from the drop down list 3 Repeat to enable the MIDI Output port 4 Reme...

Page 46: ...ge 1 Touch the M A R S on screen timecode display within the milliseconds zone named options The Transport Options page opens 2 Touch the TimeCode Format box to select a different timecode format from the drop down menu You can select from 23 98fps 24fps 25fps 29 97fps 29 97 dfps drop frame 30 fps or 30 dfps drop frame 3 Touch EXIT to return to the main M A R S pages ...

Page 47: ...name of every project stored on the M A R S hard disk Templates shows the name of any template projects which have been created You can use the touch screen buttons to scroll up and down the list choose different sort options for the list Sort by delete DEL or Load any Project or Template In the centre are three large touch screen buttons Emergeny RECORD use this button if you do not have time to ...

Page 48: ...w appears 3 Tick the DELETE MEDIA FILE option and then select Delete The Project and any recorded audio files are deleted from the M A R S hard disk Note that you can delete a Project without deleting any media files leave DELETE MEDIA FILE unticked However this will only delete the M A R S Project and not any recorded audio Therefore if you wish to free up disk space on M A R S always tick the DE...

Page 49: ...n you open the Project Settings window for the current Project as shown above you can perform the following functions Edit the Current Project Having created a Project on M A R S it cannot be renamed However you can change its settings in order to modify the timecode source file format etc for the next recording 1 With the Project Settings window open edit the options for example touch TC Source t...

Page 50: ... window for the Project you wish to copy 2 Select Save As New Project The Save As new project pop up opens 3 Select disk E and the current Project name 4 Enter a new name from the on screen QWERTY keyboard Note that you must change the name If not a new Project cannot be created 5 Then select Save The system saves a new Project which automatically becomes the current Project shown in the Project a...

Page 51: ...ave 5 Then select OK to confirm The template is created You can check it by returning to the Project Manager window the template appears in the list on the right To create a new project from a template 1 Select a file from the Templates list 2 Select Load The Project Settings window opens 3 Name the Project in the usual manner 4 Then select Create Project to create the project ...

Page 52: ...as Different pages can be opened within the main area 3 using the Page selection buttons 6 All other areas remain in constant view Note that the M A R S application can be shut down by touching or selecting the icon at the top right of the display If you do touch this icon then you will need to restart M A R S either by powering off and on or using the restart procedure described on Page 67 Here i...

Page 53: ...stem Project Management in M A R S M A R S User Guide 53 69 Project Info 2 Transport Control 4 Marker Control 5 Page Selector 6 1 Use the Page selector buttons to select different sub pages for example Arm Matrix opens the Arm Matrix page ...

Page 54: ...Pages You can find full details on M A R S sub pages from the MT128 documentation at http www vb audio com The most useful pages for M A R S applications are I O Meters This page provides metering for all tracks on M A R S Arm Matrix This page is used for track arming and naming tracks See Page 34 for details ...

Page 55: ...Project Management in M A R S M A R S User Guide 55 69 Timeline Tracks This page provides a horizontal view of audio clips recorded on M A R S Timeline Import Export This page provides access to import and export options See Page 56 for details ...

Page 56: ... function to make a copy of an existing Project by first creating a new Project and then importing the audio We are going to import audio from an existing Project into a new one 1 First follow the steps on Page 30 to create a new Project This creates a new Project folder into which you can import your audio 2 If importing from an external drive connect the drive to the M A R S USB port on the Ecli...

Page 57: ...stem you should see the contents of drive E 5 Touch the top bar E to open the File selector The File Selector window opens On the left of the display you will see the drives connected to the M A R S computer drive E plus any external USB drives 6 Select E to open the M A R S hard drive Or select the corresponding file path for your USB drive ...

Page 58: ...in so 7 Select MT128_Media to open the folder 8 Then select the sub folder which contains the audio you wish to import e g Media_Walking 9 Then select OK The File Selector closes and the media files from your folder appear in the Import Audio File window Note that the files appear in this list in alphabetical order Therefore the best way to proceed depends on how the files are named If you files a...

Page 59: ...ection the Track counter updates to keep a running total of your selections Using this method files can be imported to tracks in any order 3 When you have selected all the files you wish to import tick the COPY FILE FIRST option 4 And select IMPORT Selected Files The audio files are imported to M A R S tracks in the selected order Note that if you do not select the COPY FILE FIRST option then the ...

Page 60: ...ltitrack Audio Recording System Project Management in M A R S 60 69 M A R S User Guide 5 Select TimeLine Tracks to view the horizontal timeline of audio clips on M A R S to confirm the import has been successful ...

Page 61: ...und network then you may wish to use either of the following configurations Example 1 In this example M A R S is connected as the last device in the Ethersound network chain In this configuration when VSC or Broadway modes are activated on the FOH Eclipse the replay tracks from M A R S replace the DioCore mic inputs affecting feeds to both the FOH and monitoring consoles ...

Page 62: ...console then configure the network as follows In this example the monitor console can decide what it receives by changing its Ethersound channel patching Patching from downstream Ethersound channels shown in blue always DioCore mic inputs Patching from upstream Ethersound channels shown in red channels will be switched between mic and replay according the FOH Eclipse VSC and Broadway modes ...

Page 63: ...se see Page 9 for details on connections Or just connect the Ethersound OUT of Eclipse to the Ethersound IN of Mars if no DioCore is used 2 Switch the touch screen to M A R S and check that M A R S is booted When M A R S is booted and ready for operation you will see one of the following The Project Manager window see Page 47 The Project Settings window see Page 49 The Current Project window see P...

Page 64: ...reen to NOVA 2 Select the PATCH INPUT grid Above the picture of the M A R S Ethersound card you should see its MAC address If not 3 Select the M A R S Ethersound address from the drop down list If there is no Ethersound address available then there is still a problem with the Ethersound connection Please contact Innovason service for further assistance Patch IN UTILITIES GRID Patch Input F11 ...

Page 65: ...ion to M A R S and M A R S is booted this may occur if the remote control option for Eclipse has been turned off within the M A R S System Settings window 1 Switch the touch screen to M A R S 2 Select Sys Set at the top left of the display to open the System Settings 3 Select the Remoting menu The Innovason Eclipse option must be ticked 4 Select Save to save the change and close the System Setting...

Page 66: ...hed between Internal M A R S and MIDI timecode within the Nova software 1 Switch the touch screen to NOVA 2 Select VIEW MTC Xfade from the main menus The MTC Xfade window appears 3 Under Source select INTERNAL MARS This will switch the display to show timecode from M A R S If MIDI IN is selected the timecode display shows timecode received at the Eclipse Nova MIDI Input 4 Select CLOSE to quit the ...

Page 67: ... use the console keyboard as follows To restart only the Nova control computer Press CTRL ALT DEL To restart only the M A R S control computer Press CTRL ALT INSERT Replacing the M A R S Hard Disk The M A R S hard disk can be removed from the rear of the console frame M A R S is shipped with a single 500GB disk which can record for approximately 8 hours across all 64 tracks Should you need to purc...

Page 68: ...puter 3 Disconnect the USB cable from the NOVA computer 4 Connect the VGA black connector removed on step 1 to the M A R S computer 5 Connect the USB cable to the M A R S computer one of the USB socket Now the console is ready to boot and stay switched on M A R S computer Please follows the steps below for the System and MT128 M A R S software installation 1 Insert the System USB key in the M A R ...

Page 69: ...6 Adjust the audio card parameters like following 1 Press the Rescan ASIO driver button 2 Adjust the Buffer size to the exact value of 256 samples 3 Press the Advanced button 4 Tick the Maximum box of the ASIO engine thread priority Validate everything and switch off the console Put the cables on the back of the console back to their original setting VGA USB Switch ON the console enjoy your Eclips...

Reviews: