background image

11

SABRE

TM

 Ranger Installation Guide

Note:

The  following  steps  are  applicable  only  if  you  are  using  the  SABRE™  Ranger 
(V2 variant) terminal:

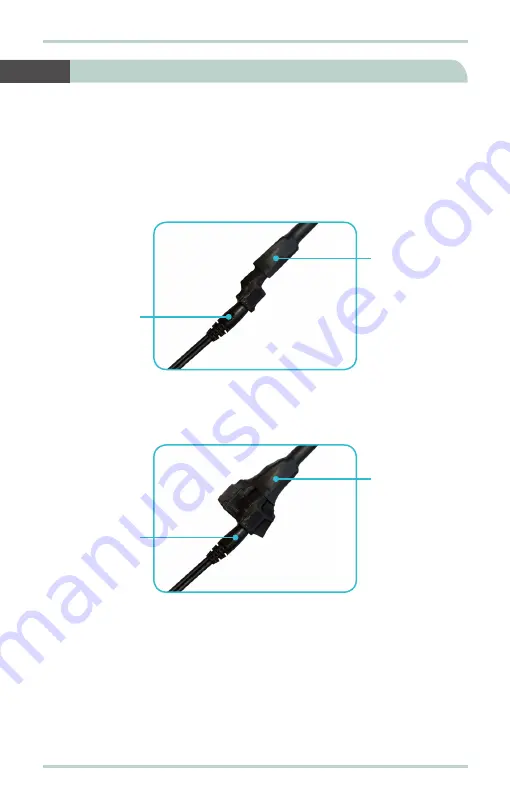
Follow these steps to power up the SABRE™ Ranger (V2 variant):

1.  Insert the power adapter output connector into the DC power input socket 

on the Heater power cable.

2.  Insert the plug end of the power adapter into an AC outlet.

3.  Insert the power adapter output connector into the DC power input socket 

on the Multi-function cable.

4.  Insert the plug end of the power adapter into an AC outlet.

5.  Turn on the power to power up the heater and SABRE™ Ranger terminal.

6.  Allow 30 minutes for the heater to warm up the SABRE™ Ranger terminal.

7.  Check to see if  the SABRE™ Ranger terminal is working normally.

8.  If the SABRE™ Ranger terminal is not working properly, proceed to power 

cycle the terminal. After this process, the SABRE™ Ranger terminal should 
be working normally.

Heater power 
cable

DC  power 

input cable

9  Powering Up the SABRE

TM

 Ranger (V2 Variant)

Multi-function 
cable

DC  power 

input cable

Summary of Contents for Wideye Sabre Ranger-V2

Page 1: ......

Page 2: ...al including but not limited to the implied warranties of merchantability and fitness for a particular purpose All trademarks marks names or product names referenced in this publication are the proper...

Page 3: ...ter with power cable additional unit only for SABRETM Ranger V2 Installation guide Product CD software utilities and documentations If any of the items are missing from the package please contact your...

Page 4: ...the SIM card 1 Remove the eight thumb head screws securing the connector cover 2 Remove and keep the connector cover and the eight thumb head screws in a safe location 3 Push tab and lift up the SIM...

Page 5: ...m the cable glands attached to the Multi function and Heater power cables 4 With the gold contacts facing down position the SIM card as indicated and slide the SIM card into the slot 5 Push the SIM ca...

Page 6: ...able and the connector of the Heater power cable through the connector cover 3 Install running couplers to secure the Multi function and Heater power cables to the connector cover Running coupler Cabl...

Page 7: ...ll the Multi function and Heater power cable plugs to the respective headers on the SABRETM Ranger terminal 5 Install and secure the connector cover with the eight thumb head screws Power header Heate...

Page 8: ...g frame 1 Place mounting frame on the back end of the SABRETM Ranger terminal Note The mounting frame can be installed in the vertical or horizontal position as shown below 2 Orientate the mounting fr...

Page 9: ...M Ranger terminal 2 Mount the SABRETM Ranger terminal to the vertical pole or column using two U bolts four nuts and washers 3 Tighten the four nuts evenly to secure the SABRETM Ranger terminal to the...

Page 10: ...Ranger terminal and secure its position using the two lock bolts and nuts on either side of the mounting frame 3 Secure the length of the Multi function and Heater power cables to the pole or column u...

Page 11: ...pter output plug into the DC power input socket on the Multi function cable 2 Insert the plug end of the power adapter into an AC outlet 3 Turn on the power to power up the SABRETM Ranger terminal 8 P...

Page 12: ...he DC power input socket on the Multi function cable 4 Insert the plug end of the power adapter into an AC outlet 5 Turn on the power to power up the heater and SABRE Ranger terminal 6 Allow 30 minute...

Page 13: ...onnector end of the Ethernet cable to the Multi function cable s Ethernet port 2 Insert the other connector end of the Ethernet cable to your computer s Ethernet port A message confirming connection i...

Page 14: ...rm the GPS acquisition automatically Follow these steps to obtain GPS co ordinates 1 Ensure that the SABRETM Ranger terminal is facing upwards and with an open view of the sky 2 Start your Internet br...

Page 15: ......

Page 16: ...r Web Console launched follow these steps to register with the network 1 Select the satellite that you want the SABRETM Ranger terminal to point to 2 Rotate the terminal left or right until it points...

Page 17: ...ster to the BGAN network Once network registration is completed the Registered to network You are now able to make phone call or send SMS and data transfer message is displayed Note The GPS co ordinat...

Page 18: ...be connected to any North American U S Canada TNV circuit or PSTN Public Switch Telephone Network Follow these steps to make phone calls 1 Connect a corded analog phone to the Multi function cable s P...

Page 19: ...ctivate Default Profile The PDP context will be activated When connected APN and IP Address details will be displayed You can proceed to use the Internet features Follow these steps to disconnect the...

Page 20: ......

Reviews: