background image

10

ASSEMBLY

1


Slide the coolant reservoir onto the 

supports located on the back of 

the saw, just above the tension unit. Fill 

with clean water, then put the coolant 

reservoir cover back in place.

2


Install the blade drip guide by 

placing it against the upper back 

of the frame, with the blade passing 

through the slot in the holder front. 

Secure in place using two of the included 

10-24 x ¾" nylon thumb screws. The guide 

is adjusted by loosening the screws and 

sliding the guide up or down as needed.

3


Control the water flow with the water 

control valve that is installed onto 

the drain tube.

If you’re fragging corals, 

corrosion brought on by salt is the #1 threat to your 

band saw. Use clean RO/DI water in the saw for coolant. Use clean fresh water on 

your saw for clean up. The amount of water present and the amount of time that 

it makes contact with the coral will not harm the animal. In fact, casual evidence 

suggests that fresh water may even be an advantage as it will help osmotically 

to destroy bacteria and other microorganisms.

Installing the coolant 

reservoir and blade drip 

guide

The coolant reservoir and blade drip 

guide must be installed when using a

diamond saw blade to supply coolant to 

the blade. Using coolant with a diamond 

blade is required to maintain the 

cutting ability and life of the blade. We 

recommend using clean water. See Fig. G 

for final setup.

Fig. G

Blade drip 

guide

Coolant reservoir

Nylon 

screws

Summary of Contents for DB-100

Page 1: ...INSTRUCTION MANUAL DB 100 band saw ...

Page 2: ... any other parts not originally intended for the DB 100 may create a hazard or cause product damage Know your power tool Read this instruction manual carefully Learn the correct applications and limitations as well as specific warnings and hazards related to this machine Usage Always wear proper eye protection to protect you from any debris that may fly out while sawing We recommend wearing safety...

Page 3: ...r cut more than one workpiece at a time Some materials contain poisonous elements Avoid sawing materials that contain uranium mercury lead arsenic etc Make sure you know the material you are sawing Allow your band saw to cool By ignoring this warning the DB 100 can overheat and deform the saw housing We recommend cutting on the DB 100 for 30 minutes on then allow 30 minutes off so the machine can ...

Page 4: ...t So that we can offer you the highest level of service possible please take a moment to register your band saw at inlandcraft com product registration You can also register by mailing us the enclosed registration form Complimentary mailing envelope is included for your convenience Registration of your band saw also helps facilitate any warranty related requests ...

Page 5: ...sumable items such as band saw blades and bladeserts will not receive our warranty service Who is covered under this warranty This warranty covers the original purchaser of the equipment and is non transferable Whom should I contact if I need a warranty service Contact Inland Craft directly by phone at 248 583 7150 or by email at info inlandcraft com and we will assist you through our warranty ser...

Page 6: ...r with drip tube and water control valve 2 Band saw blade drip guide 3 Band saw blade type and quantity vary by model 4 Band saw work table 5 10 24 x 1 2 band saw work table mounting nylon screws 6 Clear drain tube 7 BladeSerts 2 8 5 64 Allen wrench 9 Leather blade wiper 10 10 24 x 3 4 nylon screws 11 Extra fuse 11 7 ...

Page 7: ...d not want to go further without force then pull the wheel down enough to place the blade around the upper wheel using your other hand 3 Slowly release the wheel making sure the blade remains on both wheels and passes through the right and left channels Fig B 4 Tracking which we refer to as the position of the blade on the wheels is controlled by adjusting the tilt of the upper wheel Check the tra...

Page 8: ...ssary until the blade remains in the correct position If the blade walks to the back of the upper wheel Tilt the top of the upper wheel forward by turning the nylon tilt adjustment screw to the left counter clockwise Make half turn adjustments and test the effect on tracking by hand turning the lower wheel Repeat as necessary until the blade remains in the correct position If the blade walks off t...

Page 9: ...ad screwdriver to attach and secure the work surface using the included four 10 24 x nylon screws IMPORTANT DO NOT over tighten the nylon screws or you risk stripping the screws Installing the BladeSert Place one of the included BladeSerts into the work surface exactly as shown in Fig E making sure the blade passes through the split and the split faces the saw front IMPORTANT MUST READ With use an...

Page 10: ...als corrosion brought on by salt is the 1 threat to your band saw Use clean RO DI water in the saw for coolant Use clean fresh water on your saw for clean up The amount of water present and the amount of time that it makes contact with the coral will not harm the animal In fact casual evidence suggests that fresh water may even be an advantage as it will help osmotically to destroy bacteria and ot...

Page 11: ...e the leather wiper does not push the blade out of its normal path Fig J shows correct installation Installing the drain tube The drain tube must be installed when using a diamond band saw blade This drains the dirty used water so you don t use recycled water 1 Take the included plastic drain tube and straighten the tube by soaking it in warm water for a few minutes Pull it to remove any kinks 2 S...

Page 12: ...force anything into the diamond blade Once you have the right feel the blade will seem like it is pulling material into it Forcefully pushing into the blade will not increase cutting speed and will bog it down Use the power knob to adjust sawing speed to the material being cut and intricacy involved The tighter the cut the slower the speed needed to maintain control and not twist the blade 5 The b...

Page 13: ...tress on the blade and does not increase its cutting ability 3 With the saw running place your cutting material on the work table in front of the blade Using light pressure guide the piece into the blade DO NOT force anything into the blade Once you have the right feel the blade will seem like it is pulling material into it Forcefully pushing into the blade will not increase cutting speed and will...

Page 14: ... replace when it begins to show signs of widening and wear Use the X behind the slot as a wear guide Refer to the BladeSert section on page 9 Leather wiper As the end wears reposition it referring to the leather wiper installment instructions on page 11 Work table After each use rinse the work table with clean water to remove cutting residue Drain tube Periodically remove and rinse the drain tube ...

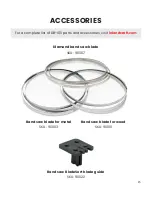
Page 15: ...For a complete list of DB 100 parts and accessories visit inlandcraft com Band saw blade for wood SKU 90001 Band saw blade for metal SKU 90003 Band saw BladeSert blade guide SKU 90022 Diamond band saw blade SKU 90007 ...

Page 16: ... International Inc 808 Burr Oak Drive Westmont IL 60559 U S A Phone 248 583 7150 Email info inlandcraft com Website inlandcraft com Facebook facebook com inlandcraft Twitter twitter com inlandcraft YouTube youtube com ICPVids ...

Reviews: