background image

Operation & Maintenance Manual

Safety

16

Book 22482517 (7-09) Rev A

Transport

When loading or transporting machines ensure that the specified lifting and tie down points are 
used.

When loading or transporting machines ensure that the towing vehicle, its size, weight, towing 
hitch and electrical supply are all suitable to provide safe and stable towing at speeds either, 
up to the legal maximum for the country in which it is being towed or, as specified for the 
machine model if lower than the legal maximum.

Do not exceed gross vehicle weight rating.

Before towing the machine, ensure that:-

the tires and towing hitch are in a serviceable condition.

the canopy is secure.

all ancillary equipment is stored in a safe and secure manner.

the brakes and lights are functioning correctly and meet necessary road traffic
requirements.

break-away cables/safety chains are connected to the towing vehicle.

The machine must be towed in a level attitude in order to maintain correct handling, braking 
and lighting functions. This can be achieved by correct selection and adjustment of the vehicle 
towing hitch and, on variable height running gear, adjustment of the drawbar.

1. Make sure wheels, tires and tow bar connectors are in safe operating condition

and tow bar is properly connected before towing.

2. When parking always use the handbrake and, if necessary, suitable wheel

chocks.

Safety chains/connections and their adjustment where fitted:

Ensure that the breakaway cable is securely coupled to the trailer and also to a substantial 
point on the towing vehicle.

Ensure that the cable length is as short as possible, while still allowing enough slackness for 
the trailer to articulate without the handbrake being applied.

Loop the chains onto the towing vehicle using the towing vehicle hitch as an anchorage point, 
or any other point of similar strength.

Ensure that the effective chain length is as short as possible while still allowing normal 
articulation of the trailer and effective operation of the breakaway cable.

Summary of Contents for Doosan HP750WCU-T2

Page 1: ...INTENANCE COMPRESSOR MODELS HP750WCU T2 C09 MANUAL XP750WCU T2 C08 XP825WCU T2 C10 Doosan purchased Bobcat Company from Ingersoll Rand Company in 2007 Any reference to Ingersoll Rand Company or use of...

Page 2: ...2...

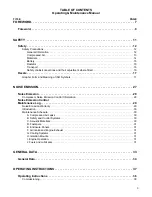
Page 3: ...EMISSION 27 Noise Emission 28 Compressor Noise Emission Control Information 28 Noise Emission Control Maintenance Log 29 Noise Emission Warranty 29 Introduction 30 Maintenance Schedule 30 A Compresse...

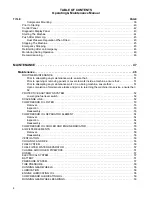
Page 4: ...ny maintenance work on a running machine ensure that 51 Upon completion of maintenance tasks and prior to returning the machine into service ensure that 52 PROTECTIVE SHUTDOWN SYSTEM 52 Low engine fue...

Page 5: ...TS Operating Maintenance Manual TITLE PAGE LUBRICATION 61 Lubrication 62 Portable Compressor Fluid Chart 62 Speed and Pressure Regulation Adjustment 63 Torque Setting Table 64 Torque Setting Table 65...

Page 6: ...6 Always use Ingersoll Rand Replacement parts...

Page 7: ...Book 22482517 7 09 Rev A 7 Foreword...

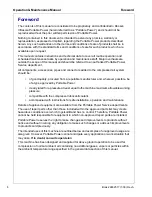
Page 8: ...ible be of a type approved by Portable Power clearly rated for a pressure at least equal to the machine maximum allowable working pressure compatible with the compressor lubricant coolant accompanied...

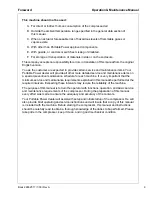
Page 9: ...e and maintenance items on a special preventive maintenance schedule for each machine It is very important that the minimum service and maintenance requirements explained in this manual be performed a...

Page 10: ...Operation Maintenance Manual Foreword 10 Book 22482517 7 09 Rev A Always use Ingersoll Rand Replacement Parts...

Page 11: ...Book 22482517 7 09 Rev A 11 Safety...

Page 12: ...such as coupling hitch drawbar components road wheels and lifting bail should be checked for total security All components which are loose damaged or unserviceable must be rectified without delay Air...

Page 13: ...ys carefully vent air supply line at tool or vent valve before performing any service The discharged air contains a very small percentage of compressor lubricating oil and care should be taken to ensu...

Page 14: ...sel fuel battery electrolyte WARNING Avoid ingestion skin contact and inhalation of fumes Should compressor lubricant come into contact with the eyes then irrigate with water for at least 5 minutes Sh...

Page 15: ...o not attempt to slave start a frozen battery since this may cause it to explode Exercise extreme caution when using booster battery To jump battery connect ends of one booster cable to the positive t...

Page 16: ...must be towed in a level attitude in order to maintain correct handling braking and lighting functions This can be achieved by correct selection and adjustment of the vehicle towing hitch and on vari...

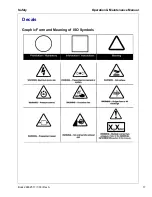
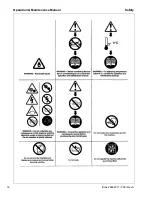
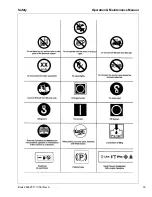
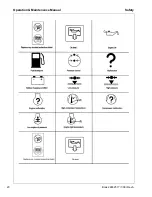
Page 17: ...Safety Operation Maintenance Manual Book 22482517 7 09 Rev A 17 Decals Graphic Form and Meaning of ISO Symbols...

Page 18: ...Operation Maintenance Manual Safety 18 Book 22482517 7 09 Rev A...

Page 19: ...Safety Operation Maintenance Manual Book 22482517 7 09 Rev A 19...

Page 20: ...Operation Maintenance Manual Safety 20 Book 22482517 7 09 Rev A...

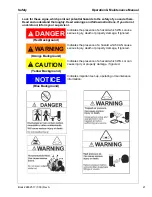
Page 21: ...ndicates the presence of a hazard which WILL cause serious injury death or property damage if ignored Indicates the presence of a hazard which CAN cause serious injury death or property damage if igno...

Page 22: ...Operation Maintenance Manual Safety 22 Book 22482517 7 09 Rev A...

Page 23: ...Safety Operation Maintenance Manual Book 22482517 7 09 Rev A 23...

Page 24: ...24 Book 22482517 7 09 Rev A...

Page 25: ...of charge Safety Decals are identified by the decal heading DANGER WARNING or CAUTION Decal parts numbers are on the bottom of each decal and are also listed in the compressor s parts manual Submit o...

Page 26: ...Operation Maintenance Manual Safety 26 Book 22482517 7 09 Rev A...

Page 27: ...Book 22482517 7 09 Rev A 27 Noise Emission...

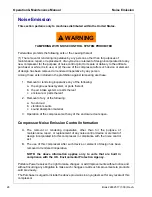
Page 28: ...tem or parts thereof b the air intake system or parts thereof c enclosure or parts thereof 2 Removal of any of the following a fan shroud b vibration mounts c sound absorption material 3 Operation of...

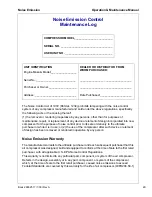
Page 29: ...chaser and each subsequent purchaser that this air compressor was designed built and equipped to conform at the time of sale to the first retail purchaser with all applicable U S EPA Noise Control Reg...

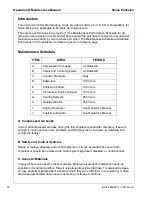
Page 30: ...ut down immediately and correct the leak s B Safety and Control Systems Repair or replace all safety and control systems or circuits as malfunction occurs No compressor should be operated with either...

Page 31: ...st systems should be inspected after each 100 hours of operation for loose damaged or deteriorated components Repairs or replacements should be made before the next period of use G Cooling Systems All...

Page 32: ...Manual Noise Emission 32 Book 22482517 7 09 Rev A MAINTENANCE RECORD FOR NOISE EMISSION CONTROL AND EXTENDED WARRANTY ITEM NO DESCRIPTION OF WORK HOURMETER READING MAINT INSPECT DATE LOCATION CITY ST...

Page 33: ...Book 22482517 7 09 Rev A 33 Section C General Data...

Page 34: ...owable Pressure 9 235 XP825DWCU 10 3 bar 150 psi HP750DWCU 12 1 bar 175 psi XP750DWCU 10 3 bar 150 psi HP675WCU 12 1 bar 175 psi Safety Valve Setting 9 235 XP825DWCU 14 bar 200 psi HP750DWCU 14 bar 20...

Page 35: ...gal Engine 9 235 Type Model Ingersoll Rand 6IRC8A Number of Cylinders 6 Oil Capacity 31 7 litres 8 4 gal Speed at Full Load min 1 RPM 2000 revs Speed at ldle min 1 RPM 1500 revs Power Available at Fu...

Page 36: ...36 Book 22482517 7 09 Rev A Always use Ingersoll Rand Replacement parts...

Page 37: ...Book 22482517 7 09 Rev A 37 Section D Operating Instructions...

Page 38: ...chine ensure that there is sufficient clearance for ventilation and exhaust requirements Adequate clearance needs to be allowed around and above the machine to permit safe access for specified mainten...

Page 39: ...materials compatible with the compressor lubricant refer to the GENERAL DATA SECTION WARNING If more than one compressor is connected to one common downstream plant effective check valves and isolati...

Page 40: ...e operating instructions in the Engine Operator s Manual or section 3 Check the compressor oil level in the sight glass located on the separator tank 4 Check the diesel fuel level A good rule is to to...

Page 41: ...ating and operators to be exposed to high noise levels 8 Check the radiator coolant level with the unit level Check the air filter restriction indicator s Refer to the MAINTENANCE section of this manu...

Page 42: ...ull air pressure at the service outlet Allows unit to warm up at reduced pressure 6 Engine Speed Gauge lndicates engine speed RPM 7 Discharge Air Temp Gauge lndicates airend discharge temperature 8 En...

Page 43: ...lndicates shutdown due to low engine oil pressure 3 High Engine Coolant Temp Fault indicator lamp lndicates shutdown due to high engine water temperature 4 Low Fuel Level Fault indicator lamp lndicate...

Page 44: ...flammable gas Use sparingly If too much is injected the uncontrolled explosion may result in costly damage to the engine Release to position 1 when engine starts The engine will now be running at a re...

Page 45: ...ains nominally constant Starting and stopping are unaffected by the selection and during normal running the selector switch may be safely operated Precaution must be taken to ensure that downstream eq...

Page 46: ...play page for a listing of shutdown conditions CAUTION To ensure an adequate flow of oil to the compressor at low temperature never allow the discharge pressure to fall below 3 5 bar 50 psi Decommissi...

Page 47: ...Book 22482517 7 09 Rev A 47 Section E Maintenance...

Page 48: ...Air Cleaner Precleaner Dumps C Fan Alternator Belts C Battery Connections Electrolyte C Tire Pressure and Surface C Wheel Lug Nuts C Hoses Oil Air Intake etc C Automatic Shutdown System C Air Cleaner...

Page 49: ...Scavenger Orifice Related Parts C Oil Separator Element R Feed Pump Strainer Cleaning C Valve Clearance Check C Lights running brake turn CBT Pintle Eye Bolts CBT Brakes C C Brake linkage C Emergency...

Page 50: ...the automatic blowdown fails to operate then pressure must be gradually relieved by operating the manual blowdown valve Suitable personal protective equipment should be worn Ensure that maintenance pe...

Page 51: ...ving panels or covers to work inside a machine ensure that anyone entering the machine is aware of the reduced level of protection and the additional hazards including hot surfaces and intermittently...

Page 52: ...ine fuel level switch Test the low engine fuel level switch circuit as follows Start the machine NOTE Do not press the load button Disconnect the switch the machine should shutdown Re connect the swit...

Page 53: ...n the oil filter head CAUTION If there is any indication of the formation of varnishes shellacs or lacquers on the filter element it is a warning that the compressor lubricating and cooling oil has de...

Page 54: ...remove the cover plate Remove the separator element lnspection Examine the filter element Examine all hoses and tubes and replace if necessary Reassembly Thoroughly clean the orifice drop tube and fi...

Page 55: ...remove any accumulation of oil grease and dirt from the exterior core of the cooler so that the entire cooling area can radiate the heat of the lubricating and cooling oil water into the air stream WA...

Page 56: ...starting the machine check that all clamps are tight VENTILATION Always check that the air inlets and outlets are clear of debris etc COOLING FAN DRIVE Periodically check that the fan mounting bolts i...

Page 57: ...damaged ELECTRICAL SYSTEM WARNING Disconnect the battery cables before performing any maintenance or service Check the security of electrical terminals on the switches and relays i e nuts or screws l...

Page 58: ...odically for tightness refer to the MAINTENANCE CHART for frequency and re tighten where necessary Refer to the TORQUE SETTING TABLE later in this section LUBRICATION CAUTION Always check the oil leve...

Page 59: ...o STOPPING THE MACHINE in the OPERATING INSTRUCTIONS section of this manual Completely drain the receiver separator system including the piping and oil cooler by removing the drain plug s and collecti...

Page 60: ...60 Book 22482517 7 09 Rev A Always use Ingersoll Rand Replacement parts...

Page 61: ...Book 22482517 7 09 Rev A 61 Section F Lubrication...

Page 62: ...anty Refer to operator s manual warranty section for details or contact your Portable Power representative DesignOperating Pressure Ambient Temperature Specification 100 psi to 300 psi 10 F to 125 F 2...

Page 63: ...g at full load speed and the service valve is fully open Refer to the GENERAL INFORMATION section of this manual Adjust the service valve on the outside of the machine to maintain normal operating dis...

Page 64: ...Operation Maintenance Manual Lubrication 64 Book 22482517 7 09 Rev A Torque Setting Table...

Page 65: ...Lubrication Operation Maintenance Manual Book 22482517 7 09 Rev A 65 Torque Setting Table...

Page 66: ...n good Fuel starvation Check the fuel level and fuel system components Replace the fuel filter if necessary Relay failed Replace the relay Faulty stop solenoid Check the stop solenoid Engine stops whi...

Page 67: ...f necessary Blocked radiator Stop the machine and clean the cooling fins with compressed air or steam Use reduced pressure for cleaning the fins Reduced cooling air from fan Check the fan and the driv...

Page 68: ...2009 Doosan Infracore International Inc Printed in the USA Doosan Infracore Portable Power 1293 Glenway Drive Statesville N C 28625 www doosanportablepower com...

Reviews: