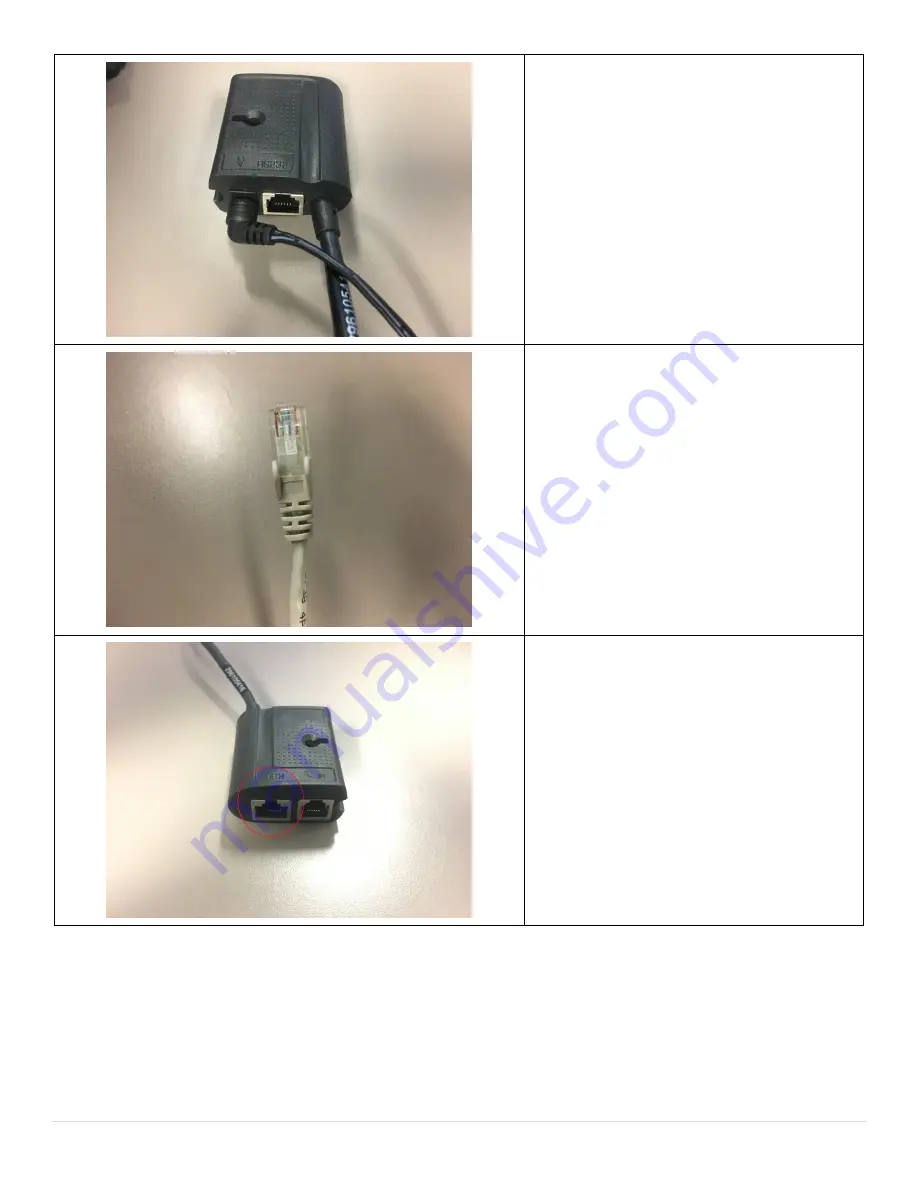
Ingenico iCT 250 Manual Download Page 5

5 | 

P a g e


4.


Connect End 2 into the pin pad’s power 
receiver. The pin pad will turn on and make 
a beeping sound when the connection is 
made properly. 


5.


Locate your Ethernet cable that is 
connected to the same router or switch 
that your computer is connected to. 


6.


Locate the Ethernet Port on the pin pad’s 
receiver, it is marked with “ETH” on the 
pinpad receiver. 

Summary of Contents for iCT 250

Page 1: ...with Global Payments Canada Cash Register Express now supports payment processing with EMV chip enabled cards through the Ingenico ICT 250 EMV PINpad device This document provides step by step instruc...

Page 2: ...t be on version 12 8001 or higher to use the ICT 250 Each ICT 250 device needs its own wired internet connection unique IP address It cannot use the same internet cable connected to the PC Prior to in...

Page 3: ...Oct 18 2016 Mathew Piccinich 1st Release 1 1 July 21 2016 Mathew Piccinich Updated Document Template Change pcAmerica to Cash register express on front page Formatted Images of pinpad Updated Screensh...

Page 4: ...hrough CRE on each register that has an ICT 250 unit connected and processing card transactions Hardware Connections 1 Here is what the device looks like with the Ethernet adapter connected to the pin...

Page 5: ...urn on and make a beeping sound when the connection is made properly 5 Locate your Ethernet cable that is connected to the same router or switch that your computer is connected to 6 Locate the Etherne...

Page 6: ...6 P a g e 7 Connect the Ethernet cable into the pin pad s Ethernet port 8 The pinpad should be powered on and it should display the global payments logo...

Page 7: ...P and DNS IP 1 With the pinpad Powered on Press the ADMIN key labeled It can be found below the 9 key and above the green enter key 2 Enter the Admin ID number and press the green enter key 3 Enter th...

Page 8: ...8 P a g e 4 Select Setup Menu 3 5 Select Communications 2 6 Select Ethernet 3...

Page 9: ...9 P a g e 7 Select Ethernet Setup 2 8 Select Dynamic 1 9 When you ve reached this screen Press the Red Cancel Key twice The screen will turn...

Page 10: ...rom your router or switch This information will be needed by CRE to communicate with the pinpad 11 When the pinpad has restarted follow the same steps above to access the Ethernet Menu Screen Press AD...

Page 11: ...Following information IP Address Gateway IP Subnet Mask PriDNS and SecDNS 14 Use the Down Key F2 to scroll down the Current Setup Screen to view more information Then Press the Red Cancel key To go b...

Page 12: ...ress information we can configure the pinpad with a static IP address 1 Press Ethernet Setup 2 2 Press Static IP 2 3 From this menu we will select each parameter with their corresponding s or by using...

Page 13: ...en enter key to confirm the address 5 Select Gateway IP 2 enter the Gateway IP address you recorded from step 13 and press the Green enter key to confirm the address 6 Select Subnet Mask 3 enter the S...

Page 14: ...en enter key to confirm the address 8 Select SecDNSIP 6 enter the Primary DNS IP address you recorded from step 13 and press the Green enter key to confirm the address 9 Select Host Port 1 7 verify th...

Page 15: ...15 P a g e 10 After confirming the Static IP settings and you ve returned to the Static IP Menu press the Red cancel key to restart the pinpad 11 The pinpad will now restart to apply the settings...

Page 16: ...ere applicable 3 Select Setup 4 then Setup Screen G 4 At the setup screen select the Payment Processing tab 5 Select the Processing Tab 6 Select Credit Debit 7 Select Global Payments Canada as the Pay...

Page 17: ...ow start processing credit card sales To process a sale with the 1 After you ve added the items to an invoice and selected Credit in CRE the pinpad will prompt to pass the terminal to the customer so...

Page 18: ...18 P a g e 3 When prompted enter the Last 4 digits of the card number on the pinpad 4 When the sale is complete the pinpad will display Approved Press the green enter key...

Page 19: ...edit card sale with an EMV card follow the steps below 1 After you ve added the items to an invoice and selected Credit in CRE the pinpad will prompt to pass the terminal to the customer so they can i...

Page 20: ...20 P a g e 3 Wait for the pinpad to approve the sale Do not remove the card from the pinpad 4 When the sale is complete the pinpad will display Approved press the green enter key...

Page 21: ...omplete a credit card sale with a contactless card follow the steps below 1 After you ve added the items to an invoice and selected Credit in CRE the pinpad will prompt pass the terminal to the custom...

Page 22: ...22 P a g e 3 Wait for the pinpad to process the sale 4 When the sale is complete the pinpad will display Approved Press the green enter key...

Page 23: ...you ve added the items to an invoice and selected Credit in CRE the pinpad will prompt to pass the terminal to the customer so they can swipe their card 2 When prompted swipe the card on the pinpad 3...

Page 24: ...24 P a g e 4 Select the type of account you want to use to pay for the sale 5 Enter your Pin 6 When the sale is complete the pinpad will display Approved...

Page 25: ...ally enter the card information by following the steps below 1 After you ve added the items to an invoice and selected Credit in CRE the pinpad will prompt to Swipe Insert Tap Card 2 Begin to Type the...

Page 26: ...a g e 4 Type in the Manager Password and press the green enter key 5 Enter the CVV Code and press the green enter key 6 When the pinpad displays Imprint Credit Card press the green enter key to conti...

Page 27: ...27 P a g e 7 Wait for the pinpad to display approved and the sale will be completed...

Page 28: ...yee must enter the last 4 digits of the card See below for more details 1 After you ve selected credit to process the return in CRE the pinpad will prompt the manager s password 2 Swipe the card you w...

Page 29: ...invoice See below for more details 1 After you ve selected Void in CRE the pinpad will prompt for the manager s password enter the password and press the green enter key 2 The pinpad will prompt for...

Page 30: ...isplay information about the invoice so you can confirm that it is correct before voiding it Press the F4 key to select it 5 Press the F1 key to confirm the void 6 When the void is complete the pin pa...

Page 31: ...must initiate the settlement in CRE but the pinpad s admin password must be entered on the pinpad to settle 1 Select the Manager or Options button 2 Enter the administrator password default admin whe...

Page 32: ...32 P a g e 5 The pinpad will now prompt you to enter the Manager Password enter the password and press the green enter key 6 Press yes to start the settlement 7 Wait for the settlement to complete...

Page 33: ...33 P a g e 8 When the settlement is finished a settlement report will print 9 You will then be prompted to print a detailed report press yes to print the report or no the finish the settlement...

Reviews: