background image

User guide Link/2500 - Link/2500 I 

Copyright© 2018 Ingenico 

All rights reserved


9


2_3 

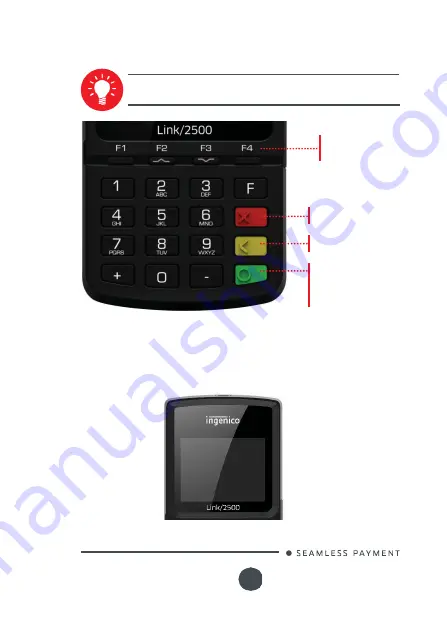
Keyboard details and functionality


The functions key accesses 

the different application 

menus


The red key cancels the 

procedure in progress


The yellow key cancels the 

last character


The green key validates 

input selections and 

information.


It is also used to switch on 

the terminal


2_4 

Touch panel (option)


The Link/2500 device could be equiped with touch panel that allows you capture 

functions and menus by your finger or using a stylus.


Some keys can have other functions according to the applications that are 

in the terminal.


Summary of Contents for Link/2500

Page 1: ...Link 2500 User Guide www ingenico com 28 32 boulevard de Grenelle 75015 Paris France T 33 0 1 58 01 80 00 F 33 0 1 58 01 91 35 Ingenico SA au capital de 47 656 332 317 218 758 RCS Nanterre ...

Page 2: ...Link 2500 2_3 Keyboard details and functionality 2_4 Touch panel option 2_5 Dual magnetic head option 2_6 Link 2500 I Integration version option 3_Use of the terminal 3_1 Switching off the terminal 3_2 Reading card 4_Installation 4_1 Recommendation 4_2 USB Terminal connections 4_2_1 USB type C 4_3 Opening trap door 4_4 SAMs SIMs 4 5 5 5 10 11 9 12 13 13 6 12 13 14 9 10 10 10 ...

Page 3: ...4_5_2 Installing the battery 4_5_3 Charging the battery 4_5_4 Changing the battery 5_Recommendations 5_1 Safety 5_2 Security of your terminal 6_Environment WEEE Batteries and Packaging 7_FCC ISED Compliance 7_1 FCC Statement 7_2 ISED Canada Statement 8_Marking 9_Troubleshooting 15 15 15 16 17 18 18 20 21 23 21 21 22 24 ...

Page 4: ...o understand and make the best use of your terminal It presents you the necessary information about use installation maintenance safety and security recommendations WARRANTY SECURITY Use only the power supply included with the product to ensure best performance and safety Maintenance should only be provided by Ingenico authorized technician Failure to comply with these instructions will void the m...

Page 5: ...co All rights reserved 5 2_Presentation 2_1 Content of the box 2_1_1 Terminal Link 2500 terminal unit A battery pack disconnected except Integration version USB Cable User guide ADVICE Keep the packaging It must be re used whenever the terminal is shipped ...

Page 6: ...User guide Link 2500 Link 2500 I Copyright 2018 Ingenico All rights reserved 6 2_2 Overview of the Link 2500 Terminal unit Touch or Dual headversion ...

Page 7: ...genico All rights reserved 7 2 4 LCD Display Touch panel in option Contactless reader Magnetic card reader second head in option Smart card reader Compartment where are located except Integration version the battery pack the modules SAM1 SIM1 SAM2 SIM2 ...

Page 8: ...tic head version Standard Slim version Integration version Touch version Dual Head version Weight 155g 121g 128g 165g 168g Dimensions L x w x h 129x70x 17 mm 129x70x 13 mm 129x70x 14 mm 129x70x 18 4 mm 129x70x 19 4 mm Electrical mains network PSU 100 240VAC 50 60 Hz Class II equipment Connections on terminal USB C connector ...

Page 9: ...ocedure in progress The yellow key cancels the last character The green key validates input selections and information It is also used to switch on the terminal 2_4 Touch panel option The Link 2500 device could be equiped with touch panel that allows you capture functions and menus by your finger or using a stylus Some keys can have other functions according to the applications that are in the ter...

Page 10: ...tion 3_Use of the terminal 3_1 Switching off the terminal If the battery is empty and the terminal in use is removed from its base the terminal automatically shuts off It may also be switch off by pressingsimultaneously and yellow key for one second In order to restart theterminal press on the keyboard The Link 2500 device could be equip ped with a rear connector to be used with another device suc...

Page 11: ...rd reader insert the card horizontally with the chip facing upwards and leave in position throughout the transaction Option Dual magnetic head version The card be read either from right to left or left to right with the strip either facing or backing the terminal Use a regular movement in order to ensure a reliable card reading Contactless Bring the card firmly up to the active zone Keep the card ...

Page 12: ... Link 2500 The terminal should be placed far from any very hot zones protected from vibrations dust damp and electromagnetic radiation computer screen anti theft barrier etc Operating conditions battery discharging Battery charging conditions Storage conditions from 10 C to 50 C 85 at 40 C Ambient temperature Max relative humidity Ambient temperature from 0 C to 40 C from 20 C to 55 C 85 at 55 C A...

Page 13: ...below picture This connector manages Host and Slave connexions The terminal supports USB Keys with FAT16 or FAT32 The USB Key has to be used with an USB adapter refers to accessories section USB type C Connector used for PC travel charger USB Key etc 4_3 Opening trap door CAUTION Switch off the terminal before opening the trapdoor Turn the terminal and unclip the trapdoor by pushing on the clip wi...

Page 14: ...nnector modules security SAM SIM is located inside the terminal in a closed compartment SAM and SIM location depend of the product There is 3 possibilities SIM1 SIM2 or SIM1 SAM2 or SAM1 SAM2 SAMs and SIMs are identified by the engraved marks on the lower housing When introducing a SAM SIM in its slot be sure to put the cut corner as indicated on the engraved marks SAM 2 Connector Dual SIM termina...

Page 15: ...use 4_5_2 Installing the battery except Integration Version WARNING Check that the terminal is not connected to the main electric network Turn your terminal and unclip the battery trapdoor by pushing on the button as shown on the picture for Dual magnetic head option see section 4_3 Disengage thetrapdoor Take the battery pack included in the box Locate the battery pack connector beside the battery...

Page 16: ...onnector How does the battery need to be charged The environment in which the charge takes place influences battery lifetime and autonomy number of transactions The optimal conditions are as follows Charging away from any external heat source radiator sun enclosed area The optimal temperature is between 15 C and 25 C How can the battery be charged Using the terminal power supply Connect the termin...

Page 17: ... by pulling it slightly arrow to bring it away from the terminal housing Inform the terminal that battery will be replaced Do not start the terminal or connecting terminal power supply without battery Connect and install the new battery by following the instructions in section 4 5 2 Installing battery Close the battery trapdoor and charge the new battery See section Charging the Battery In order t...

Page 18: ...ections Removal of SAM1 SAM2 SIM modules as well as Connecting the battery On airplanes Your handset must be switched off by removing the battery pack Remove the battery from the terminal when on an airplane Non compliance with these safety rules may result in legal action and or a ban on later access to cellular network services Explosion areas Certain regulations restrict the use of radio equipm...

Page 19: ...r Frequency Wi Fi option 2412 2462MHz 5150 5250MHz 5250 5350MHz 5470 5725MHz 5725 5850MHz NFC 13 56MHz Receiver Frequency Wi Fi option 2412 2462MHz 5150 5250MHz 5250 5350MHz 5470 5725MHz 5725 5850MHz NFC 13 56MHz RF Output Power Link 2500 I CL and Link 2500 CL WiFi Note Link 2500 I CL does not support Wi Fi ...

Page 20: ... your terminal Your terminal detects any tampered state In this state the terminal will repeatedly flash the message Alert Irruption and further use of the terminal will not be possible If you observe the Alert Irruption message you should contact the terminal helpdesk immediately You are strongly advised to ensure that privileged access to your terminal is only granted to staff that have been ind...

Page 21: ...ding to the local regulation of your country Please contact your retailers for more detailed information about the compliance solution in place for disposing of your old product and used batteries Packaging waste must also be collected separately to assure a proper disposal and recycling Please note that proper recycling of the electrical and electronic equipment and waste batteries will ensure sa...

Page 22: ...nt from that to which the receiver is connected Consult the dealer or an experienced radio TV technician for help 15 19 a 3 This device complies with Part 15 of the FCC Rules Operation is subject to the following two conditions 1 This device may not cause harmful interference and 2 This device must accept any interference received including interference that may cause undesired operation of the de...

Page 23: ...tablies pour un environnement non contrôlé conjonction avectoute autre antenne ou émetteur 8_Marking The CE marking is the manufacturer s declaration that the product meets the requirements of the applicable EC directives The CE mark is a mandatory conformity marking for certain products sold within the European Economic Area EEA Waste of Electrical and Electronic Equipment WEEE symbol indicates t...

Page 24: ...o recover Connect terminal to terminal power supply Cards are not read Check that the magnetic card is swiped correctly with magnetic band on terminal side Swipe again the card with the magnetic stripe movement constant and rapid Verify that the magnetic strip is not damaged grooved or cracked Make sure you have inserted correctly the smart card into the smart card reader and removed the card only...

Page 25: ...er recipient of this document or information contained therein is held responsible to INGENICO for the confidentiality of that information Care has been taken to ensure that the content of this document is as accurate as possible INGENICO however declines any responsibility for inaccurate incomplete or outdated information The contents of this document may change from time to time without prior no...

Reviews: