iNFinuvo Cleanmate QQ6 Series User Manual Download Page 7

5

Main Unit Features

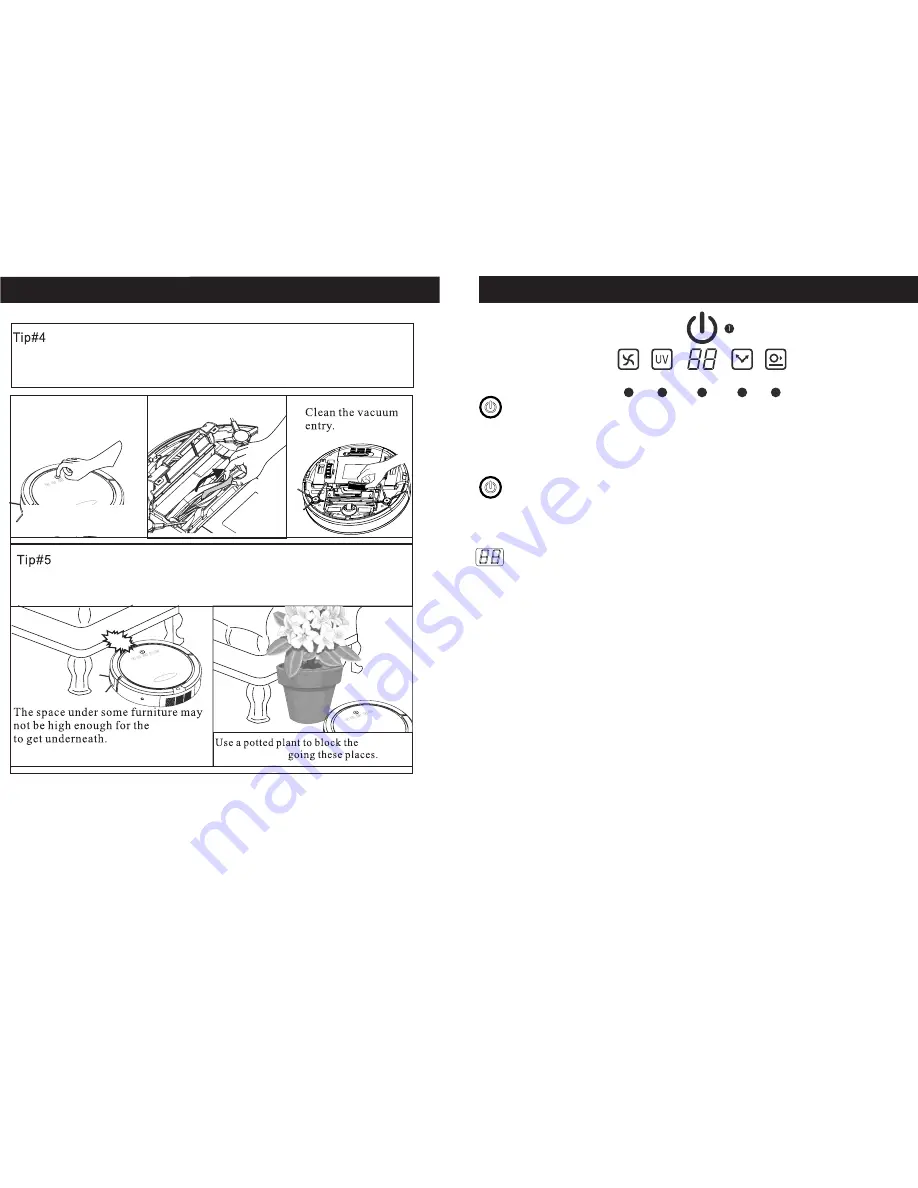
Start/Stop : Push button then blue symbol light-up, QQ6 is power  on.

TIP : During cleaning, if symbol is light-blinking in Red color, means Battery-

Low.

During charging, if symbol is light-up in Blue, means Charged-Fully.

TIP : During charging, if symbol is light-blinking in Blue, means "Charging".

TIP :

Start / Stop button : When the QQ6 is power on, Press the  button QQ6

start  working.
Push button and blue symbol light off, QQ6 stop
working.

Timer/ Movement Mode / Error, display :
1. Timer : Yon can use remote-controll setting clean time,

60

50

40

repeat.

2. Movement Mode : When QQ6 start working, it is set "Automatic

Mode".

You can use remote-control to choice 6 kinds movement

pattern : 1 Spiral", "2 Special-Bounce", "3 Along wall",

, "5 Polygonal Spiral",

and return to "A Automatic".

The display will show "1"

5", and "A".

TIP : When you push "Battery" button of Remote-control.

The display will show "H", it means go "Home" to charge battery.
QQ6 will search "Charging base" then charging.

3. Error message: When QQ6 was unreasonable stop working.

The display will show "Error number" as
You can see the message on the Label of QQ6 bottom side.

80

70

(When next time turns on . Timer will be followed

your last time setting)

"4 S shape"

"E1

E9".

→ →

→ → →

→ →

"

~"

30

20

10

80

Useful Tips

QQ6

QQ6

VAC

UV

TIME

COLLIDED

2

3

4

5

6

20

Power-off the unit

and prevent it

Q 6 will make a beeping
sound when jammed.

Q

: Fixing jams: If some object gets caught with roller brush or

side brush, turn the QQ6's power off immediately. Remove anything
that caused the jam before using the cleaner again.

Turn it upside down,
and remover the objects.

Block off certain areas with Sonic wall(or other objects)to
get better cleaning result.

Summary of Contents for Cleanmate QQ6 Series

Page 1: ...Q 6 Series Q QQ6 Series REV C20140410 QQ6 QQ6...

Page 2: ...Table of Content 1 1 2 2 3 4 7 8 9 10 11 13 14 15 17 19 21 22...

Page 3: ...Safety Precautions Safety Instruction...

Page 4: ...s could renew from unit outside and by yourself Cleaning a wide variety of floor types Optimum dimension 33 8cm 13 3 1inch Enables cleaning under beds furniture Unique UV light on the bottom helps to...

Page 5: ...f the product has been Properly installed and is used in the way of which it is intended and has received only factory authorized repairs servicing or alterations Under warranty batteries that meet th...

Page 6: ...able 2 5 hours of charging time Max 65dB at distance of 1m 3ft 6000 hours continuously 0 5 liter 21 5 23 5 cm sec IR with more than 10 meters controlling range 3V button Lithium battery CR2032 5 types...

Page 7: ...gonal Spiral and return to AAutomatic The display will show 1 5 and A TIP When you push Battery button of Remote control The display will show H it means go Home to charge battery QQ6 will search Char...

Page 8: ...er time E2 E3 Bumper touch over time E4 E5 Left wheel is overload E6 Right wheel is overload E7 Side brush is overload E8 Rolling brush is overload E9 Vacuum motor is overload Cleaner lift up Charging...

Page 9: ...QQ6 will return 1 2 3 4 5 6 7 8 9 10 Function of each Button Remote Control Function Note If the two symbol are all light up before you start setting please clear previous ID of Main unit You can fol...

Page 10: ...ed already Light off Means the ID has not been used yet Tip Each one main unit at most can be equipped with two charging stations and 2 sonic walls at the same time Step Push the start button on the m...

Page 11: ...blinking it means battery low 1 2 3 4 5 When QQ6 cleaning the Sonic Wall position must be away from charging base at least 1m 3 ft and avoid face to charging base When QQ6 complete cleaning you can po...

Page 12: ...E on remote control to let it return to the base at any time Users can always plug the battery charger to side Charging socket on Clean Mate QQ6 to charge it manually See below Put the QQ6 on the floo...

Page 13: ...again will show next day of week Choose the true day then push button again The pattern will regain blinking the Day setting is completion The Hour and Min are same operation TIP If user operating loc...

Page 14: ...ng base it will leave base and cleaning immediately QQ6 QQ6 Day of week button Setting the day of week timing Hour button Setting the hour of day timing Minute button Setting what minutes of hour timi...

Reviews: