Indesit F159359 Manual Download Page 8

8

EN

USING THE GLASS CERAMIC HOB


PRACTICAL ADVICE ON USING THE HOB

•  Use pans with a thick, flat base to ensure that they 

adhere perfectly to the cooking zone.

•  Always use pans with a diameter that is large 

enough to cover the hotplate fully, in order to use all 
the heat produced.

•  Always make sure that the base of the pan is 

completely clean and dry: this ensures that the pans 
adhere perfectly to the cooking zones and that both 
the pans and the hob last for a longer period of time.

•  Avoid using the same cookware that is used on gas 

burners: the heat concentration on gas burners may 
have warped the base of the pan, causing it not to 
adhere to the surface correctly.

•  Never leave a cooking zone switched on without a 

pan on top of it, as doing so may cause the zone to 
become damaged.

 The glue applied on the gaskets leaves traces of

grease on the glass. Before using the appliance, we
recommend you remove these with a special non-
abrasive cleaning product. During the first few hours
of use there may be a smell of rubber which will
disappear very quickly.
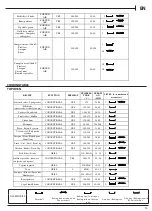
Pos.

Radiant Ceramic Hot Plate
Normal or Fast Hot Plate

Ceramic Halogen Hot Plate
Automatic Hot Plate

0

Off

Off

1

To cook fish

To melt butter or chocolate

2

To cook potatoes (steam),
soup, chickpeas, beans

To reheat liquids

3

To continue cooking large
quantities of food, vegetable
soup

4

To roast (medium)

For sauces (including cream

sauces)

5

To roast (well done)

6

To brown or quickly bring to a

boil

To cook at boiling point

7

8

For roasts

9

10

For stews

11

12

To fry

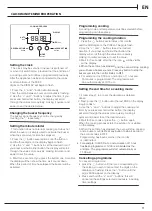
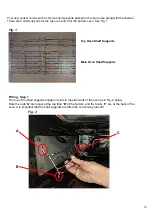
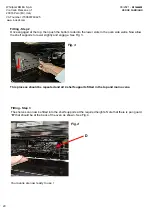
Switching the cooking zones on and off

To switch on a cooking zone, turn the corresponding 
knob in a clockwise direction.
To switch it off again, turn the knob in an anticlockwise 
direction until it is in the “0” position.
If the COOKING ZONE ON indicator light is lit, this 
shows that at least one pf the cooking zones on the 
hob is switched on.

Cooking zones

The hob is equipped with electric  heating elements. 
When they are in use the following items on the hob 
become red.
The hob is equipped with electric hilite heating 
elements. When they are in use the following items on 
the hob become red.

A. The cooking zone with radiant 
heating elements.
B.The cooking zone with a hilite 
heating element.
C. The residual heat indicator 
light: this indicates that 
the temperature of the 

corresponding cooking zone is greater than 60°C, 
even when the heating element has been switched off 
but is still hot.

A

B

C

Cooking zones with highlight heating elements

These emit heat via radiation from the hilite lamps they 
contain. They have similar properties to gas burners: 
they are easy to control and reach set temperatures 
quickly, allowing you to actually see the power they are 
providing.

Description of the heating elements

The circular radiant heating elements become red 10 - 
20 seconds after they have been switched on.
The circular hilite heating elements guarantee even 
heat distribution in addition to the usual advantages 
that hilite heating elements bring. 
Hilite lamps emit high levels of heat and light as soon 
as they are switched on, offering the following practical 
advantages:
·  rapid heating (in relation to a gas burner)
· rapid cooling
·  even temperature across the whole surface (due to 

the circular heating elements).

They are similar to the other cooking zones on the hob 
and are therefore easy to use.  To ensure you use the 
hob correctly, all you need to do is consult the cooking 
tables in the instruction booklet.

Summary of Contents for F159359

Page 1: ...ID67V9HCX UK ID67V9HCX UK ID67V9HCX UK ...

Page 2: ...EN ENGLISH Health and Safety guide Installation guide Quick guide 2 ...

Page 3: ...m the appliance until all the components have cooled down completely risk of fire Always be vigilant when cooking foods rich in fat oil or when adding alcoholic beverages risk of fire Use oven gloves to remove pans and accessories At the end of cooking open the door with caution allowing hot air or steam to escape gradually before accessing the cavity risk of burns Do not obstruct hot air vents at...

Page 4: ...G AND MAINTENANCE WARNING Ensure that the appliance is switched off and disconnected from the power supply before performing any maintenance operation never use steam cleaning equipment risk of electric shock Do not use harsh abrasive cleaners or metal scrapers to clean the door glass since they can scratch the surface which may result in shattering of the glass Do not use abrasive or corrosive pr...

Page 5: ...the wall of the cooking compartment 5 Main oven door Removable Inner Door Glass 4 5 TOP OVEN GRILL PILOT LIGHT MAIN OVEN PILOT LIGHT 1 2 3 3 4 5 ELECTRONIC TIMER EN TOP OVEN GRILL THERMOSTAT LEFT FRONT PLATE LEFT REAR PLATE TOP OVEN MAIN RIGHT REAR PLATE RIGHT FRONT PLATE THERMOSTAT OVEN KNOB ICON KNOB ICON SELECTOR GRILL ...

Page 6: ...f but not directly above the appliance and should be easily accessible in the event of an emergency The power supply cable should conform to B S 6004 with a conductor size of 6mm2 minimum Access to the mains terminals is gained by removing the rear access cover The mains cable must pass through the cable clamp adjacent to the terminal block Sufficient cable should be used to allow the cooker to be...

Page 7: ...n oven with a good door seal Since a circulaire fan oven heats up more quickly and generally cooks food at a lower temperature than a conventional oven pre heating is often unnecessary However foods such as bread scones Yorkshire pudding do benefit from being placed in a pre heated oven The oven temperature charts are a guide only giving approximate cooking temperatures and times To suit personal ...

Page 8: ...ob in a clockwise direction To switch it off again turn the knob in an anticlockwise direction until it is in the 0 position If the COOKING ZONE ON indicator light is lit this shows that at least one pf the cooking zones on the hob is switched on Cooking zones The hob is equipped with electric heating elements When they are in use the following items on the hob become red The hob is equipped with ...

Page 9: ... the pan on any of the levels below the wire shelf and add 200 ml of drinking water This function can be used to finish cooking filled pies or to thicken soups Use this function for the last 10 15 minutes of cooking This control switches on the main oven To select Fan Cooking Turn thecontrol clockwise and select control is turned the fan will start The main oven light will immediately come on The ...

Page 10: ...BE UNDERTAKEN WITH THE GRILL TOP OVEN DOOR CLOSED The grill control is designed to provide variable heat control of either the twin grill elements on together or the single left hand grill element only depending upon which direction the control knob is rotated Note The grill will not operate unless the top oven control is in the OFF position Food which requires browning only should be placed under...

Page 11: ...l scroll through the values more quickly making it quicker and easier to set the value 3 Wait for 5 seconds after that the icon will be visible 4 When the set time has elapsed and the oven will stop cooking you will hear a buzzer sounds Press any button to stop the buzzer and turn the control knobs to OFF For example it is 9 00 a m and a time of 1 hour and 15 minutes is programmed The programme wi...

Page 12: ...ns FORCED AIR YES 170 200 30 60 3 Choux buns FORCED AIR YES 170 200 20 50 Meringues FORCED AIR YES 80 100 120 200 3 Meringues FORCED AIR YES 80 100 120 200 Pizza Bread Focaccia FORCED AIR YES 190 250 15 50 2 Pizza Bread Focaccia FORCED AIR YES 190 230 20 50 2 4 Savoury pies vegetable pie quiche FORCED AIR YES 180 30 60 3 Vols au vent Puff pastry crackers FORCED AIR YES 180 210 15 40 3 Vols au vent...

Page 13: ...ish fillets Steaks GRILL 230 MAX 15 35 2 Vegetable gratin GRILL 230 MAX 10 30 2 Toast GRILL 5 MAX 0 5 1 5 2 Sausages Kebabs Spare ribs Hamburgers GRILL 230 MAX 15 30 Roast potatoes CONVENTIONAL YES 190 220 40 80 2 Vegetable gratin FORCED AIR YES 180 200 20 30 3 Stuffed vegetables tomatoes courgettes aubergines FORCED AIR YES 190 220 40 80 3 Complete meal Cook3 Fruit tart Lasagna Roast FORCED AIR 1...

Page 14: ...ws any sharp mechanical blows Take particular care not to damage the inner surface which is coated with a heat reflective layer After cleaning rinse and dry with a soft cloth For slight soiling the inner glass panel may be cleaned while still warm without removing it from the door glass removed To reassemble the oven doors proceed with inserting the glass panels in the reverse order pushing gently...

Page 15: ...l and apply a protective film at the same time For stubborn stains or heavy soiling use any of the special materials and finish off with conditioner 3 Reconnect the oven to the power supply Note Use 40 W 230 V type The bulb used in the product is specifically designed for domestic appliances and is not suitable for general room lighting within the home EC Regulation 244 2009 G9 Note Use 40 W 230 V...

Page 16: ...presence of mains electrical power and whether the oven is connected to the electricity supply Turn off the oven and restart it to see if the fault persists WWW A complete product specification including the energy efficiency ratings for this oven can be read and downloaded from our website www indesit com AFTER SALES SERVICE To receive assistance call the number given on the warranty leaflet encl...

Page 17: ...Min 650 mm Min 420 mm 17 min 10 mm ...

Page 18: ...18 7 6 1 6 2 6 3 6 4 6 5 6 6 ...

Page 19: ...oven See Fig 1 Fitting Step 1 The top of the shelf supports engage in slots in the side walls of the oven as in Fig 2 below Note the rods A are longer at the top than B at the bottom and the hooks C are at the back of the oven It is important that the shelf supports are fitted the correct way around Fig 1 Fig 2 Top Oven Shelf Supports Main Oven Shelf Supports A B C ...

Page 20: ... the required heights Note that there is pan guard D that should be at the back of the oven as shown See Fig 4 Fitting Step 2 Once engaged at the top then push the bottom rods into the lower slots in the oven side walls Now allow the shelf supports to lower slightly and engage See Fig 3 This process should be repeated and all 4 shelf supports fitted in the top and main ovens Your ovens are now rea...

Reviews: