background image

9

If you have any questions about the use of the Voladora
do not hesitate to write us to the following email:

https://indart3d.com/indart3d-en/support/

Indart 3D’s 3D printing stations include the Simplify3D™
professional manufacturing suite, a software with all the
advanced and optimized characteristics to create the
most complex objects in the highest quality. It includes
a powerful simulator to make you more productive,
visualizing the result of the printing strategy you’re
working on before you start manufacturing. 

You will be able to repair the imported designs in Simplify3D 
itself and you will love the intelligent support option.
Spectacular functionality with which the software will
create the right support for the most complex parts.
If you have any questions about the use of the software,
please consult the following page:

www.simplify3d.com/support/

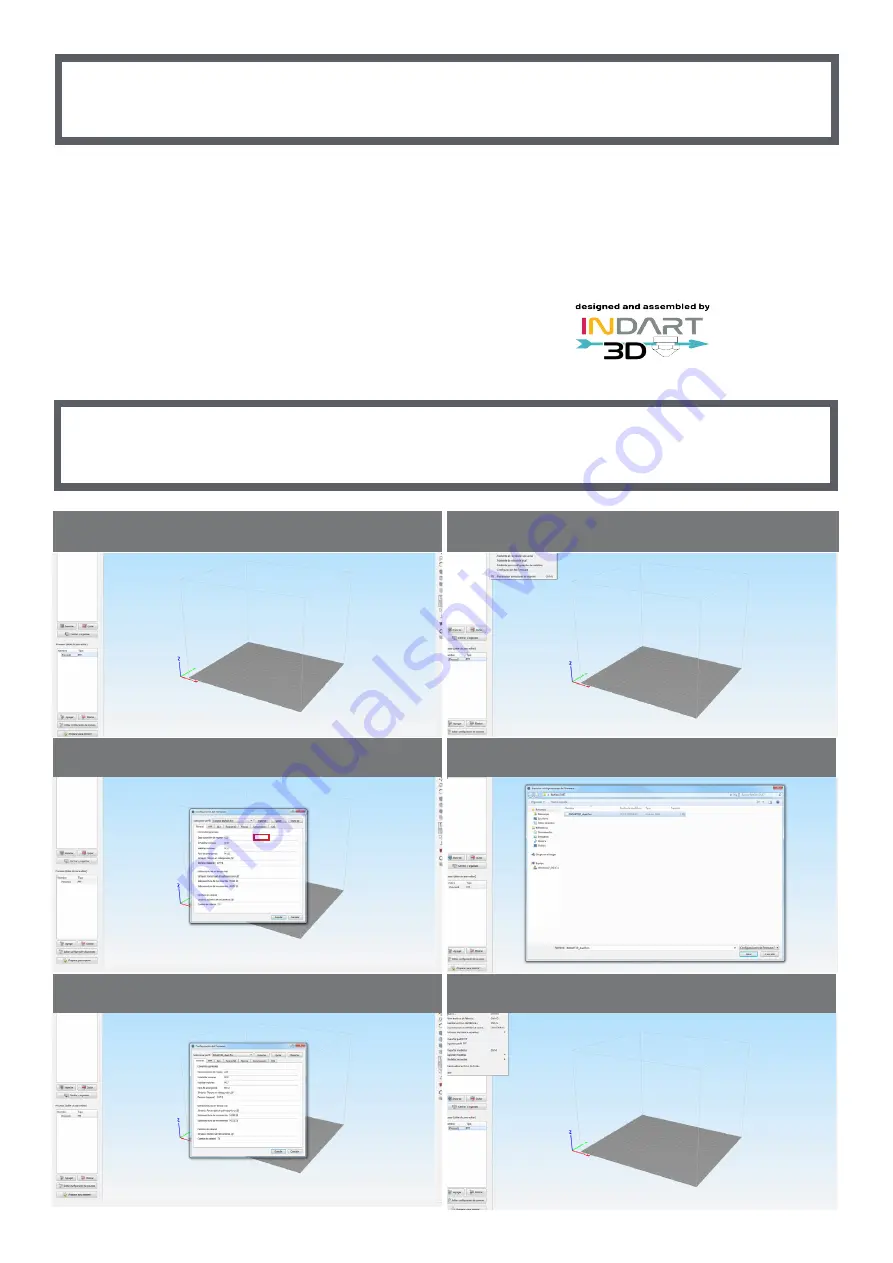
Simplify 3D printing sOFTWARE

Simplify 3D loading profiles

Open Simplify3d

Click on Import

In Tools go to Firmware Configuration

Select the .frm file

Click save

In File go to Import FFF profile

Summary of Contents for Tumaker BIGFOOT 200

Page 1: ...parts of the printer 3 Elements included in the printer 3 Installation and set up 4 Quick guide 6 Semi Automatic Calibration 7 Nozzle change 8 Simplify 3D Printing Software 9 Simplify 3D loading profi...

Page 2: ...0 48mm 0 4 nozzle 0 3mm Heated Bed 45 150 Build Plate Leveling Semi Automatic Manual Non operating Temperature 5 45 C heatbed heat up time at 20 40 C 0 30 60 C 1 00 80 C 1 45 100 C 3 00 Nozzle diamet...

Page 3: ...arge filament coils PLATFORM OR HEATED BED The printing happens on the surface of the platform this one moves along the Z axis Depending on the printing material it must be heated to a different tempe...

Page 4: ...access it from any device on the same network follow the next step Go to Console type and send M587 S Name of your wifi P password of your wifi If you know a free IP on your network you can add the fo...

Page 5: ...of the machine In the Network section replace M552 S2 for M552 S1 Click Save Press YES to restart the board I have the IP You can now access the printer from any device connected to this network If yo...

Page 6: ...to repeat this process During printing fine tune using Z Babystepping until proper adhesion is achieved Load Filament Before loading make sure you have the base separated from the nozzle min 10mm Pres...

Page 7: ...wn on the screen You can use a gauge or a sheet if you want Level the Build Plate Make sure you have a clean tip Execute the calibration process found in the Macros Calibration section and follow the...

Page 8: ...nge Below we will explain how to correctly change the nozzle 1 Remove the material from the head 2 Unscrew the fitting and remove it together with the bowden tube 3 Remove the nozzle using the tool an...

Page 9: ...izing the result of the printing strategy you re working on before you start manufacturing You will be able to repair the imported designs in Simplify3D itself and you will love the intelligent suppor...

Page 10: ...ature between 15 C 25 C Follow the printer installation and power up instructions Use materials recommended by Indart3D to ensure proper printer operation Make your prints by following the recommendat...

Page 11: ...ompany authorized by Indart3D For more information on how to make a claim see https indart3d com contacto Information on Indart3D authorized customer service centers and service companies can be found...

Page 12: ...e met the amount of the returned item will be reimbursed or always through the same form of payment in which you paid the order and excluding the shipping costs of the return and what was paid for tra...

Reviews: